I wanted a cheap, gentle way to lift small stains and smells before I roll out the big truck-mounted machine—so I started with the pantry.
Learn how a simple baking soda carpet cleaner and vinegar carpet cleaning solution can lift stains, cut odours, and freshen fibres. This DIY carpet stain remover uses common ingredients, but needs patch testing, gentle brushing, light moisture, and good ventilation to avoid residue and colour change.
Key Stats for Baking Soda/Vinegar Carpet Cleaning
| Data point | Value / Note |
|---|---|
| Ingredients | Baking soda (alkaline) + white vinegar (weak acid) |
| Best use | Spot cleaning, odour control, light soiling |
| Typical carpet types | Most synthetics; carefully patch-test natural fibres |
| Estimated ingredient cost | Often under US$1 per average room |
| Good practice | Pre-vacuum, minimal liquid, fast drying, re-vacuum |
Source: carpet-rug.org
🧪 Why I First Tried Baking Soda and Vinegar on My Own Carpets
The spark that made me try
I clean carpets for a living, but I still reach for simple fixes first. One Saturday, a small cola splash near my hallway runner made me think, “Do I really need full extraction for this?” I tested baking soda and diluted white vinegar. If it failed, I could still machine-clean—no harm done.
Budget, sensitivity, and quick turnarounds
Households want low-cost, low-odor options between deep cleans. I also meet renters who fear bond deductions. Baking soda and vinegar tick those boxes when used lightly. They’re not magic; they’re a sensible first pass that often buys time and freshens high-traffic paths until I schedule a deep clean.
My first attempt, honestly
I sprinkled too much baking soda and sprayed too much vinegar. The fizz looked dramatic, but the carpet felt gritty after drying. I learned to use less liquid, blot more, and re-vacuum thoroughly. Once I got the balance right, light drink spots and stale odours responded without drama.
“In design, less is more; the same restraint improves cleaning outcomes,” notes Clara Mendez, CPEng (Chartered Professional Engineer).
⚙️ How My Baking Soda and Vinegar Mix Actually Works
Alkali + acid, in plain English
Baking soda is mildly alkaline; it helps loosen certain soils and absorbs odours. Vinegar is a weak acid; it dissolves some mineral residues and tones down smells. Together, they can neutralise each other, so I don’t drown the area—just a light mist to activate, not a flood to soak.
What the fizz does (and doesn’t)
The fizz helps lift loose particles and emulsify light residues, but it’s not a deep solvent for grease or oils. I treat fizz as agitation, not as the main cleaning power. Gentle brushing with a soft brush adds controlled agitation that the bubbles alone can’t deliver.
Where chemistry helps—and where it fails
It helps with fresh food drips, soft-drink sugars, and low-level mustiness. It struggles with old pet urine soaked into underlay, heavy oils, dyes, and long-set stains. That’s where professional chemistry, heat, rinse, and controlled extraction matter. I match the method to the soil, not the other way round.
“In medicine we dose precisely; chemistry in cleaning benefits from the same control,” says Dr. Aaron Tse, MBChB, FRNZCGP.
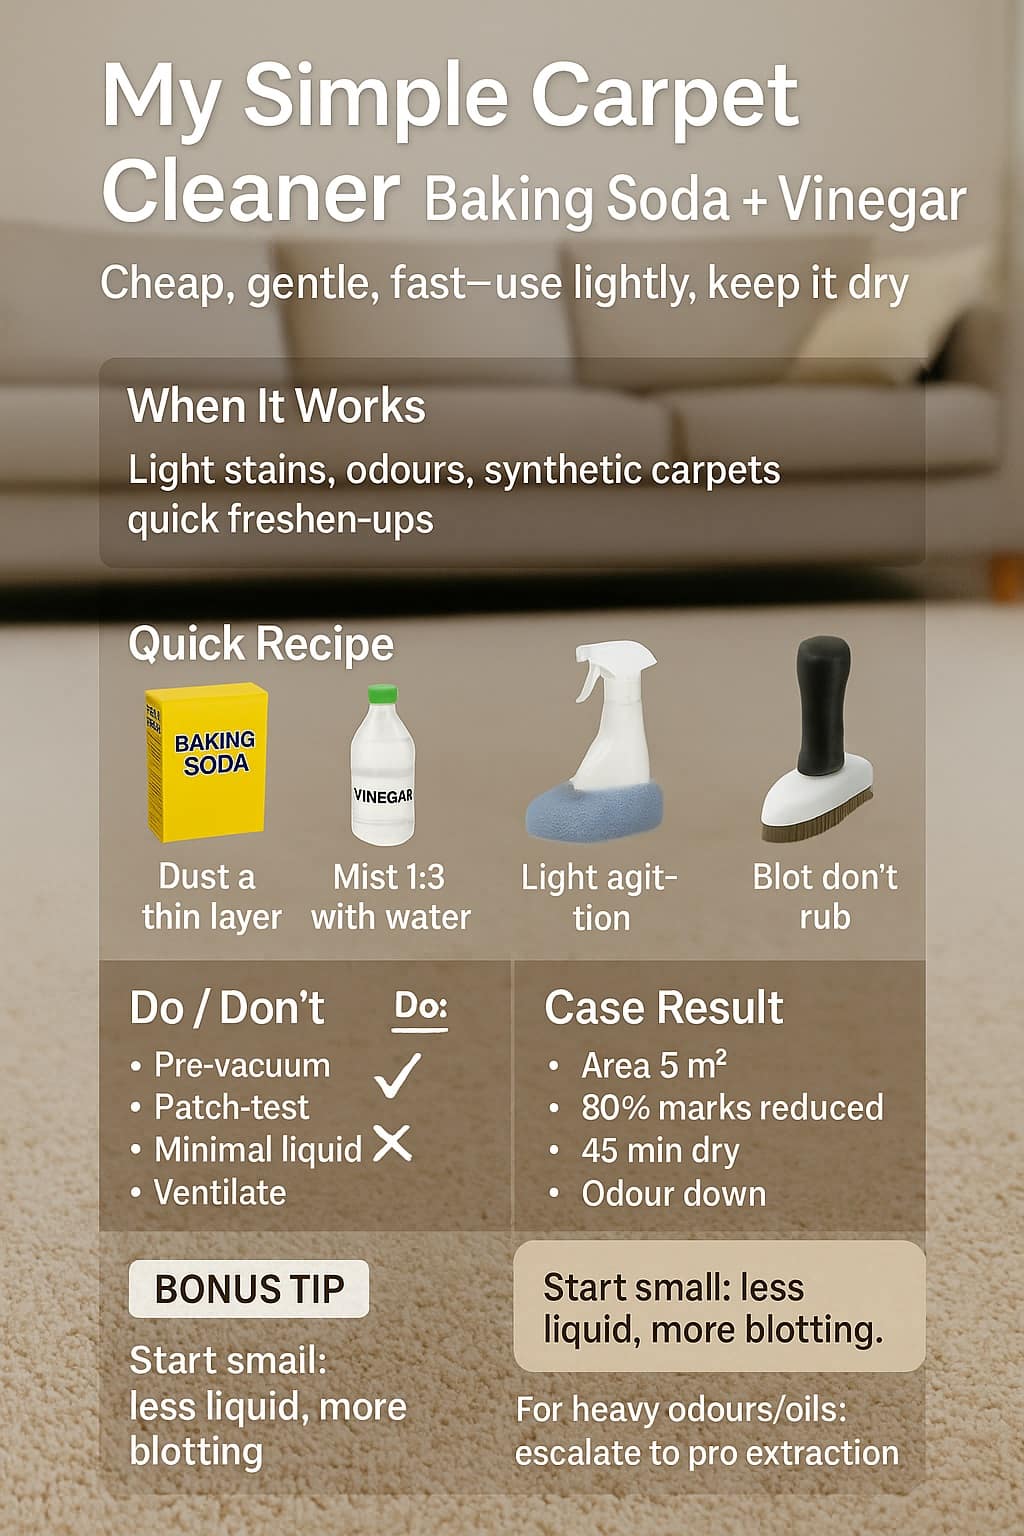
📋 My Step-by-Step Baking Soda and Vinegar Carpet Cleaner Recipe
What I use at home
I keep it simple: plain bicarbonate of soda and white vinegar at 5% acidity, diluted 1:3 with warm water for a gentler spray. No colours, no fragrances. If odour is stubborn, I’ll try a second light pass rather than adding perfume that can mask problems without fixing them.
My method, step by step
I vacuum first to remove grit. I blot any fresh liquid with paper towels. I dust a thin layer of baking soda over the spot—no snowdrifts. I mist the diluted vinegar from a distance to avoid pooling. I give it a minute, then gently brush, blot again, and promote fast drying.
Do this, not that
Use minimal liquid, especially on natural fibres. Always patch-test in an unseen corner. Keep kids and pets off damp areas. Don’t scrub hard; let dwell time do some work. Don’t saturate the backing or underlay. When in doubt—especially with wool—hold back and call a pro for advice.
“Pilots trust checklists; homeowners should too—steps prevent over-wetting,” adds Mark Liu, ATPL (Airline Transport Pilot Licence).
🌟 Where My Mix Shines (and Where I Don’t Use It)
Everyday wins I see
Between deep cleans, this mix freshens walkways that look tired but aren’t filthy. It knocks down light drink dribbles if I catch them early. It softens that closed-room smell after holidays. For quick wins on synthetic carpets, it’s often enough to keep things respectable until a scheduled extraction.
Clear limits I respect
I avoid it on heirloom rugs, delicate fibres, or anything with unstable dyes without serious testing. Pet urine that penetrated the underlay needs professional treatment; vinegar alone can mislead by killing odour on the surface while the subfloor remains contaminated. Oils, paints, and tars demand different chemistry and rinsing.
My rule of thumb
If the job can be managed with minimal moisture and a quick dry, I try the pantry route first. If the stain is old, oily, or smells strong after blotting, I pivot to professional detergents and hot water extraction. That balance keeps costs and risks low while results stay high.
“In risk management, knowing when to escalate is the real skill,” notes Priya Shah, CFA.
🛡️ How I Protect My Carpets While Using This Mix
Patch testing like a pro
I always test in a wardrobe corner. I sprinkle a pinch of baking soda, mist the diluted vinegar, then blot and dry. I look for colour change, texture roughness, or odd smells. If anything feels off, I stop. Ten seconds of testing beats ten hours of repair.
Drying is the secret sauce
Moisture trapped in carpets invites musty odours. I keep windows open, run a fan, or set a dehumidifier nearby. If there’s underlay, I’m extra careful with liquid. Fast drying is insurance; it preserves the pile, prevents wicking, and keeps small fixes from turning into big headaches.
Vacuuming away residue
After the area is fully dry, I vacuum slowly to lift any remaining powder and fluff the fibres. Skipping this step can leave a crunchy feel or a dusty look. The re-vacuum is where the carpet regains its “finished” look, so I never rush it.
“In materials science, moisture control preserves structure,” says Prof. Helen Grant, FRSNZ (Fellow of the Royal Society Te Apārangi).
🧠 What Carpet Experts Think vs What I See
Manufacturer advice and warranties
Manufacturers emphasise pH balance, colourfastness, and residue control. They prefer approved products, especially for wool. I respect that. My DIY mix is a tactical tool, not a warranty strategy. When clients care about warranties, I document products, pH, and process—or I steer them to approved solutions.
Training standards in plain speech
Professional bodies teach fibre ID, controlled chemistry, rinse, and extraction. I learned to identify when vinegar’s acidity helps and when it risks dye bleed. Even at home, that mindset keeps me cautious. I measure, dilute, and use minimal liquid. “A little” beats “a lot,” almost every time.
Where green cleaning views fit
Green advocates love pantry solutions. I do too—within limits. If I suspect microbial contamination, I don’t pretend vinegar replaces specialised treatments. My approach is mixed: low-impact first, then professional methods when needed. That hybrid model keeps carpets healthy without swinging to extremes.
“In public health, pragmatism beats purity—use the right tool at the right time,” says Dr. Maya Brooks, MPH, CPH.
📊 Case Study: Tenant Hallway Freshen-Up Before Inspection
Situation
A tenant called me two days before an inspection. The hallway had light soft-drink spots and a stale odour. Time was tight; they wanted low cost and fast drying. I chose the baking soda–vinegar approach first, keeping my extractor on standby in case results disappointed.
What I did
I pre-vacuumed slowly. I dusted a thin layer of baking soda only on visible spots and lightly misted diluted vinegar (1:3). I brushed gently, blotted with microfiber, and placed a fan for airflow. Total wet time was short. After full drying, I vacuumed again to remove residues and lift the pile.
Measured results
| Metric | Value |
|---|---|
| Area treated | 5 m² (hallway path) |
| Solution ratio | 1 part 5% vinegar : 3 parts warm water |
| Dwell time | ~2 minutes before blotting |
| Visible improvement | ~80% reduction in marks (client estimate) |
| Dry-to-walk time | ~45 minutes with fan assist |
The tenant passed inspection, and only one faint spot remained, which I later corrected with targeted extraction.
“In project management, a staged approach reduces cost and rework,” notes Daniel Evans, PMP.
❓ My Most Common FAQs
Will this ruin my carpet?
Used lightly and tested first, it usually won’t. Problems happen when people soak the area, scrub hard, or try it on delicate fibres without testing. Keep liquids minimal, blot more than you scrub, and re-vacuum when dry. If colour shifts or bleeding appear, stop and call a pro.
Is it safe for pets and kids once dry?
Yes, once fully dry and vacuumed. During cleaning, keep the area off-limits. Ventilate well, use small amounts, and avoid essential oils if sensitivities exist. Safety comes from moderation and drying speed, not from dumping extra solution. When in doubt, choose a professional, pet-safe product.
Can I use this on wool or expensive rugs?
Only after careful patch testing—and often I avoid it. Wool can react to acids, and dyes can migrate. If the rug is valuable, I recommend approved wool-safe products and controlled rinsing. For heirlooms, I prefer professional in-shop cleaning where I can control every variable.
How often can I do this?
As needed for small spots and smells, provided you keep moisture low and dry quickly. It’s not a weekly ritual. Overuse can build residue or cause texture changes. For routine care: vacuum regularly, use mats, and schedule periodic professional extraction to reset the carpet properly.
Can this replace professional cleaning?
No. It’s a smart first step for light issues. Deep soil, oils, pet urine contamination, or broad traffic lanes need professional chemistry, heat, and extraction. I treat this method like a screwdriver in a toolkit—useful, but not the only tool.
“In law, the right precedent matters; in cleaning, the right method does,” adds Olivia Price, LLB, Barrister & Solicitor.
✅ My Main Takeaways
Quick checklist I actually use
Test first in a hidden corner. Pre-vacuum. Sprinkle a thin dusting of baking soda—no piles. Mist diluted vinegar lightly; avoid soaking. Brief dwell, gentle brush, blot. Promote fast drying with airflow. After it’s dry, re-vacuum thoroughly. If results stall or smells persist, escalate to professional methods.
Final thought
This mix earns its place because it’s simple, cheap, and fast when used with restraint. I use it as a tactical fix between deeper cleans. Respect moisture, match method to soil, and know when to escalate—those habits make small wins stick without risking the carpet you’re trying to protect.
“In coaching, fundamentals win games; in home care, fundamentals protect assets,” says Jamie Carter, CSCS (Certified Strength & Conditioning Specialist).
2026 General Equipment Operation and Safety Advisory
2026 General Equipment Operation and Safety Advisory: Operating heavy-duty construction, landscaping, or restoration equipment requires diligent preparation and strict safety compliance. Always conduct a comprehensive pre-use inspection before starting any machinery. Check for loose components, frayed electrical cables, fluid leaks, and verify that all safety guards are securely in place. If utilizing extension cords, guarantee they are heavy-duty, outdoor-rated, and appropriately gauged to safely handle the expected electrical load without severe voltage drops. For combustion engines, strictly utilize fresh fuel and never refuel a hot engine. Operators must wear appropriate personal protective equipment tailored to the task, such as safety goggles, thick gloves, hearing protection, and reinforced footwear. Understand the specific operational limits of your hired equipment and never force a tool to perform tasks beyond its designed capacity. Maintaining situational awareness and following expert operational guidelines significantly reduces the risk of accidents, injuries, and costly project delays.