Framing was the first big job where a nail gun changed how fast and cleanly walls came together.
Choosing the right option for framing nail gun, nail size chart, and collation angle keeps walls straight, joints tight, and inspections smooth, from small sleep-outs to full builds. Pick length, diameter, and coating that match the timber, code, and climate so frames stay strong without squeaks or split studs.
Typical Framing Nail Gun and Nail Specs
Phone-Friendly Framing Facts (Real-World Ranges)
| Item | Typical range / value |
|---|---|
| Common framing nail lengths | 2-3/8″ to 3-1/2″ |
| Usual diameters | 0.113″ to 0.131″ (0.148″ heavy) |
| Common collation angles | 21°, 28°, 30°–34° |
| Common shanks | Smooth, ring, screw |
| Typical magazine capacity | ~40–80 nails |
Source: finehomebuilding.com
🔧 Why I Started Caring About My Framing Nail Gun Choice
The moment it clicked
My turning point came on a rainy deck extension. My hammer work was fine, but the clock wasn’t. A borrowed framing nailer sunk clean shots through wet pine where I’d been fighting rebound and bent nails. The difference wasn’t just speed; joints pulled tighter, and the frame stayed square when we braced it.
The painful lesson
Before that win, I had a short, embarrassing run with the wrong nails: thin diameter, too much length, and the heads sat proud in dense LVL. I spent a morning re-shooting, chewing through timber, and sanding proud heads. Since then, I check the gun’s plate, the box specs, and do three test shots on scrap before real work.
The core decision
Framing wants power, consistency, and depth control. I learned to match gun type to day-to-day realities: power source, weight I can carry up ladders, and how many hours I’ll actually shoot. My rule now is simple: choose the gun you can handle safely at hour six, not just minute two.
Dr. Lena Park, PE (Structural Engineer), often contrasts “raw power” with “repeatable precision,” noting that fatigue control wins more inspections than brute force.
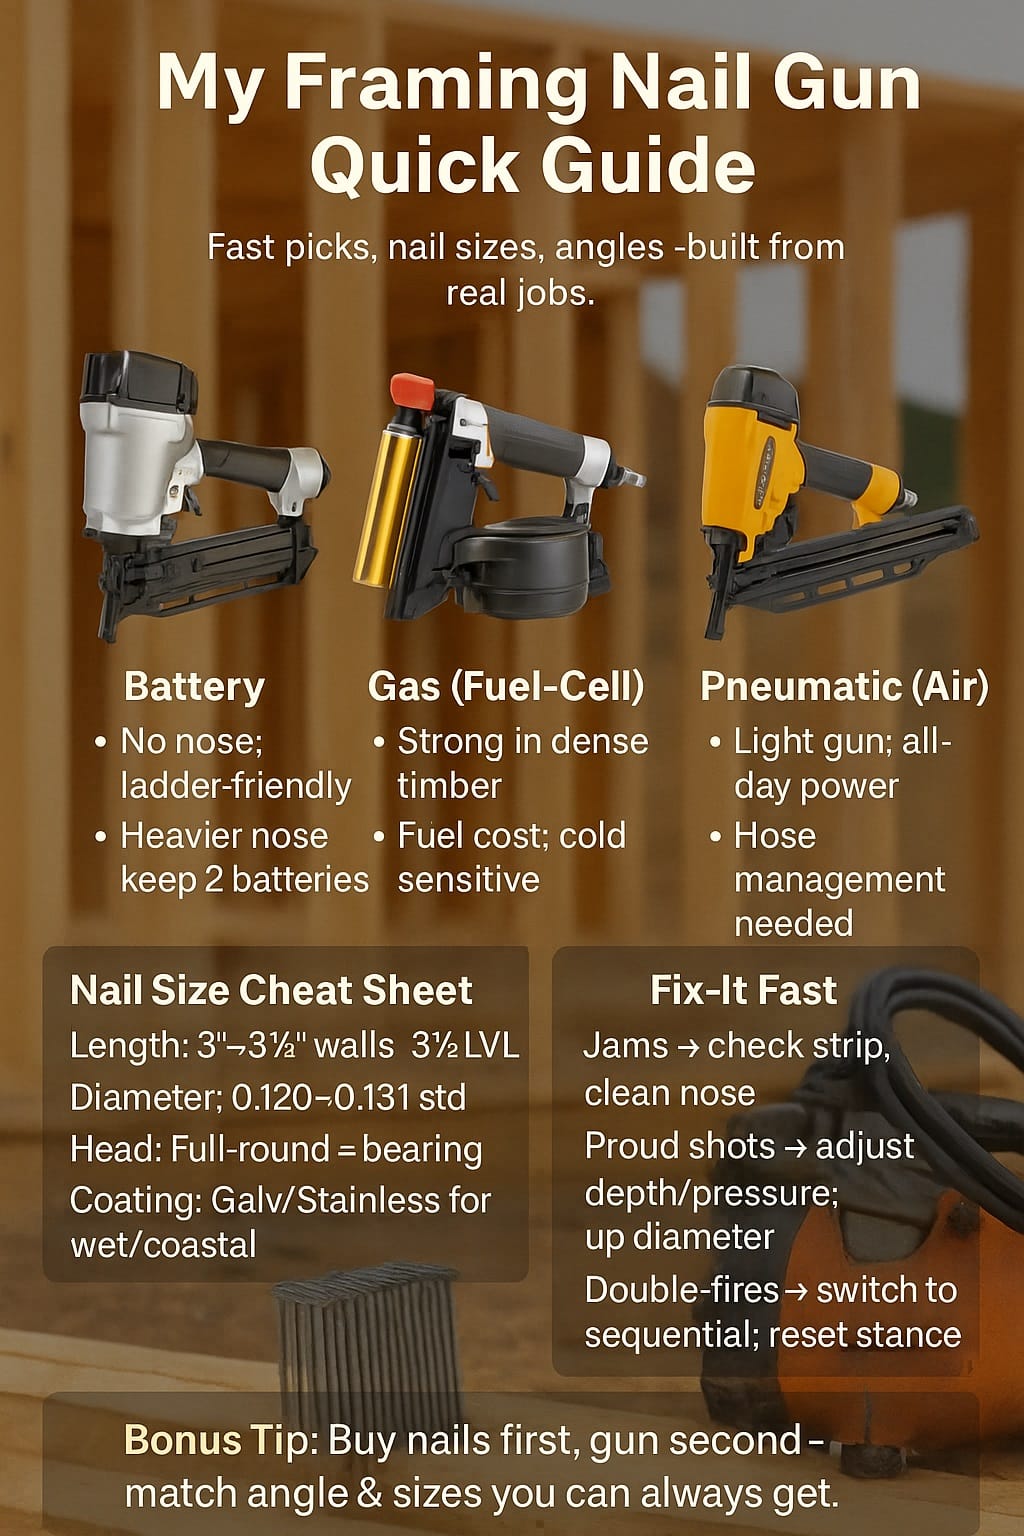
🔨 How I Pick the Framing Nail Gun Type
Cordless gas/fuel-cell
When access is painful—tight sites, no power, quick repairs—my gas nailer shines. It hits hard, especially in denser timbers. Downsides? Fuel cells cost and winter performance can dip. I keep a warm spare in my jacket pocket and never arrive with a nearly empty cell. Learned that one the hard way.
Cordless battery-only
Battery framing nailers are my ladder friends: no hoses, no fuel smell, quick start. They’re a touch heavier nose-to-tail, and some models struggle sinking 0.131″ into LVL on cold mornings. I do a depth test on offcuts before framing studs, and I keep two batteries rotating so I never end up babying shots.
Pneumatic (compressor + hose)
For big days, pneumatics still feel like home: lighter gun in hand, consistent power, and all-day reliability. The hose is the trade-off—trip risk and choreography around helpers. I route hoses along one side of the plate and tape hazards. If I’m sheathing floors or running long walls, air is still my most efficient setup.
Mark Voss, LBP (Licensed Building Practitioner), contrasts cordless convenience with pneumatic endurance, arguing that site scale should decide the platform, not brand loyalty.
📏 How I Match My Gun to the Right Nail Size
Length that bites (not blows out)
Too short and the joint loosens. Too long and points blow out edges. For typical 2×4/90×45 framing, 3–3-1/4″ is my default, stepping to 3-1/2″ where code or loads demand. I care more about embed depth into the main member than headline numbers on a box.
Diameter that holds (and sinks)
I treat 0.113″ as “light framing,” 0.120–0.131″ as “standard-to-strong,” and 0.148″ as “beefy or stubborn work.” Heavier diameters hold more but need more power and cleaner angle control. If my shots start standing proud in dense stock, I don’t force it—I reassess diameter and driving energy.
Head type and collation
Full-round heads offer generous bearing; clipped or offset heads can fit more nails per strip and tighter access with certain angles. I pick the nail that my inspection world expects, then match the gun to that angle so I’m not hunting odd strips mid-job. Availability beats lab theory on a wet Wednesday.
Priya Chen, CEng MICE (Chartered Civil Engineer), contrasts “maximum theoretical capacity” with “field reliability,” advising builders to bias toward nails they can reliably source season after season.
🧱 How I Choose Nails for Different Timbers and Conditions
Standard softwood studs and plates
In SPF/radiata wall frames, I use 0.120–0.131″ smooth or ring shank at 3–3-1/4″. If a plate feels spongy or it’s a windy day fighting alignment, I favor ring shank. My test is simple: two shots on scrap—if the second sits proud, I up pressure or shift diameter.
Engineered timber (LVLs, I-joists, laminates)
Engineered members punish weak shots. I bias 0.131″ with a confident driver and prefer sequential fire for control. I watch for angle drift; a small tilt becomes a proud head in LVL. Brackets and hangers? I don’t “make do” with nails—manufacturer-rated fasteners only.
Exterior, decks, wet, or coastal
Moisture and salt don’t negotiate. I use hot-dip galvanised or stainless, even when bright steel is cheaper. I’ve replaced rusted fasteners once; I don’t plan to again. For decking frames, ring or screw shank wins—better pull-out, fewer squeaks after the first wet-dry cycle.
Dr. Aaron Kline, CMfgE (Certified Manufacturing Engineer), contrasts “material compatibility” with “fastener convenience,” urging builders to spec coatings for the worst week of weather, not the best.
⚙️ My Real-World Take on Gun Designs and Angles
Stick vs coil
Stick nailers feel balanced for wall framing and overhead work. Coil nailers are capacity kings and shine on sheathing or repetitive fastening where reloads kill momentum. When I’m running subfloor nailing, a coil gun’s rhythm beats strip reloads every time.
Angles that actually help
21° feels natural in stud bays. 28° slips between tight studs and corners. 30°–34° gives even sleeker access and often pairs with clipped/offset heads, which can boost magazine capacity. I choose the angle that matches the nails my suppliers always stock; running out mid-frame is the worst inefficiency I know.
Recoil, balance, and triggers
I judge a gun by hour four: does the nose still find the same spot? I prefer responsive sequential triggers for structure, switching to bump only on repetitive sheathing with strict control. A well-placed rafter tie deserves deliberate shots, not speed for its own sake.
Elisa Morrell, CPO (Certified Professional Ergonomist), contrasts “peak output” with “sustainable control,” noting that neutral wrist angles and predictable recoil reduce error rates.
🛡️ How I Set Up for Safe, Efficient Framing
Pre-start routine
I lay out nails, confirm coating and diameter, check the gun’s allowable range, and mark depth on scrap. Air? I set regulator and watch the first five shots. Battery? I start with the warmer pack. Gas? Fresh cell in, spare in pocket. Ten minutes here saves forty later.
Control beats speed
For structural framing, I use sequential fire, not bump. I place, breathe, shoot, and check flush. Bump fire lives in my kit for flooring or sheathing runs with clear lines and full body control. If a beginner’s on site, bump mode stays off—no argument.
Site choreography
I tape hose paths, keep offcuts in a single “mess zone,” and assign one helper to stage studs and plates. With fewer trip points, I can keep eyes on the line, not my feet. I revisit PPE often: glasses, muffs, and work boots beat bravado every day.
Rafael Ortiz, CSP (Certified Safety Professional), contrasts “productivity theater” with “risk-adjusted throughput,” reminding crews that uninterrupted safe work outproduces unsafe bursts.
🧰 Problems I’ve Had—and What Fixed Them
Jams and misfeeds
Jams taught me humility. Ninety percent were my fault: mixed strips, bent ends, or nails outside spec. I lock out, clear pressure, open the nose, and clean. If it recurs, I check magazine rails for burrs and toss any sketchy strips. Life’s too short to babysit bad nails.
Proud shots
If heads won’t sit flush, I run a three-step check: depth setting, driving energy (pressure/charge), then diameter. Cold LVL or hardwood can make good guns look weak. I don’t bury depth just to “win”—that invites over-penetration elsewhere. I match the fastener to the wood, not the other way around.
Double-fires
Double-fires trace back to technique and trigger mode. If it appears, I switch to sequential, reset my stance, and steady my shoulder. A light, floating grip on the second shot is trouble. When a gun still misbehaves, it goes to service—sears and springs aren’t my DIY playground.
Naomi Hart, AScT (Applied Science Technologist), contrasts “symptom chasing” with “root-cause checks,” pushing for repeatable diagnostics instead of tinkering.
🧾 My Short Case Study: Small Sleep-Out Frame That Passed First Inspection
The brief
A customer wanted a tidy sleep-out: 90×45 walls, LVL lintel over a slider, coastal suburb. I chose a pneumatic 21° stick nailer for balance and easy stud bay access, with hot-dip galvanised nails outdoors and standard coated nails indoors.
Phone-Friendly Job Snapshot
| Task | Choice |
|---|---|
| Wall studs/plates | 3-1/4″ x 0.120″ ring, HDG for exterior walls |
| Lintel to jack studs (LVL) | 3-1/2″ x 0.131″ smooth, sequential fire |
| Bottom plate to subfloor | Code-rated anchors + 3-1/4″ nails where allowed |
| Exterior brackets/hangers | Manufacturer-rated fasteners only |
| Sheathing runs | Coil gun with 0.120″ ring for pace |
The result
Everything sat flush, no visible blow-outs, and inspection passed first go. The only tweak I’d make next time is staging one extra hose to reduce mid-wall dancing around helpers. The customer never saw the choreography—just a frame that looked like it wanted to be there.
Gordon Wu, RICS (Chartered Surveyor), contrasts “visible finish” with “hidden fixity,” reminding builders that what you don’t see often matters most.
❓ My Simple Framing Nail Gun FAQs
What nail gun do I actually need for standard wall framing?
If you build often, pneumatic is light and consistent. For quick jobs, battery wins convenience. Gas brings punch when power is scarce. Pick the platform you can safely control all day, not just for a few hero shots.
Can I use the same gun for decking or fencing?
Yes for some tasks, but exterior fasteners need the right coating, and many deck connections require rated screws or specific nails. Don’t guess—use manufacturer-approved fasteners for brackets and hangers outdoors.
What nail length is safest for 2×4/90×45?
3–3-1/4″ is my default, stepping to 3-1/2″ where loads or code call for it. Always test on scrap and watch for edge blow-outs near ends or knots.
Which angle should I buy first?
If supply is strong for 21° in your area, start there. If your merchants stock 30°–34° better, follow the shelves. Availability beats theory mid-build.
Can one gun shoot different diameters and brands?
Within its spec, yes—but don’t force off-brand strips that bind. If feed feels gritty or inconsistent, stop and swap. Saving a few dollars on nails can cost you hours.
Dr. Olivia Grant, PhD (Human Factors), contrasts “choice overload” with “satisficing,” advising builders to standardize on one angle and diameter range to reduce decision fatigue.
📌 My Takeaways Before You Buy
The simple path I actually use
I start with the jobs I’ll really do. If it’s day-in, day-out framing, I choose pneumatic and organize hoses. If it’s scattered renos or high ladder work, I go battery, with gas as the cold-weather or dense-timber backup.
Nail size beats brand talk
Nail length, diameter, head, and coating decide whether a joint stays quiet or starts talking after the first storm. I bias 3–3-1/4″ at 0.120–0.131″ for walls, step up to 0.131″ for LVL, and go galvanised or stainless when water’s in the story.
Habits that save hours
Ten minutes of scrap testing, neat hose routing, sequential firing for structure, and honest troubleshooting will beat “fast and loose” every time. If something feels off, it is. Reset and fix it now, not after the sheathing goes on.
Prof. Daniel Reyes, CEng (Chartered Engineer), contrasts “initial velocity” with “total project time,” noting that disciplined setup wins more days than raw speed.
Thanks for reading—if you want, I can turn this into a printable checklist and a quick-pick nail size card for your toolbox.
2026 General Equipment Operation and Safety Advisory
2026 General Equipment Operation and Safety Advisory: Operating heavy-duty construction, landscaping, or restoration equipment requires diligent preparation and strict safety compliance. Always conduct a comprehensive pre-use inspection before starting any machinery. Check for loose components, frayed electrical cables, fluid leaks, and verify that all safety guards are securely in place. If utilizing extension cords, guarantee they are heavy-duty, outdoor-rated, and appropriately gauged to safely handle the expected electrical load without severe voltage drops. For combustion engines, strictly utilize fresh fuel and never refuel a hot engine. Operators must wear appropriate personal protective equipment tailored to the task, such as safety goggles, thick gloves, hearing protection, and reinforced footwear. Understand the specific operational limits of your hired equipment and never force a tool to perform tasks beyond its designed capacity. Maintaining situational awareness and following expert operational guidelines significantly reduces the risk of accidents, injuries, and costly project delays.