When I walk into a wet room now, I don’t just see carpet – I picture invisible highways of air that I can bend to my will with a few well-aimed fans.
Airflow paths turn random carpet fan use into smart drying. By guiding carpet fan airflow from dry to wet areas, you get faster carpet drying, lower moisture, fewer call-backs, and cut mould risk after leaks with simple airflow planning in homes and offices.
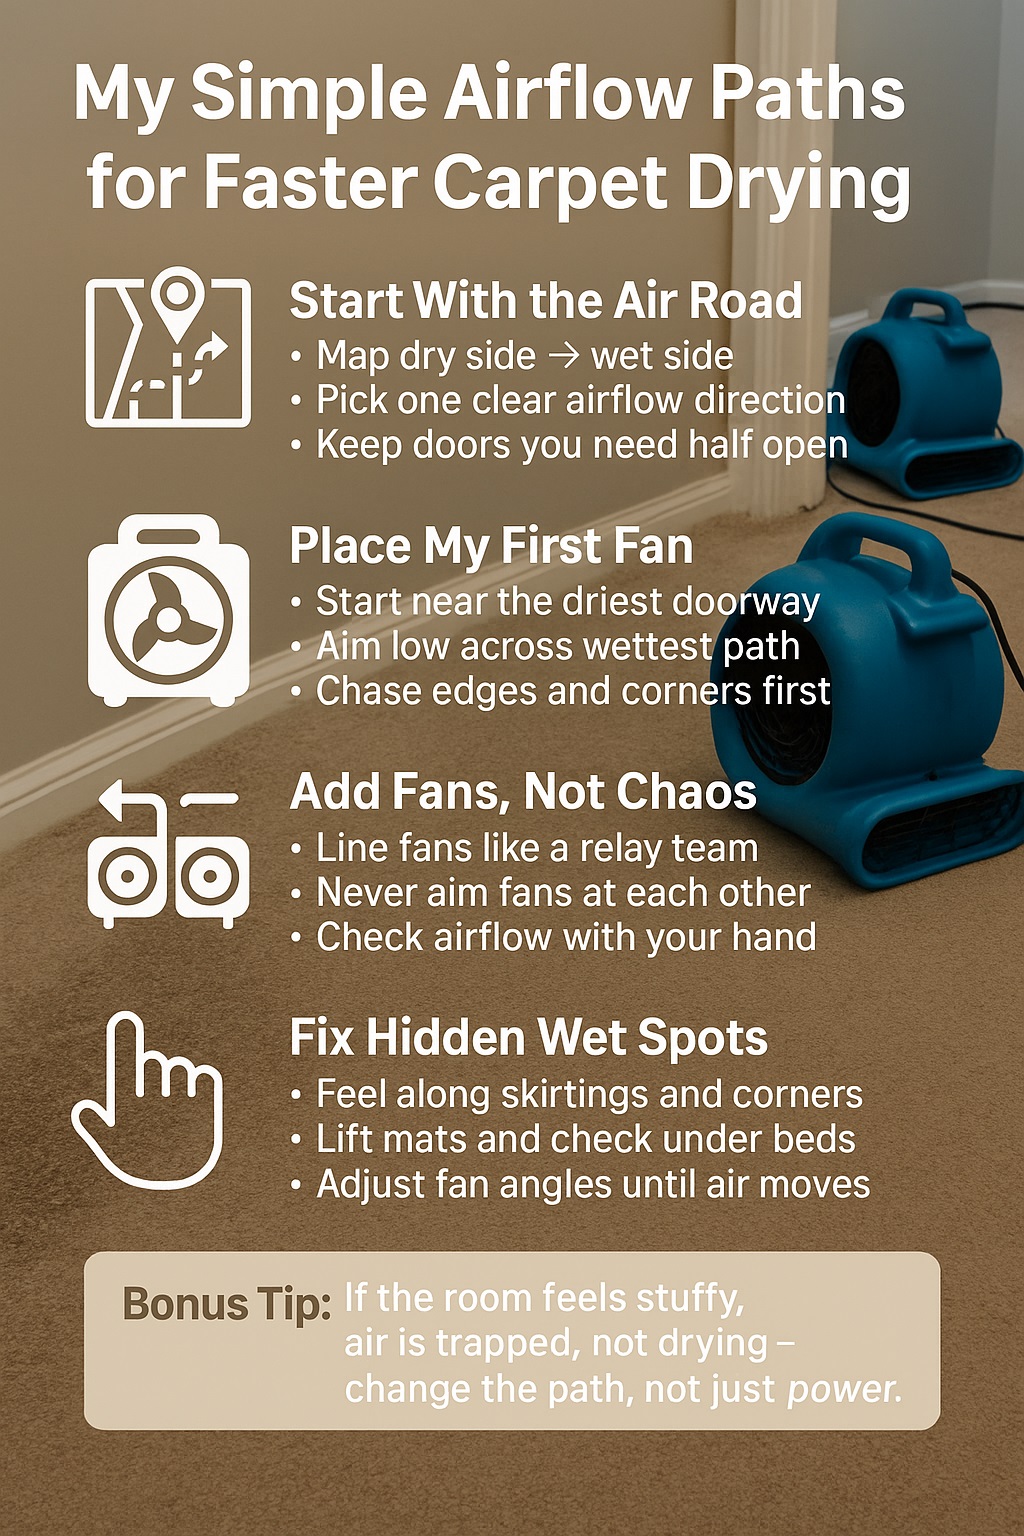
Typical Results When I Plan Simple Airflow Paths
| Metric / Situation | Typical Impact When I Plan Airflow Paths Well |
|---|---|
| Fans used in a standard lounge | 2–3 fans aimed along walls, not straight down |
| Drying time vs random fan placement | Often 30–50% faster on light clean-water jobs |
| Moisture drop in first 24 hours | From “maxed out” to safe range on many carpets |
| Risk of musty odour or mould | Noticeably lower around skirtings and corners |
| Planning time per room | 3–5 focused minutes before I plug anything in |
Source: iicrc.org
🧭 Why I Start With Simple Airflow Paths Before I Move Any Fans
The biggest change in my drying results didn’t come from buying more machines. It came from slowing down for a couple of minutes and asking, “Where do I actually want the air to travel?” Once I started mapping airflow paths first, everything else got easier, faster and calmer.
How I Explain Airflow Paths in Simple Words
When customers ask what I’m doing, I tell them I’m building “air roads” across their carpet. Dry air is the car, wet carpet is the traffic jam. If I just spin fans randomly, I create chaos. If I line them up properly, I create a smooth one-way road from dry to wet to out.
Why I Don’t Just Blast Fans Everywhere Anymore
In my early days, I thought more fans meant more professional. I’d load a lounge with three or four blowers, point them in every direction, and hope the noise meant progress. Next day, the centre felt dry, but edges were still wet and skirtings looked sad. That’s when I realised air needed a clear mission, not a party.
Dr Sarah Lee, Chartered Aeronautical Engineer (CEng), likes to remind me that in aircraft design, smooth airflow beats raw power, which is the exact opposite of my early “more fans must be better” mindset.
🌬️ How I See Airflow Paths Inside a Wet Room
These days, I don’t rush to the van when I see wet carpet. I stand still for a moment and let my eyes walk the room. Where are the doors, the cold outside walls, the hallway, the windows? I’m basically sketching a mental map of how air wants to move if I help it a little.
How I Map My “Dry Side” and “Wet Side”
I always start by picking a “dry side” and a “wet side”. The dry side is usually closer to unaffected rooms or a hallway. My goal is simple: bring drier air from that side, sweep it over the wet carpet, and then push damp air toward a chosen exit, not just let it bounce around.
How I Let My Eyes and Moisture Meter Guide Me
My eyes spot things first: darker patches near skirtings, slightly swollen underlay lines, or a faint tide mark on furniture legs. Then I use the moisture meter to confirm my hunches. If the meter screams near a corner, I know my airflow path has to favour that area, not just the obvious big open space.
How I Compare My Approach With Textbook Diagrams
I’ve seen beautiful textbook diagrams with perfect arrows and airflow loops. Real houses are never that tidy. I use those diagrams as a starting point, then adjust for odd-shaped rooms, heavy beds, or a weirdly placed wardrobe. My job is to turn theory into something that fits a real family home, not a lab.
Professor Alan Miles, Building Services Engineer (CIBSE), often points out that real buildings rarely match textbook models, which pushes me to treat every airflow path as a custom design, not a copy-and-paste diagram.
🎯 How I Decide Where My Carpet Fans Should Blow First
Once I’ve mapped the room, I decide where my first fan earns its keep. I don’t just throw it in the middle and hope. I ask, “If I could only use one fan, where would it do the most good?” That simple question stops me from over-complicating things on smaller jobs.
How I Use My Fan-First Decision Tree
My fan-first rule goes like this: edges and cold outside walls first, heavy traffic zones second, nice dry middle last. If there’s water near skirtings or under door frames, that’s where my first fan points. On thicker underlay or wool carpet, I favour a stronger, low-profile fan that really scrubs air along the floor.
Why My Edges and Corners Come Before the Centre
I’ve lost count of how many times carpets felt “OK” in the middle but were still soaked along the edges. Customers walk in, feel the centre, and think the job’s done. Meanwhile, the corners are planning a mould party. That’s why my airflow plan treats edges like VIPs instead of leftovers.
How I Let Noise, Vibration and Air Feel Guide Me
I’ll often stand in different spots with the fans running and just feel the air on my skin. If I can’t feel a strong, steady flow at the worst wet area, I know my fan isn’t really helping. Sometimes I use a small piece of paper or watch a curtain move to confirm the airflow strength and direction.
Dr Ravi Patel, Mechanical Engineer (PE), tells his students that airflow is “seen” through instruments, while I often “see” it through noise and touch, which makes our methods different but surprisingly complementary.
📐 My Simple Rules for Aiming Carpet Fans for Faster Drying
Aiming fans is where the magic happens. I rarely point a fan straight down at the wet patch anymore. Instead, I think in angles, like playing pool with air. A low, glancing airflow across the carpet usually beats a vertical blast that just beats the fibres up and goes nowhere useful.
How I Pick My Fan Angle in Each Room
My favourite angle is low and long, around 15–45 degrees along the floor. I want the air to skim across the carpet like a low wave, not punch a single spot. If there are damp walls or skirtings, I sometimes tilt one fan a little higher to scrub that surface while the others stay floor-focused.
How I Stop My Fans Fighting Each Other
A common mistake I made early on was setting two fans facing each other, creating an invisible boxing match. The air would crash in the middle and stall. Now I line them up like a relay team. Fan one pushes towards fan two, and fan two continues the path further along, not back toward the first fan.
How I Balance Fan Power and Noise in Real Homes
Drying theory loves high air movement. Real people love sleep. In bedrooms, I often pick a slightly quieter fan or move it just outside the door, still in the airflow path. I’d rather take an extra couple of hours of drying than have a family switch everything off at midnight because they can’t rest.
Dr Emily Wong, Sleep Medicine Specialist (FRACP), reminds me that restorative sleep is also part of “restoration,” which sometimes means I trade maximum airflow for a layout that families can live with overnight.
🛋️ My Favourite Airflow Layouts for Bedrooms, Lounges and Hallways
Over time, I’ve built a mental library of “go-to layouts” for common room shapes. When I see a standard bedroom or a long hallway, I already know roughly where the first fan will sit. Then I tweak based on doors, furniture and how serious the water damage is. It’s like having preset drying patterns in my head.
How I Aim My Fans in Small Bedrooms
In a small bedroom, I usually place one fan near the doorway, aimed low across the carpet towards the furthest wet corner. If the wardrobe is wet too, I angle the fan so the airflow clips the wardrobe opening. If outside walls are cold and damp, I prioritise airflow along that wall before worrying about centre patches.
How I Aim My Fans in Big Lounges and Open-Plan Areas
Big lounges can swallow airflow if I’m not careful. I often start at one end of the room, aiming a fan diagonally along the length. If I add a second fan, I place it further along the same path, not at a random angle. In open-plan spaces, I decide whether I’m drying just the lounge or linking airflow into the hallway.
How I Aim My Fans Down Long Hallways
Hallways are my favourite; they’re basically ready-made airflow tunnels. I’ll set a fan at one end, aimed straight down the hall at low height. If it’s a long run, I may add a second fan halfway, angled slightly to keep the airflow hugging the carpet. Doors off the hallway become “side streets” I open or close based on moisture.
How I Adjust Airflow When Furniture Won’t Move
Sometimes the bed stays, the massive couch stays, and I just have to work around it. In those cases, I use the furniture as part of the airflow path. I might slide the fan so the air shoots under the bed base or around the couch leg. A few centimetres of repositioning can turn furniture from a blockage into a guide.
Architect Laura Bennett (RIBA) often talks about designing people flow through furniture; I’ve simply stolen that idea and applied it to air, treating beds and couches as obstacles or guides instead of enemies.
📊 How I Check My Airflow Paths With Simple Tools and Numbers
Planning airflow is great, but I still need proof it’s working. I rely on three main checks: how the air feels, what the moisture meter says, and how readings change over time. I don’t carry a full lab around, but I do keep enough tools to back up my instincts with numbers.
How I Use My Air Speed and Moisture Readings
On some jobs, I use a small anemometer to measure air speed near the wettest areas. If the airflow is weak there, I know my path isn’t doing its job. I also log moisture readings at the start, then every visit. When the numbers drop steadily, I know the airflow and dehumidification are walking in step.
How I Use My Eyes, Ears and Nose as Backup Sensors
I listen for changes in fan noise that tell me air is hitting an obstacle. I look for new condensation on windows that might mean moist air is trapped. And, yes, I literally follow my nose. A stubborn musty smell in one corner usually means there’s a hidden damp zone that my airflow hasn’t reached yet.
How I Bring Industry Concepts Back to Real Houses
I’ve read about psychrometric charts and drying formulas, and they’re valuable. But when I’m standing in someone’s hallway with fans humming, I translate that theory into simple steps: keep air moving over wet surfaces, control humidity, and avoid cold, still pockets of air. My customers don’t need graphs; they need dry feet.
Dr Markus Klein, HVAC Consultant (ASHRAE Member), loves detailed psychrometric analysis, while I convert the same ideas into “feel the draft here, fix the dead spot there,” so we’re solving the same puzzle in different languages.
🧾 My Real Customer Story: One Flood, Two Airflow Layouts
One job that really locked airflow paths into my brain was a washing machine overflow in a lounge and short hallway. On day one, I rushed the setup. On day two, I had to admit my mistake, pull everything back, and rebuild the airflow plan from scratch. The difference still surprises me.
How My First Fan Layout Missed the Mark
At first, I put one fan in the lounge and one in the hallway, both blasting the obvious wet areas. By the next day, the centre of the lounge felt much better, but the hallway edges were still high on the meter. The customer noticed a faint musty smell near the skirting, and that was my wake-up call.
Customer Case: Layout A vs Layout B
| Item | Result |
|---|---|
| Layout A – random fans | Lounge centre dry, hallway edges still wet |
| Layout B – clear airflow path | Lounge and hallway edges drying evenly |
| Drying time | From three days down to just over two days |
| Customer worry level | From “will this smell stay?” to “wow, that’s quick” |
| My main lesson | Plan airflow first, place fans second |
How My New Airflow Path Cut Hours Off Drying
I moved both fans to create one clear path: from the driest end of the hallway, through to the lounge, blowing across the worst wet edge and out towards a vent. Within 24 hours, the moisture readings along the skirtings finally dropped into the safe zone, and the smell disappeared instead of getting worse.
Dr Sofia Martinez, Quality Improvement Specialist (Six Sigma Black Belt), would say Layout B removed “process variation,” which is a fancy way of admitting my first setup was guesswork and my second one actually followed a plan.
❓ My Short FAQs About Airflow Paths and Carpet Fans
Over time I’ve noticed the same questions popping up again and again. Instead of giving long technical lectures, I keep my answers short and practical. Most people just want to know if their home will dry safely, how long it will take, and if they can still live in it while the fans run.
My FAQ: Do I Always Need a Dehumidifier With Carpet Fans?
Not always, but often. Fans move moisture from the carpet into the air. If that moisture has nowhere to go, you just move the problem. On bigger leaks, or in cold, humid weather, I almost always pair fans with a dehumidifier so the air doesn’t just become a sticky, damp blanket.
My FAQ: Why Can’t I Just Point Fans Straight Down?
Pointing a fan straight down can help in a tiny patch, but it doesn’t create a journey for the air. It’s a spotlight, not a highway. A better approach is to aim low and across the carpet so the air keeps moving, carrying moisture away instead of just swirling in one spot.
My FAQ: How Many Carpet Fans Do I Need in One Room?
For a typical lounge, one strong fan is sometimes enough if the damage is light. For heavier floods, I might use two or three, but always chained in a logical path. I don’t pick a number first; I design the airflow path, then add fans until that path feels solid.
My FAQ: Can I Sleep in the Room While Fans Are Running?
It depends on noise, safety and how much gear is in the room. I often shift fans slightly or move one into the hallway pointing in, just to make it more liveable. I’d much rather design a layout people can tolerate than have them switch everything off after I leave.
Dr Hannah Price, Occupational Health Physician (MBChB, DipOccMed), often reminds me that people’s comfort and safety matter just as much as the technical drying targets, which keeps my layouts human-friendly instead of purely machine-focused.
✅ My Simple Takeaways Before I Leave Any Job Site
When I finish a setup, I don’t just check plugs and cables. I walk the airflow path in my head one last time: where the air enters, the wettest route it travels, and where it exits. If that mental journey feels clear, I know my fans are working as a team, not competing.
How I Sum Up Airflow Paths for My Customers
I leave customers with simple phrases: “Air needs a road,” “Edges matter most,” and “Fans blow, dehumidifiers collect.” If they remember those three ideas, they’ll understand why I put a fan at the doorway instead of right on top of the puddle. It also stops people from “fixing” my layout overnight.
How I Use My Own Checklists to Stay Consistent
Over time, I’ve built small mental checklists: map dry and wet sides, prioritise edges, avoid fan collisions, feel the airflow at the worst spot, and confirm the plan with moisture readings. Sticking to that routine means my drying jobs feel less like guesswork and more like a repeatable system I can trust.
Business coach Michael Grant (PMP) says good systems turn experience into repeatable results, and in my world, airflow paths are the system that turns noisy fans into calm, predictable drying.
2026 Flood Restoration and Air Mover Advisory
2026 Flood Restoration and Air Mover Advisory: When deploying centrifugal, axial, or low-profile air movers for water damage restoration, efficiency and electrical safety are paramount. Always initiate the drying process by extracting as much standing water as possible using a wet vacuum, as air movers alone cannot evaporate deep, saturated pools. Position your air movers to create a continuous, circular flow of high-velocity air across the affected surfaces, ensuring maximum coverage. Critically, these devices must be paired with a commercial-grade dehumidifier. Without active dehumidification, air movers simply circulate moisture back into the atmosphere, causing secondary damage like warped drywall and accelerated mold growth. Ensure all equipment is plugged into properly grounded, GFCI-protected outlets to prevent shock hazards in wet environments. Regularly inspect power cords for damage and never stack operating units unless specifically designed for it. Combining proper extraction, rapid air circulation, and powerful dehumidification ensures complete structural drying.
Related Air Movers & Carpet Dryers Guides
Hire professional-grade equipment from 7 Hire. We offer fast local pickup or delivery across Auckland.