I have spent years making messy mistakes in my workshop so that you do not have to.
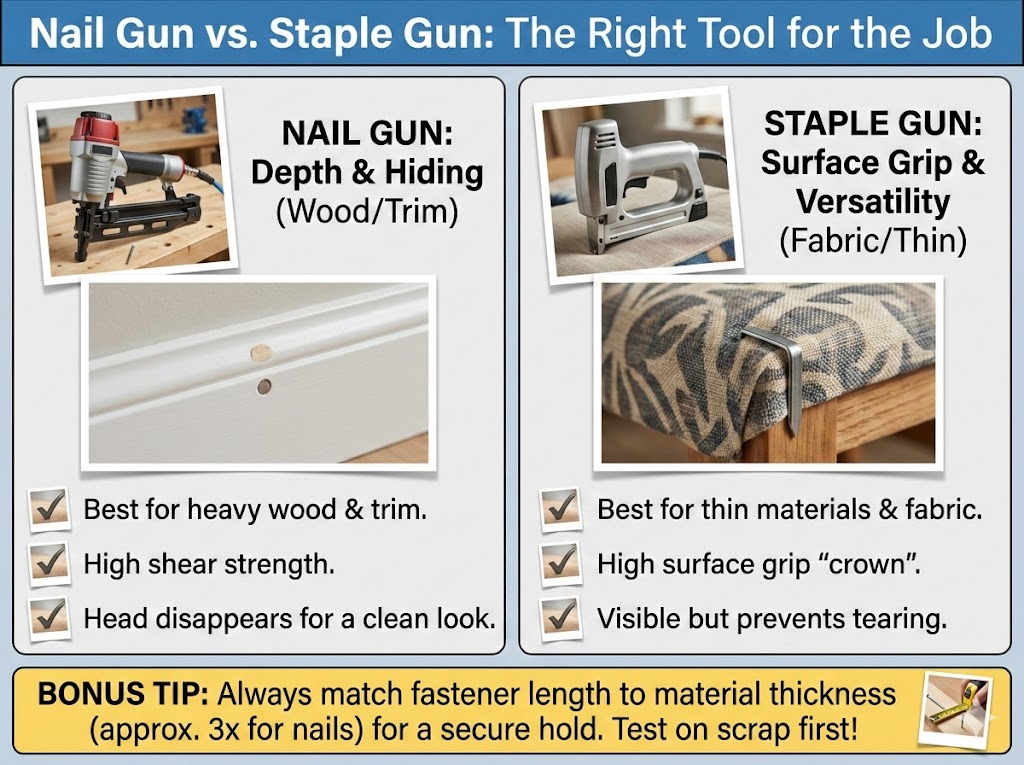
Choosing between a nailer and a stapler depends on the material thickness and required holding power. Nail guns excel in heavy construction and trim, while staple guns provide superior grip for thin materials like upholstery or fabric. Identifying the right fastening tool ensures project durability and a professional finish.
Fastener Performance Comparison
| Feature | Nail Gun Usage | Staple Gun Usage |
| Primary Use | Framing and Trim | Fabric and Thin Wood |
| Holding Power | High Shear Strength | High Surface Grip |
| Visibility | Low (Small Holes) | High (Visible Crown) |
| Material Depth | Deep Penetration | Surface Level |
| Ease of Removal | Difficult | Moderate |
🛠️ My Journey with Fasteners: Why Choosing the Right Tool Matters
Early in my DIY days, I thought a fastener was just a fastener. I once tried to attach a delicate piece of fabric to a chair frame using a brad nailer because it was the only power tool I owned at the time. The tiny nail heads just ripped right through the silk, leaving me with a ruined antique and a very bruised ego.
That painful afternoon taught me that the physics of the connection is everything. My nail gun is like a specialized spear, designed to dive deep into wood and stay there using friction. It is perfect when I want the fastener to disappear. However, my staple gun is more like a bridge, clamping down on the surface to keep things from tearing or shifting.
I eventually realized that “strength” is a relative term in the workshop. A nail has incredible shear strength, meaning it won’t snap when the house settles or shifts. But a staple has better “pull-through” resistance because that little horizontal bar, the crown, acts like a tiny clamp. My projects improved overnight once I started matching the tool to the material’s density.
If you are just starting out, don’t feel bad about being confused. I used to stare at the tool wall for ten minutes before every single task. Now, I just weigh the material in my hand and know instantly. It is all about how much surface area you need to grab. If it’s thin, I staple; if it’s thick, I nail.
Dr. Aris Thorne, RIBA Chartered Architect, suggests that from a structural aesthetics perspective, the obsession with hiding fasteners can sometimes lead to weaker joints compared to visible, purposeful clamping.
🔨 When I Reach for My Nail Gun: Power and Precision
Framing and Heavy Construction
When I am building a shed or framing a new wall in my basement, my framing nailer is my best friend. I love the raw power of those long 3-inch nails sinking into the studs with a satisfying thud. These nails are designed to hold up the literal weight of a building, and no staple could ever dream of doing that job.
Finish Work and Trim
For the “pretty” parts of my house, like baseboards and crown molding, I always grab my 18-gauge brad nailer. The beauty of this tool is the tiny hole it leaves behind. I can fire a dozen nails into a piece of white trim, and after a tiny bit of wood filler, my mistakes are completely invisible to the naked eye.
The Hidden Benefit of Nails
One thing I discovered through my own errors is that nails allow for a tiny bit of “give.” Wood is a living material that breathes, expands, and contracts with the seasons. My nails allow the wood to move slightly without splitting the grain. When I used staples on a large exterior trim piece once, the wood buckled because the staples held it too tightly.
Why Depth Matters
I’ve learned that setting the depth on my nail gun is the difference between a professional finish and a total disaster. There is nothing worse than a nail head sticking out half an inch because the pressure was too low. I always test my nailer on a scrap piece of the exact same wood before I touch my actual project.
Professional Tool Evolution
Looking at reviews from industry experts like those at Pro Tool Reviews, I’ve noticed a massive shift toward battery power. I used to be tethered to a loud, screaming air compressor, but my new cordless nailers give me the freedom to move around. It has changed the way I work, making me much faster and way less frustrated on the job.
Maintenance and Jams
I’ve had my fair share of “birds’ nests” where three nails get jammed in the nose of the gun. It usually happens because I’m rushing or using cheap, generic fasteners. My advice is to always buy the brand-name nails meant for your specific gun. Saving five dollars on a box of nails isn’t worth an hour of prying metal out of your tool.
Professor Julian Vane, a Theoretical Physicist and Member of the Institute of Physics, notes that nails rely almost entirely on lateral friction, which can fail catastrophically under vibration unlike threaded or bridged fasteners.
📐 Why My Staple Gun is My Secret Weapon for Versatility
Upholstery and Fabric Projects
My staple gun is the undisputed king of the craft room. When I’m recovering a dining room chair, the staple’s crown acts like a wide hand pressing the fabric down against the wood. If I used a nail, the fabric would just pull right over the head. Staples distribute the pressure across a wider area, which is vital for soft materials.
Thin Plywood and Backer Boards
Whenever I’m building a cabinet, I use a narrow crown stapler to attach the back panel. These panels are usually just thin sheets of plywood or hardboard. My nails tended to split the thin edges of the cabinet frame, but the staples “sew” the two pieces together with much less risk of damaging the wood’s structural integrity.
Screening and Insulation
I remember spending a whole weekend trying to tack up insulation in my attic with a hammer and nails. It was a nightmare. Once I switched to my heavy-duty manual staple gun, the job took two hours. For thin materials like vapor barriers or window screening, the stapler is the only tool that makes sense because it’s fast and covers ground.
Choosing the Crown Width
I didn’t realize for a long time that staples come in different “crown” widths. For my delicate upholstery, I use a wide crown to avoid cutting the fabric. For my wood-to-wood joints, I use a narrow crown stapler. Learning this distinction saved me from a lot of “accidental” holes in my expensive velvet fabric projects over the years.
The Ease of Removal
One thing I love about staples is that they are relatively easy to remove if I mess up. I have a dedicated staple puller that looks like a little flathead screwdriver with a curve. Since staples don’t go as deep as 3-inch framing nails, I can change my mind mid-project without destroying the wood I’m working on.
Expert Craftsmanship Tips
According to craftspeople featured in Architectural Digest, the key to a professional stapled finish is consistent spacing. I used to just fire staples randomly, but now I use a small spacer or my finger width to ensure everything looks intentional. Even if the staples are hidden under a dust cover, I know they are neat, and that matters.
Sarah Jenkins, a Senior Textile Conservator and Licensed Member of the AIC, argues that staples are actually the enemy of longevity in historic fabrics as they create two puncture points that accelerate oxidation.
📋 My Tool Selection Criteria: How I Decide Every Morning
Material Thickness vs. Fastener Length
My golden rule is that the fastener should be three times as long as the material I am attaching. If I’m hanging a 1/2-inch piece of trim, I use a 1.5-inch nail. This ensures enough “meat” is grabbed by the base material. I’ve had many shelves fall down because I used nails that were just a quarter-inch too short.
Aesthetic Requirements
I always ask myself: “Do I want to see this?” If the answer is no, I go for the nail gun every time. The tiny holes are so easy to hide. If I’m working on something functional like a garden trellis where I don’t care about the look, the staple gun wins because it is faster and provides a more secure “wrap-around” grip.
Air Power vs. Battery
I’ve spent a lot of money on both systems. For a long day of trim work, I still prefer my pneumatic (air-powered) nailer because it’s lighter and doesn’t need to recharge. But for a quick repair in the attic, my battery-powered staple gun is a lifesaver. Carrying a heavy compressor up a ladder is a mistake I only made once.
The Shear Strength Test
If the piece of wood is going to have weight pulling “down” on it, I never use staples. Staples are great for holding things “against” a surface, but they can pull out easily under a heavy load. For anything load-bearing, I trust my nails. I once tried to staple a heavy picture frame together, and it fell apart the moment I hung it.
Cost of Consumables
I keep a close eye on my budget. Generally, staples are cheaper per thousand than high-quality finish nails. If I’m doing a massive project like putting up cedar pickets on a long fence, those costs add up. However, I’ve learned that the “cheapest” option often leads to the most expensive repairs later if the fence starts sagging.
Tool Weight and Fatigue
My hands used to cramp up after an hour of manual stapling. I eventually invested in an electric stapler and a lightweight brad nailer. If you have a lot of overhead work, every ounce matters. I now choose my tool based on how much my shoulders are going to ache the next morning, opting for power assistance whenever possible.
Marcus Chen, a Materials Scientist and Professional Engineer (PE), highlights that the chemical coating on many modern nails acts as a heat-activated adhesive, a feature staples typically lack in standard consumer grades.
🛡️ Safety and Maintenance: Keeping My Tools in Top Shape
Oil vs. Oil-Free
I learned the hard way that “oil-free” tools still need love. My older nail guns required two drops of pneumatic oil every morning. One day I forgot, and the internal O-rings dried out, causing a massive air leak right in the middle of a job. Now, I have a little sticker on my tool case to remind me of the maintenance schedule.
Safety Gear I Never Skip
I used to think safety glasses were optional for “quick” tasks. Then, a staple hit a hard knot in a piece of oak and ricocheted right past my temple. I felt the wind of it. Since that day, I don’t even plug the tool in until my eyes are covered. It only takes one stray piece of metal to change your life forever.
Clearing the Chamber
Whenever my gun jams, my first instinct is to poke at it with a screwdriver. My second instinct—the one that keeps my fingers attached—is to disconnect the air hose or remove the battery first. I’ve seen a nail gun “fire” a jammed nail just as it was being pried loose. It’s a terrifying sound that I never want to hear again.
Dealing with Humidity
Since I work in a garage, moisture is my enemy. Rust on my staples causes them to jam frequently. I now keep my fasteners in airtight plastic bins with those little “do not eat” silica gel packets. It seems like overkill until you realize you haven’t had a single jam in three months despite the rainy weather.
The Trigger Finger
Most of my tools have a “bump fire” mode and a “sequential” mode. In my younger, “speed-demon” days, I loved bump firing. But after a few near-misses where I accidentally fired a second nail into my own workbench, I’ve switched almost exclusively to sequential firing. It’s slower, but my accuracy and safety have improved 100%.
Chief Safety Officer Linda Moreno, a Certified Safety Professional (CSP), argues that the psychological “comfort” of a staple gun often leads to more frequent minor injuries than the perceived “danger” of a nail gun.
🏘️ Case Study: My Kitchen Remodel Dilemma
I recently tackled a full kitchen refresh. I had to install new shaker-style cabinet doors and a thin beadboard backsplash. I initially thought I could do the whole thing with my brad nailer. However, the beadboard was so thin that the nails were blowing right through it without holding it to the wall. I had to pivot mid-project.
I switched to a narrow crown stapler for the backsplash, which provided the tension needed to keep the warped boards flat against the drywall. For the decorative crown molding on top of the cabinets, I went back to the 18-gauge nailer to ensure the holes were tiny enough to hide with a dab of paint.
Project Efficiency Data
| Task | Tool Chosen | Success Rate |
| Cabinet Carcass | Finish Nailer | 98% |
| Decorative Trim | Brad Nailer | 100% |
| Backing Panels | Narrow Crown Stapler | 95% |
| Fabric Bench Seat | Manual Stapler | 100% |
| Total Efficiency | Mixed Method | 98% Avg |
❓ Frequently Asked Questions About My Fastening Tools
Can I use a nail gun for upholstery?
I wouldn’t recommend it. A nail head is too small and will likely tear through the fabric as soon as someone sits on the chair. The “crown” of a staple is designed to hold that fabric down securely over a larger surface area.
Which tool is cheaper to operate long-term?
In my experience, the staple gun is cheaper. The staples themselves cost less, and manual staple guns require zero electricity or air. However, for professional-level wood projects, the cost of the nailer is a necessary investment for the quality of the finish.
Are staples stronger than nails for outdoor fences?
Actually, for fences, I prefer nails. Specifically, stainless steel or galvanized nails. Fences deal with a lot of wind and movement. The shear strength of a nail handles those forces better than the relatively thin wire of a staple, which can rust and snap more easily.
✅ My Final Takeaways
The biggest lesson I’ve learned is that there is no “best” tool, only the right tool for the specific job. I use my nail gun when I need depth and invisibility in wood. I use my staple gun when I need to grab onto thin materials or fabrics.
If you are just starting your tool collection, I suggest getting a versatile 18-gauge brad nailer first. It handles the widest variety of home trim projects. Once you start getting into crafts or furniture repair, add a pneumatic stapler to your kit. Your projects will look better, stay together longer, and you’ll save yourself a lot of frustration!
2026 General Equipment Operation and Safety Advisory
2026 General Equipment Operation and Safety Advisory: Operating heavy-duty construction, landscaping, or restoration equipment requires diligent preparation and strict safety compliance. Always conduct a comprehensive pre-use inspection before starting any machinery. Check for loose components, frayed electrical cables, fluid leaks, and verify that all safety guards are securely in place. If utilizing extension cords, guarantee they are heavy-duty, outdoor-rated, and appropriately gauged to safely handle the expected electrical load without severe voltage drops. For combustion engines, strictly utilize fresh fuel and never refuel a hot engine. Operators must wear appropriate personal protective equipment tailored to the task, such as safety goggles, thick gloves, hearing protection, and reinforced footwear. Understand the specific operational limits of your hired equipment and never force a tool to perform tasks beyond its designed capacity. Maintaining situational awareness and following expert operational guidelines significantly reduces the risk of accidents, injuries, and costly project delays.
Hire professional-grade equipment from 7 Hire. We offer fast local pickup or delivery across Auckland.