I used to think all chains were basically the same… until my first “slab” looked like I’d cut it with a hungry spoon.
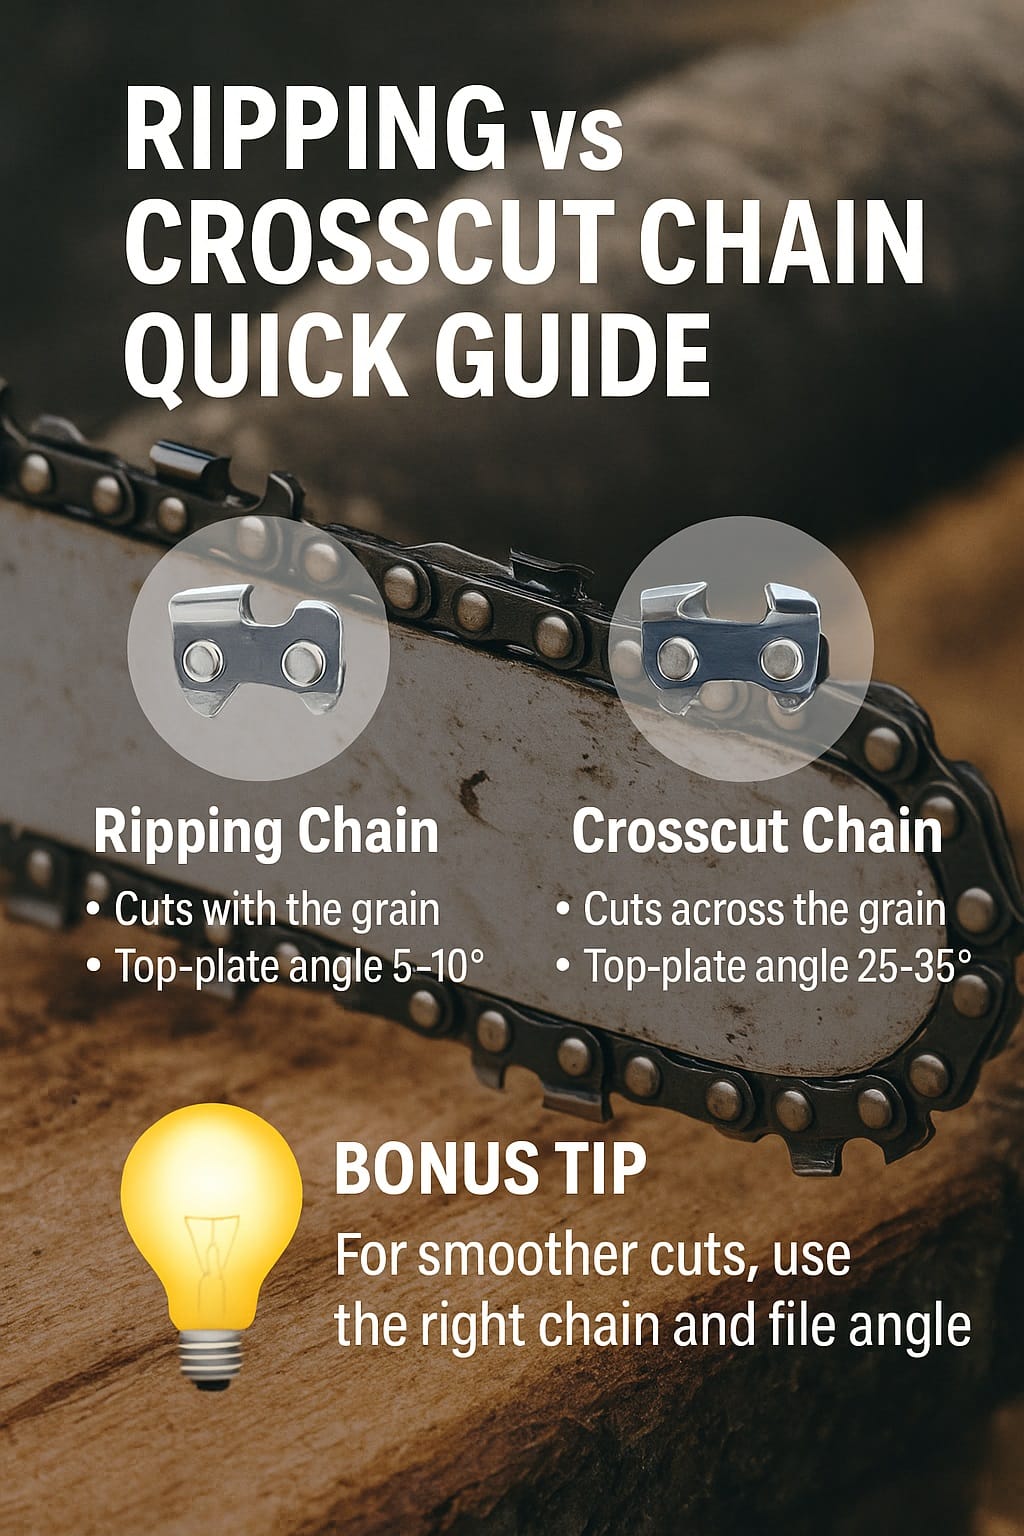
A ripping chain is built for cutting with the grain, while a crosscut chain is built for cutting across the grain faster. The biggest difference is the top-plate filing angle, which changes chip shape, cutting feel, and surface finish. Pick the right chain and your saw works with you, not against you.
Ripping chain vs crosscut chain quick data (fast phone check)
| Key difference | Typical quick answer |
|---|---|
| Cutting direction | With grain (ripping) vs across grain (crosscut) |
| Top-plate angle | ~5–10° vs ~25–35° (30° common) |
| Cutting speed | Slower vs faster |
| Surface finish | Smoother slabs vs rougher when ripping |
| Best use | Milling/slabbing vs bucking/limbing/firewood |
Source: oregonproducts.com
🔍 My quick answer first (how I pick ripping vs crosscut)
My “one-question” rule
If I’m cutting along the log like I’m unzipping it, I treat it as ripping. If I’m cutting the log into rounds like slicing bread, it’s crosscut. That one question saved me so much time. Before that, I’d just push harder… which is basically the dumbest sharpening strategy ever.
My “feel test” when I’m unsure
When I’m ripping with a normal crosscut chain, I feel extra vibration, extra heat, and the saw wants to wander. The chips get stringy and messy. With a rip-friendly setup, the saw feels calmer and more steady. It’s slower, sure—but it’s a smooth, controlled slow, not a struggling slow.
My simple “buy vs file” decision
If I’m doing one quick slab, I’ll often re-file what I have and accept “good enough.” If I’m doing repeated milling cuts, I want a proper ripping chain or a dedicated rip grind. Milling is long cuts, lots of heat, and lots of chances to wreck sharpness if I’m stubborn.
Riley Chen, Licensed Cabinetmaker (NZ), would say a slower cut that needs less sanding is “faster overall,” which clashes with my old “speed is everything” mindset.
🪵 My ripping chain explained in plain English
My definition of “ripping”
Ripping means cutting with the grain, where the wood fibres run the same direction you’re traveling. This is why the cut can feel like it drags. The chain isn’t chopping fibres across—it’s peeling and shaving along them. The first time I tried it with a crosscut chain, the saw acted like I’d offended it personally.
My real-world ripping jobs
I use ripping setups for chainsaw milling, slabbing, and making flat faces on logs. If I’m turning a fallen tree into bench slabs or rough planks, ripping is the whole point. It’s not just a “different chain.” It’s a different goal: straighter, smoother, and more predictable across a long cut.
My expectations (so I don’t get angry at physics)
Ripping is usually slower. That’s normal. What I want is steadiness and a nicer surface. I also expect more heat and more oil demand because the chain is in the cut longer. If I try to rush it, I get a wavy cut, a tired back, and a chain that goes blunt early.
Dr. Meera Patel, PE (Mechanical Engineer), would tell me “heat management is the real boss,” which is funny because I used to blame the chain for everything.
⚡ My crosscut chain explained (why it’s the everyday default)
My definition of “crosscut”
Crosscut means cutting across the grain—bucking rounds, trimming limbs, cutting firewood, and most normal yard jobs. This is the chain most people run because most people aren’t milling slabs every weekend. Crosscut geometry is built to bite and clear chips fast, so the job finishes sooner and the saw feels lively.
My “factory chain” reality
Most standard chains are crosscut-friendly out of the box. That’s why so many filing guides, marks, and sharpening angles point you toward those 25–35° ranges. When I first started, I didn’t even know there were different purposes. I thought I was “bad at chainsaws,” when really I was using the wrong setup.
My moments where crosscut wins easily
If the job is mostly rounds and limbs, crosscut is unbeatable for speed and efficiency. It also tends to feel more forgiving in normal cutting positions because it’s designed for that bite-across-fibres action. When I used a rip setup on firewood, it worked… but it felt like jogging in gumboots.
Casey Morgan, ISA Certified Arborist, would argue “clean, fast cuts reduce fatigue and mistakes,” which pushes back on my obsession with ultra-smooth finishes.
📐 My cutter geometry checklist (the angles that change everything)
My top-plate angle shortcut
This is the big one. For ripping, I aim more like 5–10°. For crosscut, I’m usually around 25–35° (30° is common). When I kept ripping with a 30° setup, it cut fast at first, then overheated, got grabby, and left a rough finish that made sanding feel like punishment.
My side-plate and “hook” reality
The side plate shape affects how aggressive the tooth feels. Too much “hook” can feel fast but jerky, especially in hard wood. I’ve learned to prefer predictable over wild. A chain that pulls itself forward is fun… until it pulls itself forward at the worst moment and scares the soul out of me.
My depth gauge rule (rakers matter more than I expected)
If rakers are too high, the chain feels dull even if the cutters are sharp. If rakers are too low, the saw chatters, grabs, and vibrates like a washing machine on a brick. For milling, I’m extra careful because long cuts amplify every tiny setup mistake.
Jordan Lim, Licensed Electrician (EWRB NZ), would say “small resistance compounds into big heat,” which sounds like wiring advice but fits ripping perfectly.
🧾 My “choose the right chain” decision checklist
My milling/slabbing choice
If I’m milling, I want a rip-friendly chain or a rip filing angle, plus patience and oil. The win is a smoother slab and less wandering. I also plan my cuts so I’m not forcing the saw. I’ve learned the hard way: forcing the saw doesn’t make it faster—it just makes it blunt.
My firewood/cleanup choice
If I’m cutting rounds, trimming, or doing storm clean-up, crosscut is my default. It clears chips well and finishes jobs quicker. For most homeowners, crosscut covers 95% of tasks. If I only owned one chain and didn’t mill, I’d keep it crosscut and just get good at sharpening.
My “power and bar length” reality check
Long bars and hard wood demand more from the saw. A ripping setup can reduce aggression, which can help control and smoothness, but it also needs torque and good oiling. If the saw is underpowered, I keep cuts realistic and let the chain do its job without bullying it.
Noah Hughes, Licensed Builder (LBP NZ), would say “use the right tool, not more force,” which is painfully accurate for my early chainsaw years.
🔧 My setup checklist before I blame the chain
My chain-to-bar match checks
I check pitch, gauge, and drive link count. If the chain doesn’t match the bar, everything gets weird fast—poor oiling, sloppy tracking, and heat. I also watch for bar rail wear. A worn bar can make a “perfectly sharpened” chain cut crooked, and that’s a frustrating rabbit hole.
My tension and oil routine
I tension the chain so it’s snug but still moves freely, and I re-check after warm-up. For ripping and long cuts, I’m picky about oil. If I’m milling, I take breaks, keep the groove clean, and watch for dry dust instead of healthy chips—dry dust is a warning sign.
My sharpening consistency rule
I don’t chase perfection; I chase consistency. Same file size, same guide (if I’m using one), same number of strokes per tooth, and I keep cutters even. When I sharpen “by vibes,” I end up with uneven teeth, a wandering cut, and a strong desire to blame everyone except me.
Lina Torres, Registered Physiotherapist, would remind me “bad posture plus force equals injury,” which is why I now set up the saw so I’m not wrestling it.
🪚 My real cut results (speed, finish, effort, and fuel)
My “chip truth” lesson
Crosscut chains usually throw chunkier chips when they’re sharp and set right. Ripping setups can throw longer, stringier chips, especially in softwood. When I see fine dust, I stop and fix something—sharpness, rakers, or oil—because continuing is like driving on a flat tyre and hoping it becomes a feature.
My finish expectations (so I don’t overpromise)
A chainsaw-milled slab is still a rough surface compared to a planer. But a rip-friendly setup absolutely improves the look and reduces the deep tear-out that makes sanding miserable. When I used crosscut angles for slabs, I got a rougher finish that ate time later. The cut ended sooner, but the job didn’t.
My effort and fatigue comparison
Wrong chain for the job feels like pushing a shopping trolley with a stuck wheel. The saw resists, my arms tire, and my focus drops. Right chain feels calmer. I still respect it, but I’m not fighting it. Less fighting means better control, and better control is basically the hidden safety feature.
Dr. Ethan Brooks, CSP (Certified Safety Professional), would say “fatigue is a hazard,” which is annoying… because it means my ego doesn’t get to vote.
🛡️ My safety notes (kickback and milling-specific risks)
My one-minute kickback reminder
Kickback happens when the upper tip of the bar contacts wood and the chain grabs. Any chain can kick back. The best defence is sharp chain, correct technique, stable stance, and avoiding that danger zone. I treat every cut like the saw can surprise me, because it absolutely can.
My milling hazards people forget
Milling is long cuts, lots of heat, and awkward body positions. That’s a perfect mix for fatigue and sloppy moves. I also treat dust seriously—especially if the wood is dry. I pace myself, take breaks, and I don’t do “one last cut” when I’m tired, because that’s when mistakes breed.
My minimum PPE list
Eye and ear protection, gloves, proper footwear, and leg protection are my basics. If I’m doing bigger work, I add a helmet setup and keep the work area clear. I also keep a simple rule: if I wouldn’t feel safe with someone watching, I shouldn’t be doing it alone.
Hannah Reed, RN (Registered Nurse), would say “most injuries happen when people rush,” which contradicts my old habit of trying to finish before lunch.
📊 My customer case study (one log, two setups, simple results)
My quick story
A customer had a fallen backyard log and wanted two small slabs for a simple garden bench. We tried one slab using a standard crosscut-style sharpening angle first. It cut quicker, but the surface looked rougher and needed more cleanup. Then I re-filed toward a rip-friendly angle and the cut slowed down—but tracked straighter.
My “what changed” takeaway
The bigger change wasn’t magic—it was control. The rip-friendly setup didn’t feel like it wanted to jump ahead. The customer cared more about sanding time than bragging rights on cut speed. That surprised me, because I used to measure everything by how fast the saw chewed.
| Case-study metric | Result |
|---|---|
| Wood + goal | Softwood log, 2 small slabs for a bench |
| Setup A | Crosscut-style angle (~30°) |
| Setup B | Rip-style angle (~10°) |
| Cut feel | A: faster bite, rougher finish; B: steadier, smoother |
| Outcome | Customer chose smoother slab, less sanding time |
Marco Silva, Certified Project Manager (PMP), would say “optimize the whole workflow,” which is a fancy way of saying my sanding time matters too.
❓ My ripping chain vs crosscut chain FAQs
Can I use a crosscut chain for ripping?
Yes, I can, and I have. It works, especially for short rips. But it usually runs hotter, feels rougher, and can wander more in long cuts. If I’m milling regularly, I don’t keep fighting physics. I either re-file toward a rip angle or run a proper ripping chain.
Can I “convert” my chain by filing?
In many cases, yes—by changing the top-plate angle and keeping teeth even. The catch is consistency. If I convert half the teeth “close enough,” it cuts crooked and I waste time. When I do it, I commit: same angle, same strokes, and I check rakers so the chain feeds smoothly.
Do ripping chains reduce kickback?
Not automatically. Kickback is about contact at the bar tip, chain sharpness, technique, and control. A less aggressive geometry may feel calmer, but I never treat it like a safety device. I still avoid the kickback zone, keep the chain sharp, and keep my body position stable and sensible.
Why does my saw wander in a long rip cut?
Usually it’s uneven cutter lengths, uneven sharpening angles, mismatched rakers, bar wear, or poor technique (twisting the saw mid-cut). Long cuts expose tiny issues. When I see wandering, I stop and check symmetry. If one side is sharper or lower, it will pull that direction like a shopping trolley.
Should I change depth gauges for ripping?
Sometimes. Rakers control how much wood each tooth bites. For ripping, I aim for smooth feed and control, not maximum bite. If I go too low, the saw chatters and grabs. If I go too high, it feels dull. I adjust carefully and in small steps, because rakers are easy to overdo.
What’s my easiest “one chain” recommendation for beginners?
If someone isn’t milling often, I tell them to stick with a standard crosscut chain, sharpen it well, and learn safe technique. If they occasionally want a slab, they can try a mild re-file toward a lower angle or accept that the finish won’t be pretty. Skills beat hacks over time.
Sophia Nguyen, JD (Barrister & Solicitor), would say “a small shortcut can increase risk,” which is why I don’t recommend aggressive raker drops to beginners.
✅ My takeaways (my 30-second cheat sheet)
If I’m bucking firewood or limbing, I run a crosscut chain because it’s faster and made for it. If I’m milling slabs or ripping with the grain, I want a ripping chain or a rip-friendly filing angle because it tracks steadier and leaves a nicer surface. My best upgrade isn’t a fancy trick—it’s consistent sharpening, correct rakers, and enough oil.
Gareth Owens, Chartered Accountant (CA), would say “time saved later beats time saved now,” which is exactly why I stopped treating sanding like free labour.