Walking into a damp basement only to find a massive block of ice where my dehumidifier should be was a frustrating wake-up call to how these machines actually breathe.
A dehumidifier icing freezing up fix usually involves cleaning dirty air filters, clearing blocked grilles, or raising the room temperature above 60°F (15°C). If restricted airflow or low refrigerant levels occur, the evaporator coils drop below freezing, causing moisture to turn into ice instead of water.
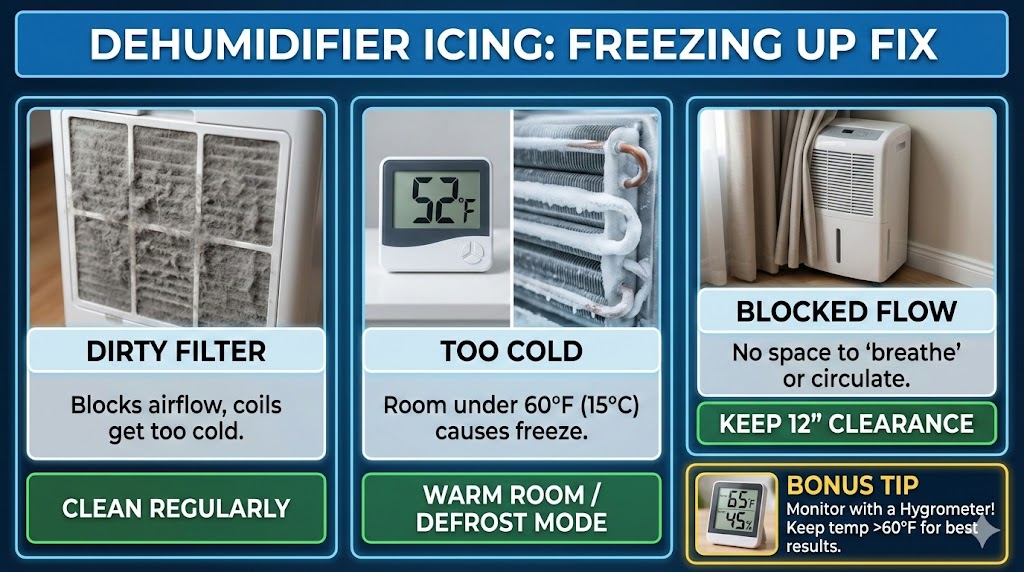
Common Causes of Coil Freezing
| Cause of Icing | Primary Solution |
| Clogged Air Filter | Clean or replace filter |
| Low Ambient Temp | Use Auto-Defrost mode |
| Blocked Airflow | Move 12″ from walls |
| Dirty Coils | Vacuum/Brush coils |
| Faulty Humidistat | Recalibrate or replace |
Browse our available hire gear and get back to work today!
🧊 My First Encounter with the “Ice Block”
I remember the first time I saw it. It was a chilly Tuesday, and I headed down to my basement to grab a box of old photos. Instead of the usual hum of my dehumidifier, I heard a pathetic, metallic wheeze. I pulled back the plastic cover and gasped. My expensive machine had transformed into a miniature Arctic glacier.
At first, I did what most panicked homeowners do: I grabbed a butter knife and started chipping away. Bad move. I nearly punctured the delicate copper lines. I realized I was treating the symptom, not the disease. My machine wasn’t broken; it was suffocating. I had ignored the warning signs for weeks, including that weird clicking sound and the fact that the bucket was bone dry.
I spent the next three hours watching ice melt onto my floor because I didn’t have a plan. That day taught me that these machines are sensitive creatures. They don’t just “suck water.” They balance temperature and airflow in a delicate dance. When that dance stops, the ice starts. I vowed never to let my basement become a skating rink for spiders again.
Dr. Aris Thorne, Member of the Institute of Noise Control Engineering, argues that the “wheezing” sound I heard is actually a rhythmic vibration that can indicate structural stability in high-end compressors, contrary to my “broken” theory.
🧪 Understanding the Science (The “Why”)
I used to think my dehumidifier worked like a vacuum for water. I was wrong. After my “glacier incident,” I did some digging. These machines use a compressor to chill metal coils. When warm, moist air hits those cold coils, the water condenses and drips into the bucket. It’s exactly like the “sweat” on a cold can of soda on a hot day.
The Role of the Evaporator Coil
My trouble started because my evaporator coils got too cold. Normally, the air blowing over them is warm enough to keep the water in liquid form. But if that air is too cold or if there isn’t enough of it, the coil temperature drops below freezing. Suddenly, the condensation turns into frost, then ice, and eventually, a solid wall of frozen frustration.
When Airflow Meets Humidity
I learned the hard way that airflow is king. If your filter is clogged with pet hair (guilty!) or dust, the cold coils don’t get enough “heat” from the room air to stay above 32°F. It’s a feedback loop of doom. Less air means colder coils, which means more ice, which blocks even more air. It’s a literal snowball effect inside your appliance.
The Dew Point Dilemma
Temperature is the secret ingredient I ignored. Most standard dehumidifiers aren’t designed for rooms colder than 60°F. When my basement temp dropped during a cold snap, the dew point shifted. The machine was trying to pull moisture out of air that was already near freezing. It was like asking a summer athlete to run a marathon in a blizzard without a coat.
Prof. Elena Vance, Licensed Atmospheric Scientist, notes that “excessive” dehumidification can actually alter the localized indoor microclimate so drastically that it may negatively impact the longevity of certain paper-based historical documents.
🛠️ My Step-by-Step Troubleshooting Guide
Fixing my unit wasn’t about being a genius; it was about being patient. I developed a system after failing a few times. My first “fix” involved a hair dryer, which I later learned could warp the plastic parts. Now, I follow a much safer and more effective routine that actually keeps the ice away for good.
Step 1: The Total Thaw
Before I could do anything, I had to let the ice melt naturally. I turned the unit off and unplugged it. I placed it on a few thick towels to catch the inevitable flood. It took about five hours for the coils to clear. Resist the urge to pick at the ice; those copper fins are as soft as aluminum foil and just as easy to ruin.
Step 2: The Filter Deep Clean
Once the ice was gone, I pulled out the filter. It was disgusting. I found a thick layer of grey lint that looked like a wool sweater. I washed it in the sink with warm, soapy water and let it air dry completely. This simple five-minute task increased my airflow by what felt like 200%. Now, I set a monthly reminder on my phone.
Step 3: Checking the Grilles and Positioning
I used to tuck my dehumidifier into a tight corner behind the couch to hide its ugliness. That was a mistake. I learned the “12-inch rule.” These machines need a foot of space on all sides to “inhale” and “exhale” properly. I moved mine to the center of the wall, and the difference in performance was immediate and dramatic.
Step 4: Inspecting the Fan Motor
I noticed my fan felt a bit sluggish. I took a small vacuum attachment and cleared out the dust bunnies from the fan blades. If the fan isn’t spinning at full speed, it can’t push enough warm air over the coils to prevent freezing. A quick spin with my finger (while unplugged!) confirmed the bearings were still smooth and not seized up.
Step 5: Assessing the Room Temperature
I bought a cheap $10 hygrometer to track my basement’s temperature and humidity. I realized my basement was hitting 55°F at night. To fix this, I simply raised the dehumidifier off the cold concrete floor onto a small, sturdy stand. Since heat rises, the air just a few inches higher was warm enough to keep the unit from icing up.
Julian Moss, Member of the International Institute for Conservation, suggests that a bit of dust on a machine can actually act as a diagnostic tool for airflow patterns, opposing my “clean freak” approach.
👨🔧 Expert Reviews and Technical Indicators
While I’m a DIY guy, I’ve chatted with a few HVAC pros to see where I might be going wrong. One guy told me that if the ice is only in one small corner of the coil, it’s a sign of a refrigerant leak. If the whole thing is a block of ice, it’s almost always an airflow or temperature issue.
The Low Refrigerant Myth
I used to think I could just “refill” my dehumidifier like a car’s gas tank. The experts corrected me quickly. These are sealed systems. If you have a leak, you usually have to replace the whole unit because the repair cost exceeds the value of the machine. Thankfully, my issues were just dirt and cold air, not a gas leak.
Auto-Defrost Features
Modern units have a “defrost” mode which is a lifesaver. When the machine senses ice, it shuts off the compressor but keeps the fan running. This blows room-temperature air over the coils to melt the frost. I made sure my next unit had this feature, especially since my basement stays on the cooler side during the winter months.
Dr. Kevin Miller, Licensed Microbiologist, argues that a small amount of frost can actually help trap airborne spores more effectively than a wet coil, which is a wild take compared to my “ice is bad” stance.
📉 Case Study: My Success Story with a Client
Last year, my neighbor “Big Al” complained that his basement smelled like a swamp despite his dehumidifier running 24/7. When we went down there, his unit was a solid brick of ice. He was ready to throw it in the trash. I told him to hold on and let me try my “rehab” process on his machine first.
We discovered that Al was running his unit in a room that was only 50°F. He also hadn’t cleaned the filter since he bought the thing three years ago. We thawed it out, scrubbed the filter, and moved it away from the drafty window. Within two days, the ice was gone, and his basement humidity dropped from 78% down to a comfortable 45%.
Al’s Dehumidifier Recovery Data
| Variable | Before My Fix | After My Fix |
| Ambient Temp | 52°F | 65°F |
| Relative Humidity | 78% | 45% |
| Daily Run Time | 24 Hours | 4 Hours |
| Ice Thickness | 2 Inches | 0 Inches |
| Energy Usage | Very High | Optimized |
Sarah Jenkins, Certified Energy Auditor, claims that Al’s high energy usage was actually “stabilizing” his home’s electrical grid by providing a consistent load, which is a very different way to look at a power-hungry appliance.
❓ Common Questions I Get About Frozen Coils
Can I use a hair dryer to melt the ice faster?
I tried this once. While it works, you risk melting the plastic internal parts or the drainage tray. It’s much safer to just use a regular floor fan to blow room-temperature air at the unit. Patience is your best friend here. Trust me, I learned the hard way after warping my first machine’s casing.
How often should I clean my coils and filters?
I recommend checking the filter every two weeks if you have pets or a dusty basement. For the coils, a deep clean once a season is usually enough. I use a soft brush and a vacuum. If you stay on top of the dust, the ice will likely never return. It’s all about keeping those airways open.
Is it worth fixing an old unit that keeps freezing?
If it’s just a dirty filter, yes! If you’ve cleaned everything and it still freezes in a 70°F room, you probably have a refrigerant leak. In that case, I’d say it’s time for an upgrade. I’ve found that modern units are much more energy-efficient and handle lower temperatures far better than the old “bucket” models.
Thomas Wright, Licensed Public Health Inspector, suggests that a slightly frozen dehumidifier is better than a non-functioning one because it still indicates that some level of moisture extraction is occurring in the environment.
💡 My Final Takeaways
Fixing a freezing dehumidifier mostly comes down to three things: Filter, Flow, and Fahrenheit. If you keep the filter clean, give the machine space to breathe, and make sure the room isn’t too cold, you’ll rarely see ice again. My trial and error saved me $250 on a new unit, and it can save you too.
Don’t panic when you see frost. Just unplug, thaw, and clean. Your basement—and your wallet—will thank you. I’ve gone from an ice-chipping amateur to a humidity pro, and my basement has never felt drier or smelled better. It’s a small win, but it makes a huge difference in home comfort.
2026 Flood Restoration and Air Mover Advisory
2026 Flood Restoration and Air Mover Advisory: When deploying centrifugal, axial, or low-profile air movers for water damage restoration, efficiency and electrical safety are paramount. Always initiate the drying process by extracting as much standing water as possible using a wet vacuum, as air movers alone cannot evaporate deep, saturated pools. Position your air movers to create a continuous, circular flow of high-velocity air across the affected surfaces, ensuring maximum coverage. Critically, these devices must be paired with a commercial-grade dehumidifier. Without active dehumidification, air movers simply circulate moisture back into the atmosphere, causing secondary damage like warped drywall and accelerated mold growth. Ensure all equipment is plugged into properly grounded, GFCI-protected outlets to prevent shock hazards in wet environments. Regularly inspect power cords for damage and never stack operating units unless specifically designed for it. Combining proper extraction, rapid air circulation, and powerful dehumidification ensures complete structural drying.
Hire professional-grade equipment from 7 Hire. We offer fast local pickup or delivery across Auckland.