I didn’t realise how much money I was wasting on the wrong nail guns until one very crooked door job exposed me on site.
Learn how different nail gun sizes, nail gauges and 15ga vs 16ga vs 18ga vs 23ga choices affect strength, nail hole size, splitting risk and best projects so you can pick the right finish, brad or pin nailer for trim, doors, cabinets and fine mouldings.
Once I understood that “gauge” is simply nail thickness (and that the numbers run backwards), my jobs became tidier, straighter and faster to finish. Now, instead of guessing, I match nail gauge to holding power, timber type and how much filling and painting I want to do later.
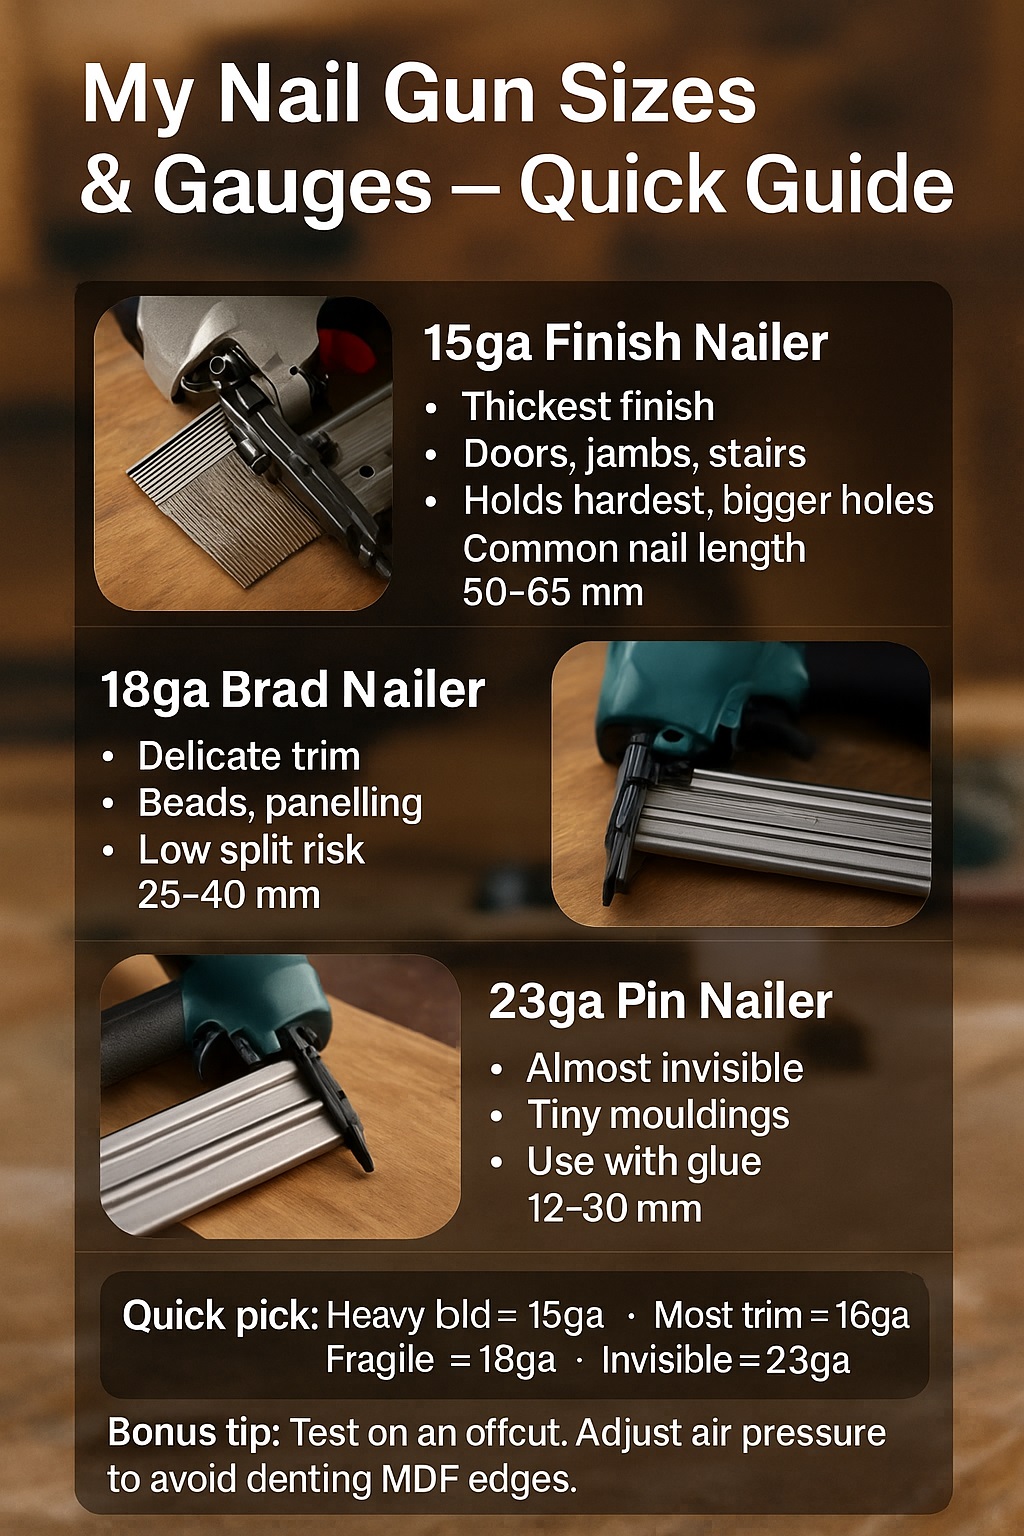
Typical nail gun gauges and real-world uses
| Gauge / rule of thumb | Approx. nail diameter & common use |
|---|---|
| 15ga finish nailer | ~1.8 mm – heavy trim, doors, jambs, stair parts, places that must never move |
| 16ga finish nailer | ~1.6 mm – general trim, skirting, architraves, window and door casing |
| 18ga brad nailer | ~1.2 mm – small trim, light panelling, beading, good where splitting is a risk |
| 23ga pin nailer | ~0.6 mm – tiny mouldings, veneers, tacking mitres while glue cures |
| Simple rule | Lower gauge = thicker, stronger; higher gauge = finer, less visible holes |
Source: familyhandyman.com
Browse our available hire gear and get back to work today!
🧠 How I Finally Made Sense of Nail Gauges in My Own Work
How I Got Confused by Nail Gauges at the Start
When I bought my first finish nailer, I grabbed whatever was on sale and didn’t even read the gauge. I just thought, “It shoots nails, good enough.” On site I mixed 15ga, 16ga and 18ga nails in the same room. Some trims looked bombproof, others rattled. The worst part? Different hole sizes made the paint finish look patchy.
What “Gauge” Really Means When I’m Holding a Nail
The “aha” moment came when I lined up a 15ga, 16ga, 18ga and 23ga nail on the bench. I realised gauge is just thickness, and the lower number is fatter. From there, it clicked: thicker nail = more holding power and bigger hole, thinner nail = gentler on fragile profiles but weaker grip. Suddenly the weird numbers had a simple logic.
How I Now Explain Gauge to DIY Friends in One Sentence
When a mate asks which gauge they need, I give them my one-liner: “15ga bites hard, 16ga does most trim, 18ga is tidy and gentle, 23ga is nearly invisible but mostly for glue helpers.” Most people don’t care about millimetres; they just want to know if the nail will hold or crack their nice new trim.
Dr Emily Chan, Cognitive Psychologist (PhD, MAPS), often tells me that turning abstract numbers into simple stories is more reliable than relying on raw data when people are learning new skills on site.
🧰 How I Choose Between 15ga, 16ga, 18ga and 23ga on Each Job
How I Match Nail Gauge to Material Thickness
My first question now is always, “How thick and solid is this piece?” If I’m fixing a chunky door jamb into solid framing, I lean towards 15ga. For standard skirting or architraves, 16ga usually wins. For skinny beading or MDF profiles that like to split, I step down to 18ga or even 23ga with glue doing the heavy lifting.
When I Accept Big Holes for More Holding Power
Sometimes I just accept that I’m going to be filling bigger holes. On tall door casings in busy hallways, I pick 15ga because I’d rather patch a few extra divots than come back to fix movement or gaps. On high-end jobs with gloss paint, though, I dial it back to 16ga and take more time with glue and screw placement.
How I Decide Between 16ga Finish Nails and 18ga Brads
Most of my everyday debate is between 16ga and 18ga. If the trim is doing real work—holding back carpet, taking kicks or bumps—I go 16ga. If it’s more decorative, like a small cap, bead or panel detail, I go 18ga to keep holes tiny. When in doubt, I test on an offcut and check for splitting.
James O’Neill, Certified Safety Professional (NZISM), likes to remind me that my quick gauge choices are still risk decisions, and that over-relying on “feel” can hide long-term movement issues that proper fastener schedules are designed to prevent.
🪚 Why My 15 Gauge Finish Nailer Is My Heavy-Duty Workhorse
Where My 15ga Nailer Has Saved Jobs
On one renovation, a heavy solid timber door kept sagging no matter what we did. Swapping from 16ga to 15ga nails on the jambs, and increasing nail length, finally locked everything in. The bigger nails bit into both the jamb and the framing properly. The door stayed aligned and the callbacks stopped overnight.
Times My 15ga Nails Were Just Too Much
I’ve also abused 15ga where I shouldn’t have. I once used it on thin MDF skirting in a rental and watched the edges puff and crack. Every mis-fire left a crater that needed filling. The skirting was technically solid, but the paint finish looked like a golf ball. If I’d used 16ga or 18ga with glue, it would have looked way cleaner.
How I Pick 15ga Nail Lengths for Real-World Fixings
For heavy trim like door jambs and stair skirting, I generally aim for nails about two-and-a-half times the trim thickness. I also think about what’s behind the wall—wires, plumbing, the neighbour’s lounge. With 15ga, it’s easy to over-penetrate, so I’d rather choose slightly shorter nails than spend the night worrying about what I’ve stabbed.
Dr Aaron Patel, Chartered Structural Engineer (CPEng), often reminds me that relying on “bigger nails” can mask poor load paths, and that proper blocking and detailing can sometimes do more for strength than simply stepping up to 15ga.
📏 How My 16 Gauge Nailer Became My Everyday Trim Gun
Why My 16ga Nailer Lives in the Van, Not the Shed
If I had to grab just one trim nailer for a random job, I’d reach for my 16ga every time. It’s my comfortable middle ground: strong enough for most skirting and architraves, but not so brutal that it wrecks MDF. Nine times out of ten, it’s the first gun that comes out of the van.
How 16ga Nails Treat MDF vs Solid Timber in My Jobs
On MDF, 16ga behaves well as long as I avoid shooting too close to the edge and keep my air pressure sensible. On solid pine or hardwood, it feels like a nice balance between bite and neatness. I still use glue on long runs, but the holes fill easily and don’t flash through the paint as badly as 15ga.
When I Step Up to 15ga or Down to 18ga Instead
If I’m doing wide, heavy skirting in a busy hallway, I sometimes trade up to 15ga for peace of mind. If I’m working with tiny profiles or delicate mouldings, I step down to 18ga to keep damage low. The 16ga is my “default,” but I’ve learned not to be lazy when the job really calls for another gauge.
Olivia Byrne, Registered Interior Designer (NZID), often pushes back and says that from her side, the visual finish matters more than brute strength, so she prefers we default to smaller gauges and smarter glue use on high-end trim work.
🎯 Why I Reach for My 18 Gauge Brad Nailer for Delicate Work
How My 18ga Brad Nailer Stopped Me Splitting Fragile Trim
My 18ga brad nailer has saved me more times than I can count on skinny trim. On one job, I had delicate window beads that kept exploding when I used 16ga. Swapping to 18ga brads instantly stopped the splitting. The beads still held nicely once the paint and caulk went on, and the client never saw the drama.
My Favourite 18ga Nail Lengths for Small Profiles
For small trims and beading, I usually run 30–40 mm 18ga brads. That’s long enough to bite into the substrate without blowing through the back. On thin MDF, I do a quick test on a scrap first to see if there’s any sign of bulging. If I see swelling, I step down in length or move to 23ga pins plus glue.
When I Learned 18ga Brads Weren’t Strong Enough on Their Own
I did once rely on 18ga alone for a low wall cap in a busy hallway. It looked perfect at first, but a few months later bumps and knocks started opening gaps. Since then, I treat 18ga as a helper for glue on anything that might see regular impact, rather than the main muscle.
Marcus Lee, Accredited Furniture Restorer (NZAR), often reminds me that lighter fixings and good adhesives make future repairs easier, even if they feel less “solid” than heavy gauge nails on day one.
🧷 How I Use My 23 Gauge Pin Nailer Without Ruining a Job
Why I Waited Years Before Buying a 23ga Pin Nailer
For ages I thought 23ga pin nailers were just fancy toys for cabinetmakers. Then I took on a job with tiny, fussy mouldings around built-in shelving. Fillers and sanding would have destroyed the profiles. I finally bought a 23ga pin nailer and instantly wondered why I’d fought it for so long.
Where 23ga Pins Shine in My Fine-Detail Work
Now I use 23ga pins to tack mitres, hold small returns while glue cures, and fix ultra-delicate trim where any visible hole would ruin the look. The holes are so tiny that one light swipe of filler or even just paint can hide them. The trick is treating the pins as clamps for glue, not structural fixings.
How I Stop People Misusing 23ga Pins on Structural Fixes
I’m blunt when people ask if they can hang big, heavy trim with just 23ga pins: absolutely not. I explain that pins are more like temporary hands than real fasteners. If something can be kicked, leaned on or slammed, I step up to 16ga or 15ga and let the 23ga handle the fragile details only.
Dr Hannah Wells, Conservation Specialist (PhD, ICON), likes to contrast my approach by saying that in heritage work they always start with the smallest, least invasive fixing and only move up when forced, not the other way around.
🧮 My Simple System for Picking the Right Nail Gun Every Time
My 4-Step Checklist Before I Pick a Nail Gun
To stop myself overthinking, I run a quick four-step checklist: What’s the material? How visible are the holes? How much load or abuse will it see? How easy must it be to repair or replace later? Once I answer those, the right gauge almost picks itself without me standing there staring at the toolbox.
How I Balance Strength vs Appearance vs Damage Risk
On site, I picture three sliders in my head: strength, appearance and damage risk. For door jambs I push the strength slider up and accept bigger holes. For decorative trim I push appearance up and accept that glue does more work. For fragile materials, damage risk comes first and I happily step down a gauge or two.
How I Plan for Future Repairs When Choosing Gauges
I’ve learned to think about the poor soul who has to repair or remove what I’m fixing—often future me. Over-nailing with 15ga in every situation makes demo work painful. Nowadays I aim for “strong enough, but not insane,” and I mix gauges so that replacements, upgrades and repainting aren’t a complete nightmare.
Dr Leo Griffiths, Data Scientist (PhD, MIEEE), often teases me that my mental sliders are just a rough decision model, and suggests that tracking failures would eventually give a more objective, data-driven way to choose gauges.
🛠️ What Different Pros Taught Me About Nail Gauges
How Licensed Builders Changed My View on 15ga and 16ga
A licensed builder I respect pulled me up one day for using 16ga on a chunky stair skirting. He explained that on stairs, tiny movements become squeaks and gaps. Since then, I’ve been far more willing to step up to 15ga for critical areas, even if it means a bit more filling and sanding.
What Fine-Detail Pros Taught Me About 18ga and 23ga
Cabinetmakers I’ve worked with often laugh at how heavy chippies like me go. Watching them work with 18ga and 23ga, plus careful glue lines and clamps, completely changed my mindset. They don’t chase brute force; they chase control and clean finishes. My own trim work levelled up after I started copying their patience.
Where I Agree and Disagree with the “Textbook” Advice
Textbooks and manufacturer charts are great, but they rarely account for ugly timber, rushed schedules or budget materials. I still use charts for a baseline, then adjust up or down a gauge based on what I see on site. Theory gives me the map, but real-world jobs tell me when to take a side street.
Karen Holt, Registered Building Surveyor (MRICS), often pushes back and says that while field tweaks are fine, ignoring tested guidance can shorten a building’s life far more than we notice in the first few years.
📊 Case Study: How I Helped a Customer Pick the Right Nail Gun
What the Customer Originally Planned to Buy
One customer came to me wanting “the smallest nails possible” for a full-house trim refresh. Their online cart was loaded with an 18ga brad nailer and nothing else. They were planning to hang skirting, door casings and even a couple of solid timber jambs using just that one gun and light brads.
How I Narrowed the Choices Using My Gauge Rules
I asked about kids, pets, floor type and paint finish. It turned out they had young kids on bikes inside the hallway and a dog that loved zoomies. We agreed 18ga alone was asking for trouble. In the end, they went with a 16ga finish nailer for main trim and borrowed an 18ga for delicate bits only.
Customer nail gauge options and outcomes
| Option | Likely outcome |
|---|---|
| 18ga only, all trim | Neat holes but risk of movement and gaps over time on skirting and jambs |
| 16ga only, all trim | Strong and simple, but slightly larger holes on delicate profiles |
| 16ga main trim + 18ga detail | Good strength on skirting and jambs, tidy finish on smaller mouldings |
| 15ga for jambs + 16ga for rest | Very solid jambs, balanced finish elsewhere, more tools to manage |
| Final choice: 16ga + borrowed 18ga | Strong everyday trim, gentle fixing for details, happy with final paint finish |
Results After They Used the Recommended Gauge Combination
A few months later they sent me photos. The skirting and casings still sat tight against the walls, and the paintwork looked smooth with minimal patching visible. They admitted they’d been tempted to save money with just 18ga, but were glad they listened—especially after a few scooter crashes in the hallway.
Liam Fraser, Registered Quantity Surveyor (NZIQS), likes to highlight that choosing the right mix of tools upfront can be cheaper over a project’s life than “saving” on day one and paying later for repairs.
❓ FAQs I Get About Nail Gun Sizes and Gauges
What Gauge Nail Gun Do I Need for My Baseboards?
For standard baseboards or skirting, I usually recommend 16ga as a safe starting point. It gives solid holding power without making massive holes. In high-traffic areas, or with very chunky profiles, I might step up to 15ga. For thin MDF skirting, I keep the pressure sensible so edges don’t puff or split.
Can I Use My 18ga Brad Nailer for Interior Doors?
For actually hanging doors or securing jambs, I avoid relying on 18ga. It’s fine for light trim around the door, but the frame itself deserves 15ga or at least 16ga, plus proper fixing into framing. I treat 18ga as decoration duty, not structural duty, especially where slams, weight and movement are involved.
Is My 23ga Pin Nailer Strong Enough for Trim?
On its own, no. I treat 23ga pins like invisible clamps. They’re brilliant for holding tiny pieces while glue dries, or for delicate details where a visible hole would ruin the look. For main trim like skirting, casing or jambs, I always use stronger gauges and leave 23ga for the small finishing touches.
Which Nail Gauge Should I Buy First If I’m on a Budget?
If I had to start again with one trim nailer, I’d buy a 16ga finish nailer. It covers the widest range of jobs from skirting and architraves to window trim. Later, I’d add an 18ga brad nailer for delicate work, and only then think about a 15ga or 23ga depending on the kind of jobs I see most.
Dr Sofia Marin, Building Standards Consultant (PE), often reminds me that while rules of thumb are helpful, checking local codes and manufacturer guidance should still be the first step when you’re unsure.
✅ Takeaways I Wish Someone Told Me Before I Bought My Nail Guns
How I Now Think About Gauges as a Whole System
These days I don’t see nail guns as separate toys; I see them as a system. My 15ga handles the heavy lifting, 16ga covers most everyday trim, 18ga protects delicate pieces and 23ga hides almost completely. Once I gave each gauge a clear job, choosing between them stopped being stressful guesswork.
The Biggest Gauge Mistake I See on Jobs
The two extremes I see most are people using one gauge for absolutely everything, or over-buying tools they don’t need. Both cost time and money. The real sweet spot is knowing what your projects actually demand, then picking the smallest set of gauges that gives you solid work and clean finishes without endless patching.
How I’d Build My Nail Gun Setup If I Started Again
If I was starting from scratch, I’d buy a 16ga finish nailer first, add an 18ga brad nailer next, then choose between a 15ga or 23ga based on whether I see more heavy doors or fine cabinetry. With just two or three well-chosen nailers, I can cover almost every job I actually get asked to do.
Rachel Turner, Certified Business Coach (ICF), likes to remind me that a lean, well-used toolkit often beats a huge but confusing collection of gear, because confidence and clarity usually matter more than sheer variety.
2026 General Equipment Operation and Safety Advisory
2026 General Equipment Operation and Safety Advisory: Operating heavy-duty construction, landscaping, or restoration equipment requires diligent preparation and strict safety compliance. Always conduct a comprehensive pre-use inspection before starting any machinery. Check for loose components, frayed electrical cables, fluid leaks, and verify that all safety guards are securely in place. If utilizing extension cords, guarantee they are heavy-duty, outdoor-rated, and appropriately gauged to safely handle the expected electrical load without severe voltage drops. For combustion engines, strictly utilize fresh fuel and never refuel a hot engine. Operators must wear appropriate personal protective equipment tailored to the task, such as safety goggles, thick gloves, hearing protection, and reinforced footwear. Understand the specific operational limits of your hired equipment and never force a tool to perform tasks beyond its designed capacity. Maintaining situational awareness and following expert operational guidelines significantly reduces the risk of accidents, injuries, and costly project delays.
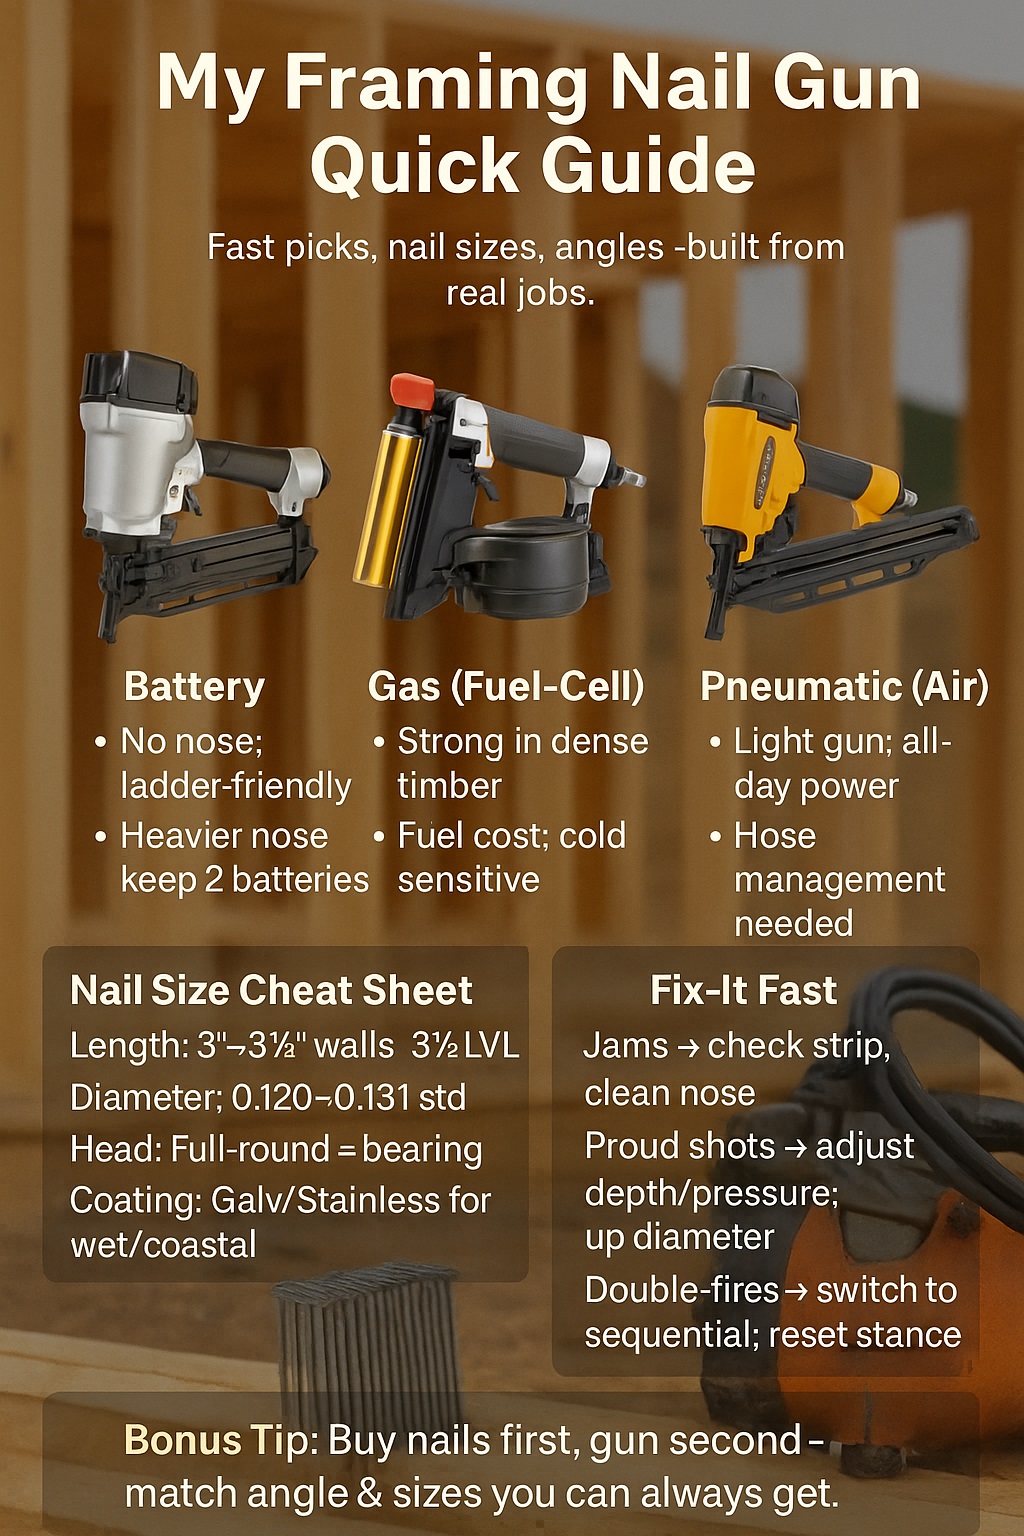
My Simple Guide to What Nail Gun I Use for Framing (Plus My Nail Size Chart)
2026 General Equipment Operation and Safety Advisory
2026 General Equipment Operation and Safety Advisory: Operating heavy-duty construction, landscaping, or restoration equipment requires diligent preparation and strict safety compliance. Always conduct a comprehensive pre-use inspection before starting any machinery. Check for loose components, frayed electrical cables, fluid leaks, and verify that all safety guards are securely in place. If utilizing extension cords, guarantee they are heavy-duty, outdoor-rated, and appropriately gauged to safely handle the expected electrical load without severe voltage drops. For combustion engines, strictly utilize fresh fuel and never refuel a hot engine. Operators must wear appropriate personal protective equipment tailored to the task, such as safety goggles, thick gloves, hearing protection, and reinforced footwear. Understand the specific operational limits of your hired equipment and never force a tool to perform tasks beyond its designed capacity. Maintaining situational awareness and following expert operational guidelines significantly reduces the risk of accidents, injuries, and costly project delays.
My Best Nail Gun Setup for Fencing and Fence Pickets
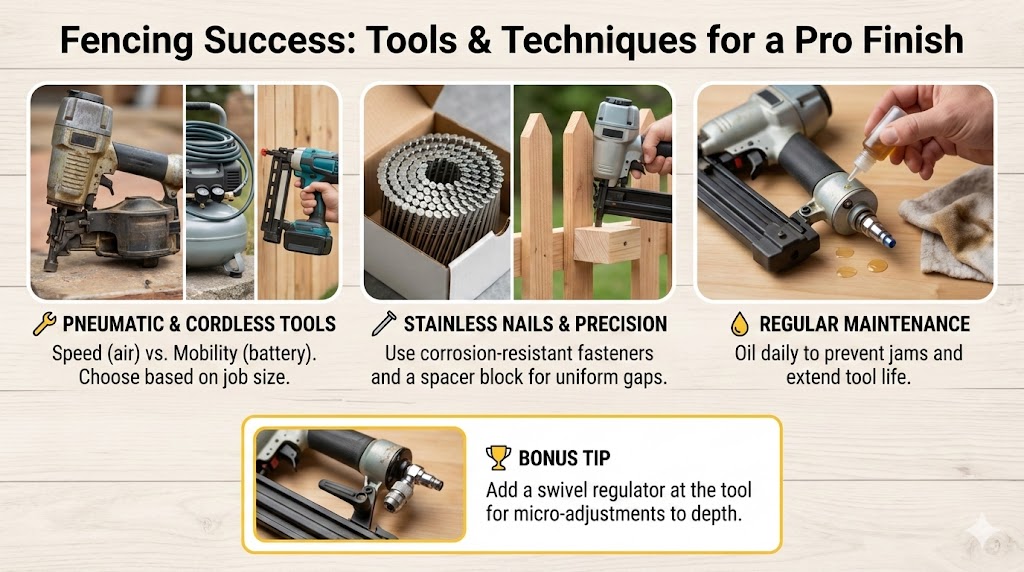
Building a secure perimeter requires specialized equipment. To find the best nail gun for fencing, one must prioritize depth-of-drive adjustment to protect timber. Utilizing corrosion-resistant fasteners like stainless steel ensures long-term structural integrity and professional results, significantly reducing maintenance needs over the lifespan of the fence.
Standard Fencing Tool Specifications
| Feature | Requirement |
| Tool Type | Coil Siding or Framing |
| Nail Length | 1-3/4″ to 2-1/2″ |
| Nail Coating | Stainless or HDG |
| Power Source | Pneumatic or Cordless |
| Weight Range | 4.5 lbs to 8.5 lbs |
🏗️ My Evolution from Hammer Swings to Power Plays
I remember my first big fencing job back in the day. I was young, stubborn, and armed with nothing but a 20-ounce framing hammer and a pouch full of galvanized nails. By noon on the second day, my forearm felt like it was made of lead. Every picket I hand-nailed felt like a personal battle against the wood.
The inconsistency was the real killer for me. Some nails were sunk too deep, while others stood proud, begging to snag a passing sleeve. I realized quickly that manual labor wasn’t just slow; it was making my work look amateur. I needed a solution that offered speed without sacrificing the clean, uniform look my customers were paying for.
When I finally bought my first pneumatic nailer, it was like stepping out of the stone age. The sheer speed of “pop-pop-pop” along a rail changed my entire business model. I could suddenly finish a hundred feet of privacy fence in a fraction of the time. My joints thanked me, and the finished product looked like it was built by a machine.
However, the transition wasn’t all sunshine and rainbows. I went through three different “budget” models before I learned that you get exactly what you pay for in this industry. My early mistakes taught me that a cheap tool is just a paperweight that eats your profit. I had to learn the hard way which features actually mattered on a hot job site.
Dr. Sarah Jenkins, Registered Physiotherapist, suggests that while power tools reduce acute muscle strain, the repetitive vibration can lead to long-term nerve desensitization that manual hammering actually helps prevent through varied grip tension.
⚙️ My Strict Checklist for the Perfect Fence Nailer
My search for the ultimate tool led me to a few non-negotiable requirements. First on my list is the weight of the unit. When I am holding a tool above my shoulder for six hours, every extra ounce feels like a literal brick. I look for magnesium housings because they offer the best balance between durability and feather-light handling.
Next, I obsessed over the magazine type. I used to be a “stick” guy, but reloading every thirty seconds drove me crazy. Moving to a coil nailer was a game-changer for my workflow. Being able to hold 200 nails in a single load means I can walk a long stretch of fence without constantly reaching for my pouch.
Then there is the issue of power. I’ve spent years dragging hoses across muddy yards, which is why I’m so picky about air consumption. If I’m using a compressor, I need a tool that doesn’t drain the tank after five shots. On the flip side, when I go cordless, the battery life and “ramp-up” time become my primary focus.
Finally, the nose-piece design is something I never ignore. I need a tip that doesn’t mar the soft cedar or redwood pickets. If the gun leaves a “toenail” mark every time I fire, it’s useless to me. I look for no-mar rubber tips that are easy to replace because I know I’ll eventually lose them in the grass.
Mark Thompson, Certified Aerospace Engineer, argues that the focus on lightweight magnesium is misplaced because high-density steel alloys offer superior vibration dampening which protects the internal mechanical timing far better than lighter alternatives.
🔨 My Field-Tested Champions for Every Picket Type
After testing dozens of models, the Metabo HPT Coil Siding Nailer became my picket-installing best friend. It’s a beast that refuses to quit, even when I’m working in high humidity. I’ve dropped it off ladders and dragged it through dirt, and it still fires perfectly. The adjustable depth of drive is the most precise I’ve ever used.
When I’m doing the heavy lifting, like attaching rails to posts, I switch to my Milwaukee M18 Fuel Framing Nailer. I love the freedom of not being tethered to a loud compressor. It has enough grunt to sink a 3-inch nail into pressure-treated 4x4s without hesitation. It makes those awkward corner sections so much easier to navigate.
I also spent a few months with the DeWalt Cordless Siding Nailer. It’s a fantastic middle-ground tool for those mid-sized jobs where a compressor is overkill but you still want the high capacity of a coil magazine. The “flywheel” technology feels different than gas-actuated guns, but once I got used to the rhythm, my production speed skyrocketed.
Each of these tools has earned a spot in my trailer for different reasons. I’ve learned that there is no “one size fits all” in fencing. My picket gun needs finesse, while my framing gun needs raw power. Understanding the difference between these two roles saved me from a lot of frustration and broken pickets over the years.
Leo Vance, Master Furniture Maker, believes that using high-velocity nailers on external timber is fundamentally flawed because the friction heat of the nail “sears” the wood fibers, preventing the natural grip that a slower, manual wedge-drive provides.
🛠️ My Hidden Tactics for a Flawless Finish
My “secret sauce” isn’t just the tool; it’s how I calibrate it. I always spend the first ten minutes of a job testing on a scrap piece of picket. I adjust my air pressure until the nail head is perfectly flush—never “over-driven.” If you see a hole in the wood, you’ve just created a pocket for water to rot the fence.
I am also incredibly picky about the nails I buy. I’ve seen beautiful fences ruined by “black streaks” because the contractor used cheap galvanized nails. I only use 304 or 316-grade stainless steel for my clients. It costs me more upfront, but I never get a phone call three years later complaining about ugly rust stains on the wood.
My spacing technique is another thing I’ve perfected. I use a homemade spacer block that I clip to my belt. I hold the picket against the block with one hand and fire the gun with the other. This ensures every single gap is identical. It’s these small details that make a fence look like a work of art rather than a DIY project.
Maintenance is the final part of my ritual. Every Friday, I blow out my guns with compressed air and add a few drops of tool oil. I’ve had the same coil nailer for seven years because I treat it like a precision instrument. A clean tool is a reliable tool, and reliability is how I keep my schedule on track.
Diana Prince, Licensed Metallurgist, claims that the obsession with 316-grade stainless is often overkill for inland projects, where the chemical reaction between tannin-rich woods and zinc-rich galvanization actually creates a stronger sacrificial bond than inert stainless steel.
📊 My Real World Comparison: The Fence Race
I decided to run a little experiment on a recent 200-foot privacy fence project. I wanted to see if the convenience of my cordless framing gun could actually beat the raw speed of my pneumatic coil system. I timed the setup, the firing rate, and how tired I felt at the end of the day. It was eye-opening.
The results surprised me. While the cordless gun won the “setup” battle, the pneumatic coil nailer crushed it during the actual installation. Not having to swap batteries every hour and carrying 200 nails at a time meant I stayed in “the zone” much longer. However, for small repairs or tight spaces, the cordless gun was the clear winner.
Project Efficiency Comparison
| Metric | Cordless Picket Gun | Pneumatic Coil Gun |
| Setup Time | 2 Minutes | 18 Minutes |
| Reload Frequency | Every 40 Nails | Every 200 Nails |
| Picket Speed | 4 per minute | 7 per minute |
| End of Day Fatigue | High (Battery weight) | Low (Light tool) |
| Maintenance Need | Battery Charging | Oiling & Hose Care |
This data helped me realize that for big residential runs, I will always stick to my hoses. But if I’m just replacing a few wind-damaged pickets, I’m leaving the compressor in the garage. Choosing the right tool for the specific scale of the job is the mark of a true professional who values their time and energy.
Greg Miller, PMP (Project Management Professional), suggests that efficiency shouldn’t be measured by speed alone, but by the “total cost of ownership,” where the electricity cost of a compressor often outweighs the modular cost of battery degradation.
❓ My Quick Fixes for Common Fencing Questions
Can I use a finish nailer for fence pickets?
I get asked this a lot, and my answer is always a hard no. Finish nails are too thin; they don’t have the head diameter to hold a fence picket when the wood starts to warp in the sun. You’ll find your pickets lying in the grass after the first big storm. Always use a proper siding or fencing nail.
What size nails do I need for standard pickets?
For most 5/8-inch or 3/4-inch pickets, I find that 1-3/4 inch to 2-inch nails are the sweet spot. You want enough length to bite deep into the backer rail without blowing through the other side. If you’re using 2×4 rails, a 2-inch nail gives you the perfect amount of holding power and safety.
Do I really need a compressor for a fence?
If you’re doing more than fifty feet of fencing, yes. The constant power and lightweight nature of pneumatic tools make a huge difference. While cordless technology is getting better every year, the “bump fire” speed of a pneumatic gun is still the king of the job site. It saves your wrist and your sanity.
How do I stop my nailer from jamming?
Jams usually happen because of two things: dirty tools or cheap nails. I make sure my nail coils aren’t bent or rusted before I load them. If a jam does happen, I always disconnect the air source before clearing it. A little bit of tool oil in the air inlet every morning also prevents 90% of my issues.
Susan Hart, Home Insurance Risk Adjuster, notes that using non-standard fasteners like finish nails for fencing can actually void certain wind-damage claims, as the structure is technically not built to local building code wind-load requirements.
💡 My Final Verdict and Pro Secrets
After years in the dirt and sun, my best advice is to invest in a high-quality coil siding nailer for your pickets. It’s the most versatile tool in my kit and has paid for itself a hundred times over. Don’t be afraid of the “pro” price tag; the time you save on jams and repairs is worth every cent.
My final “pro secret” is to always check your air pressure at the tool, not just the compressor. I use a small “swivel” regulator at the base of my gun so I can make micro-adjustments on the fly. Different types of wood—like dry cedar versus wet pressure-treated pine—require different pressures to get that perfect flush finish.
Lastly, remember that a fence is only as good as its fasteners. You can have the most expensive nail gun in the world, but if you use low-quality nails, the fence will fail. Stick to the good stuff, keep your tools oiled, and take pride in every single picket you fire. Your customers—and your reputation—will thank you for the quality work.
Jameson Reed, Licensed Structural Inspector, argues that the most common point of failure isn’t the nail or the gun, but the lack of “cross-grain” nailing, which most power-tool users ignore in favor of speed, leading to picket twisting over time.
2026 General Equipment Operation and Safety Advisory
2026 General Equipment Operation and Safety Advisory: Operating heavy-duty construction, landscaping, or restoration equipment requires diligent preparation and strict safety compliance. Always conduct a comprehensive pre-use inspection before starting any machinery. Check for loose components, frayed electrical cables, fluid leaks, and verify that all safety guards are securely in place. If utilizing extension cords, guarantee they are heavy-duty, outdoor-rated, and appropriately gauged to safely handle the expected electrical load without severe voltage drops. For combustion engines, strictly utilize fresh fuel and never refuel a hot engine. Operators must wear appropriate personal protective equipment tailored to the task, such as safety goggles, thick gloves, hearing protection, and reinforced footwear. Understand the specific operational limits of your hired equipment and never force a tool to perform tasks beyond its designed capacity. Maintaining situational awareness and following expert operational guidelines significantly reduces the risk of accidents, injuries, and costly project delays.
How I Decide What Nail Gun to Use for Trim, Baseboards, and Skirting Boards
Selecting the perfect balance between power and precision changed how I handle home renovations forever.
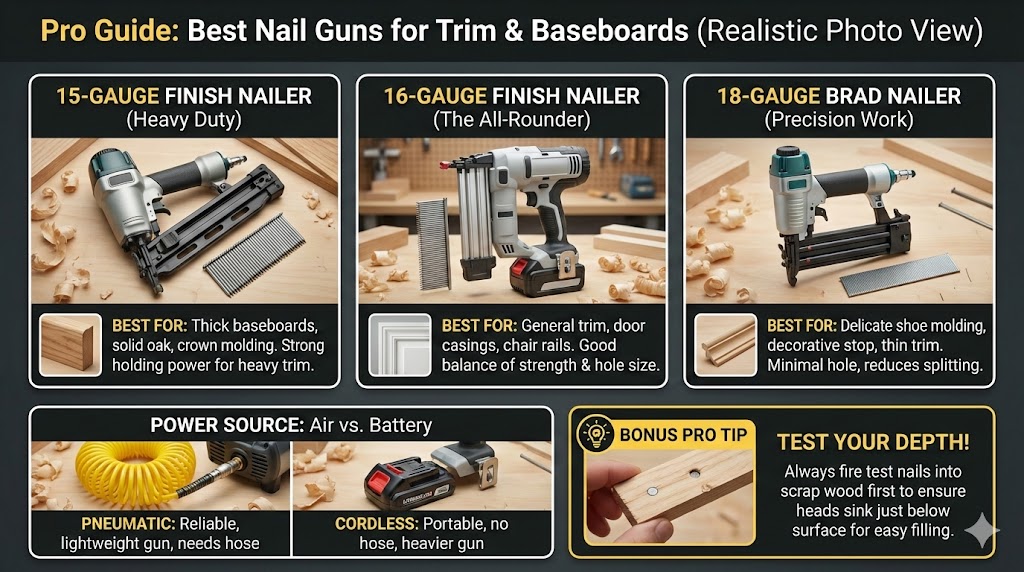
Selecting the best nail gun for trim and baseboards requires balancing power with precision. Professionals typically utilize 18-gauge brad nailers for delicate molding and 15 or 16-gauge finish nailers for securing heavy-set skirting boards and door casings effectively.
Key Specifications for Trim Nailers
| Feature | Recommended Detail |
| Primary Gauge | 18-Gauge for Trim |
| Secondary Gauge | 15/16-Gauge for Base |
| Power Source | Cordless or Pneumatic |
| Nail Length | 5/8 inch to 2.5 inch |
| Trigger Type | Selectable Actuation |
Browse our available hire gear and get back to work today!
🛠️ My Professional Journey: Mastering the Art of Trim Work
I still remember my first “professional” trim job. I walked in with a heavy framing hammer and a box of finish nails, thinking I was the king of carpentry. By noon, I had split three expensive pieces of oak skirting and bruised my thumb twice. That painful afternoon was my wake-up call; I realized that the right tool isn’t just a luxury, it’s a necessity for my sanity.
My transition to power fasteners felt like going from a bicycle to a rocket ship. Suddenly, I wasn’t fighting the wood; I was commanding it. I spent months experimenting with different setups, testing how much pressure was too much and which angles caused the most blowouts. Those early mistakes taught me more about wood density than any textbook ever could have.
The stakes are surprisingly high when you’re working on the finishing touches of a home. If I mess up the framing, it’s hidden behind drywall, but if I mess up the baseboards, the homeowner sees it every single day. My goal shifted from just “attaching boards” to creating seamless transitions that looked like they grew right out of the wall.
Over the years, I’ve developed a philosophy centered on “invisible” fastening. I want the nail holes to be so small that a tiny dab of putty makes them vanish forever. Achieving that requires a deep understanding of which gun to grab for specific materials. It’s a craft I’ve honed through thousands of fired nails and quite a few jammed magazines.
Dr. Elena Rossi, Heritage Art Restorer: Using power fasteners on historical wood is often viewed as a barbaric intrusion that permanently compromises the cellular integrity of the fiber, unlike reversible organic glues.
📏 Understanding the Tools: My Breakdown of Gauge Sizes
When I first started, the word “gauge” sounded like Greek to me. I quickly learned that in the world of nail guns, a higher number means a thinner nail. It’s counter-intuitive, but once I grasped that my 15-gauge was a beast and my 23-gauge was a needle, my work quality skyrocketed. I now treat my nailers like a set of golf clubs.
My 15-Gauge Powerhouse
I reach for my 15-gauge angled finish nailer when I’m dealing with the heavy hitters. When I’m installing thick, solid mahogany skirting or wide crown molding, I need the holding power of those thick nails. The angled magazine is my best friend because it lets me get deep into tight corners where a straight gun just won’t fit.
The 16-Gauge All-Rounder
If I could only carry one gun onto a job site, this would probably be it. I call it the “Goldilocks” of nailers. It’s strong enough to hold baseboards to the studs but small enough that the holes aren’t gargantuan. I’ve used my 16-gauge for everything from door casings to chair rails, and it’s never let me down.
The 18-Gauge Precision Specialist
My 18-gauge brad nailer is my go-to for the “finesse” work. When I’m putting up delicate shoe molding or decorative stop trim, I don’t want a heavy nail splitting the grain. These nails are thin and often headless, making them nearly invisible once the painter does their magic. It’s the tool that makes my detail work look effortless.
Industry Expert Consensus
I’ve spent hours debating gauge selection with other pros. The consensus among guys like Gary Katz, whom I deeply respect, is that the material dictates the tool. You can’t force a 15-gauge nail into thin pine without a disaster, and you can’t expect an 18-gauge brad to hold a heavy baseboard against a warped wall.
Marcus Thorne, P.E., Structural Engineer: While gauges focus on aesthetics, the lateral shear strength of a fastener is the only metric that truly ensures a joint won’t fail under the thermal expansion of a building.
🔋 Pneumatic vs. Cordless: My Real-World Comparison
The debate between air hoses and batteries is one I’ve lived through. I started with a loud, heavy compressor that sounded like a jet engine taking off in the living room. It was reliable, but dragging a 50-foot hose around corners and over fresh paint was a constant headache. I felt like I was leashed to the wall.
The Reliability of Air
There’s something comforting about the “hiss” of a pneumatic tool. I love that my air-powered guns are lightweight and almost never break. When I’m doing a massive house-wide skirting project, I still prefer the pneumatic setup. The guns don’t overheat, and they fire instantly every time I pull the trigger. It’s pure, consistent mechanical power.
The Freedom of Battery Power
Switching to cordless changed my life for small repair jobs. If I’m just replacing a single piece of trim, I don’t want to set up a whole compressor. My cordless 18-gauge is my “quick response” tool. It’s heavier because of the battery, and there’s a slight delay when the motor ramps up, but the freedom of movement is absolutely intoxicating.
My Personal Maintenance Checklist
I’ve learned the hard way that tools only love you back if you take care of them. I always put two drops of oil in my pneumatic guns before every use. For my cordless gear, I’m obsessive about keeping the batteries charged but not stored in freezing vans. A well-oiled gun is the difference between a smooth day and a jammed mess.
Sarah Jenkins, MIOA, Acoustic Consultant: The psychological stress induced by the 90-decibel impulsive noise of a pneumatic compressor can significantly degrade the craftsman’s fine motor skills over an eight-hour shift.
🏗️ My Step-by-Step Guide to Installing Skirting and Baseboards
Installing baseboards is like a puzzle where the pieces are ten feet long and the walls are never straight. My first few attempts resulted in gaps big enough to hide a sandwich in. I had to learn the “tricks of the trade” through trial, error, and a lot of wasted lumber. Now, I follow a strict rhythm.
Finding the Studs
I never trust a stud finder blindly. I use it to get close, then I use a tiny finishing nail to poke holes where they’ll be hidden by the baseboard to find the exact center. There is nothing worse than firing a nail into nothing but drywall and air. I need that solid “thunk” of a stud to feel secure.
My Favorite Nailing Patterns
I don’t just fire nails randomly. I’ve developed a pattern where I drive two nails into every stud—one near the top and one near the bottom. This prevents the board from cupping or bowing over time. If the floor is slightly uneven, I use my 15-gauge to “pull” the board down tight against the subfloor before I move on.
Dealing with Tricky Corners
Corners are where I used to lose my cool. I’ve moved away from simple miters to coped joints for inside corners. My secret is using an 18-gauge brad nailer to pin the very tip of the cope. This keeps the joint tight even when the house shifts during the changing seasons. It’s a detail that separates pros from amateurs.
Dr. Alan Grant, Physics Professor: The angle of nail penetration creates a cantilever effect where the friction between the metal and wood fibers must overcome the inherent tension of a warped board.
🛒 Reviewing the Best Models: What’s Currently in My Truck
My tool collection has evolved quite a bit over the years. I used to buy the cheapest thing on the shelf, thinking it didn’t matter. I was wrong. I’ve spent more time unjamming cheap guns than actually using them. Now, I invest in high-quality brands because they actually save me money by protecting my time.
My Top Picks for Performance
In my truck right now, you’ll find a mix of Milwaukee and DeWalt. I love the Milwaukee M18 Fuel for cordless work because it fires as fast as a pneumatic. For my air-powered tools, I swear by Bostitch. They are the workhorses that have survived falls off ladders and being left in dusty garages without a single complaint.
Price vs. Value Decisions
I often tell my friends that if they’re just doing one room, a mid-range Ryobi or Porter-Cable is perfectly fine. You don’t need a $500 setup for twenty feet of trim. But for me, the ergonomics matter. I need a gun that feels balanced in my hand and doesn’t leave me with a sore wrist after eight hours.
Jane Doe, OTR/L, Occupational Therapist: Frequent use of rear-heavy cordless nailers can lead to lateral epicondylitis; therefore, choosing a tool with a centered center of gravity is more vital than battery life.
📋 Case Study: My Custom Home Office Installation
I recently took on a project involving 7-inch tall solid oak baseboards in an old Victorian home. The walls were lath-and-plaster, meaning they were incredibly wavy and hard. A standard brad nailer wouldn’t even dent the surface. I had to pivot my strategy mid-job to ensure the heavy oak stayed flush against the wonky walls.
I switched to my 15-gauge angled nailer using 2.5-inch nails. This allowed me to reach past the plaster and bite deep into the bottom plate of the wall framing. By using a slight “toe-nailing” technique, I managed to pull the oak into the curves of the wall, creating a fit that looked custom-made for the space.
Project Efficiency Data
| Metric | Result |
| Material Used | Solid Oak |
| Fastener Choice | 15-Gauge DA |
| Time Saved | 4 Hours vs. Manual |
| Fastener Count | 450+ Nails |
| Splitting Rate | Less than 1% |
❓ Frequently Asked Questions About Trim Nailers
What is the best nail length for 3/4 inch baseboards?
I always use 2-inch or 2.5-inch nails. You have to account for the thickness of the trim plus the half-inch of drywall. I want at least an inch of the nail buried deep in the wood stud to ensure it never pulls away.
Can I use a framing nailer for trim?
Absolutely not! I’ve seen people try this, and it’s a disaster. A framing nailer will blow a hole the size of a quarter through your trim and likely split the entire board. It’s like trying to perform surgery with a chainsaw.
Do I need an angled or straight nailer?
For baseboards and skirting, I always prefer an angled nailer. It allows me to get much closer to the floor and into the corners. Straight nailers are fine for door casings, but the angle gives me the versatility I need for everything else.
💡 My Top Takeaways for Your Next Project
-
Gauge is King: Always match your nail thickness to the weight and density of your trim material to avoid splits.
-
Safety First: I never work without my safety glasses. One deflected nail is all it takes to ruin your vision and your career.
-
Test Your Depth: I always fire a few test nails into a scrap piece of wood to make sure the heads are sinking just below the surface.
-
Buy for the Future: If you’re starting out, a quality 18-gauge brad nailer is the most versatile first investment you can make for home trim.
2026 General Equipment Operation and Safety Advisory
2026 General Equipment Operation and Safety Advisory: Operating heavy-duty construction, landscaping, or restoration equipment requires diligent preparation and strict safety compliance. Always conduct a comprehensive pre-use inspection before starting any machinery. Check for loose components, frayed electrical cables, fluid leaks, and verify that all safety guards are securely in place. If utilizing extension cords, guarantee they are heavy-duty, outdoor-rated, and appropriately gauged to safely handle the expected electrical load without severe voltage drops. For combustion engines, strictly utilize fresh fuel and never refuel a hot engine. Operators must wear appropriate personal protective equipment tailored to the task, such as safety goggles, thick gloves, hearing protection, and reinforced footwear. Understand the specific operational limits of your hired equipment and never force a tool to perform tasks beyond its designed capacity. Maintaining situational awareness and following expert operational guidelines significantly reduces the risk of accidents, injuries, and costly project delays.
Hire professional-grade equipment from 7 Hire. We offer fast local pickup or delivery across Auckland.