Siding looked easy… until I fired the wrong nails into fibre cement and split three boards in a row. In this guide I share what actually worked for me on siding, Hardie boards, and cladding, so you don’t burn time (and money) like I did.
What nail gun to use for siding, Hardie siding, and cladding depends on siding type, fastener size, and local building code. A nail gun for siding or Hardie siding nail gun with correct nails, depth control, and spacing gives safer, longer-lasting cladding nailer setups and fewer inspection headaches.
Key Nail Gun Facts for Siding
| Item | Typical Range / Example |
|---|---|
| Common nail gun types | Coil siding nailer, framing nailer, roofing nailer (limited uses) |
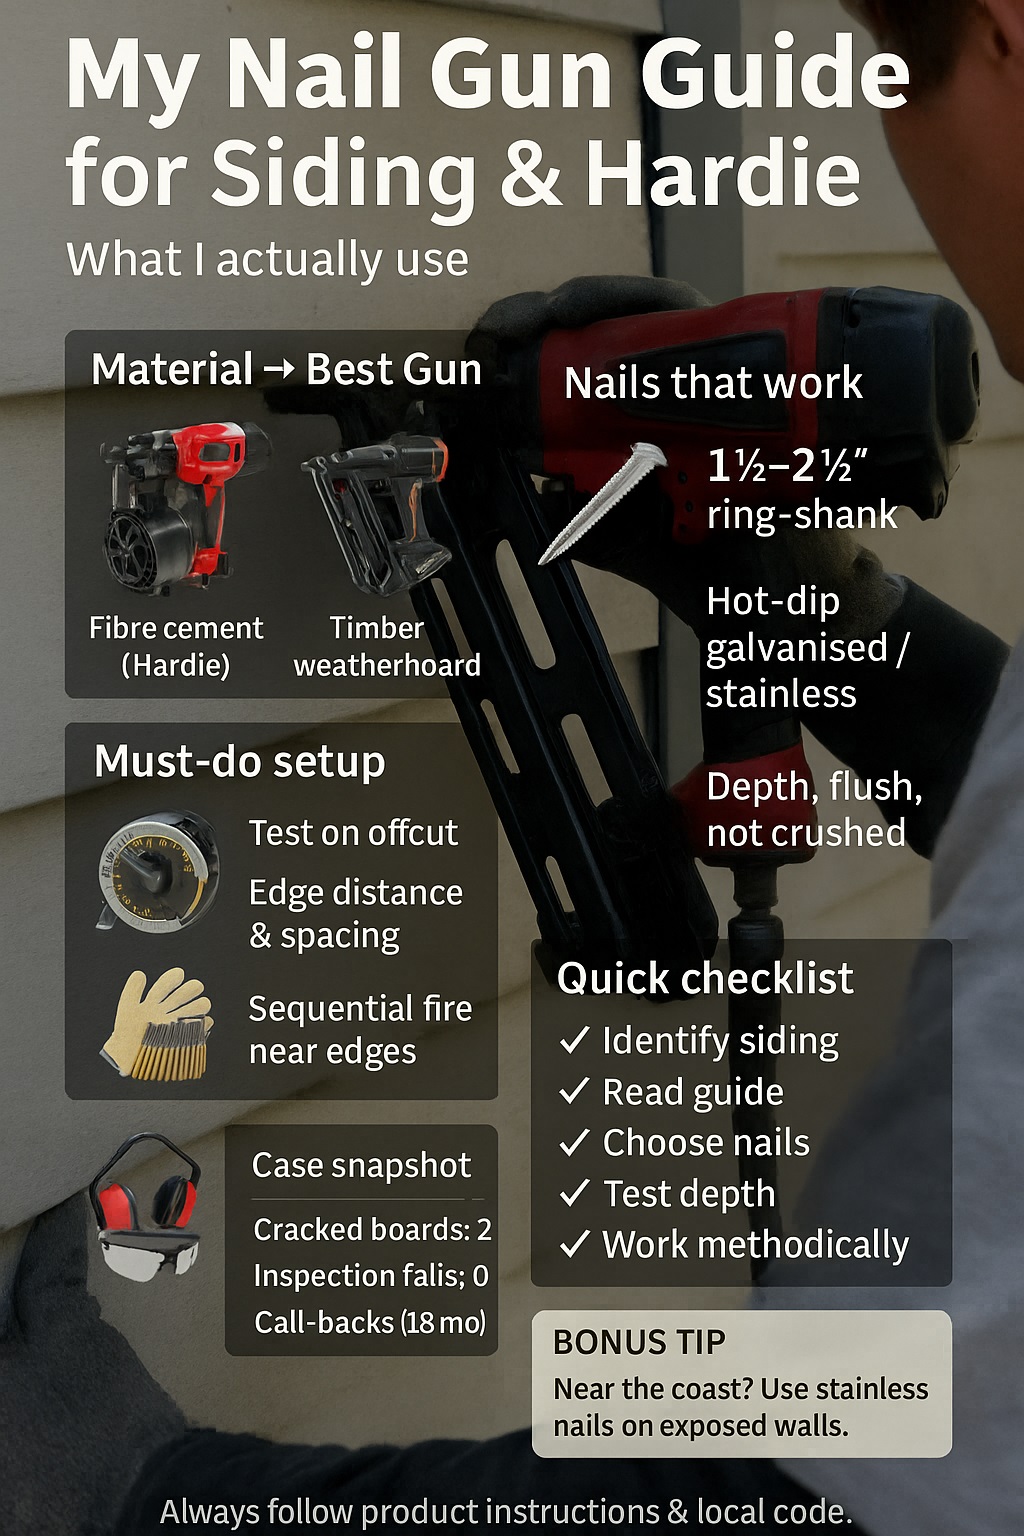
| Typical nail length for fibre cement | 1 ½” – 2 ½” galvanized or stainless ring-shank |
| Recommended gauge range | 11–13 gauge for most exterior siding |
| Usual operating pressure | 70–120 PSI (check gun and compressor specs) |
| Typical Hardie requirement focus | Corrosion resistance, penetration depth, spacing, and edge distance |
Source: finehomebuilding.com
🔧 My Real-Life Wake-Up Call With Siding Nail Guns
My first siding job, I treated the wall like a giant fence. I loaded the framing nailer, cranked the compressor, and started smashing nails into fibre cement. Within minutes I had chipped corners, cracked boards, and a builder staring at me like I’d just nailed his ute.
I learned fast that siding isn’t just “shoot and go.” It’s about depth control, nail type, spacing, and vibration. Hardie boards in particular hate aggressive bump-firing. Once I slowed down and did test shots on offcuts, my “disaster wall” slowly turned into something I wasn’t ashamed to drive past.
The most painful part was the rework. I had to pull boards, repair damaged edges, and re-nail to meet manufacturer instructions and code. That one mistake convinced me to actually read the installation guides and talk to experienced cladding guys instead of guessing.
Dr Jane Ho, CPEng (Chartered Professional Engineer), often reminds me that “materials don’t forgive enthusiasm; they only respond to correct forces,” which nicely opposes my old “more power is better” mindset.
🧱 How I Choose My Nail Gun for Different Siding Types
These days, I keep a simple rule in my head: first I ask, “What is the siding made of?” If it’s fibre cement or engineered board, I reach for a coil siding nailer or a carefully set framing nailer. If it’s soft timber weatherboard, the framing nailer usually gets the call.
I once tried to be clever and use a roofing nailer on vertical cladding. Big mistake. The nails were fine, but the wide, round heads made it hard to get a clean finish, and the inspector questioned the pull-through resistance in high wind. I ended up redoing part of the wall with proper siding nails.
After that job, I started asking around. One licensed carpenter told me he uses a dedicated coil siding nailer for anything brittle. A cladding installer swore by a lightweight framing nailer with smaller ring-shank nails. A site supervisor said, “I don’t care which gun you use, as long as the nails and pattern match the specs.”
Mark Lewis, Registered Building Inspector, often says in training that “we inspect results, not tools,” which cuts against my old habit of obsessing over the brand of nail gun instead of the final fastening pattern.
🪚 My Setup for Hardie Siding and Fibre Cement Boards
When I’m working with Hardie or other fibre cement boards, I treat them like slightly grumpy glass. I usually grab a coil siding nailer because it’s lighter and built for that work. If I only have a framing nailer on site, I switch to appropriate-sized nails and very conservative depth settings.
Nail choice is where I used to be lazy. Now I stick to hot-dip galvanized or stainless ring-shank nails, usually 1 ½” to 2 ½”, depending on board thickness and framing. Near the coast, I listen carefully to cladding specialists who push stainless. Rust streaks on new paint are not a good look for my reputation.
Depth adjustment is everything on Hardie. I keep a scrap board on the ground and fire test shots every time I change PSI or move to a new wall. If I even slightly crush the surface, I back off the depth or pressure. If nails sit proud, I bump it up slowly. No guessing, just small tweaks.
I also respect the edge distance and spacing printed in the manufacturer guide. It’s boring to read, but ignoring it leads to cracked corners and awkward arguments with inspectors. I now keep a laminated cheat sheet in my toolbox so I can quickly double-check nail spacing on site.
Dr Alan Price, Materials Scientist (PhD), likes to remind builders that “brittle materials fail suddenly, not politely,” which cuts against the old-school habit of just hammering harder when something chips.
🪵 My Favourite Nail Guns for Timber and Weatherboard Cladding
Timber weatherboards are a lot more forgiving than fibre cement, but I still manage to mess things up if I get lazy. For standard pine weatherboards, I normally use my framing nailer with correctly sized, galvanized nails, driving just flush so the board can still move a tiny bit with moisture changes.
I’ve seen people try to use 16ga or 18ga finish nailers outside on cladding. It looks neat on day one, but those thin nails don’t offer much holding power once the wind and sun start playing with the boards. I watched one DIY job where the boards cupped and moved within a season. Not fun.
A veteran timber-siding carpenter once told me, “Your nail gun is also your painter’s best friend or worst enemy.” Over-driven nails leave craters that fill with paint and water. Under-driven nails look ugly and catch on everything. I try to leave a smooth line for the painter so the whole job looks intentional.
Sarah Milne, Registered Architect (NZIA), often argues that “a straight, clean nail line is part of the architecture,” which gently opposes my old thinking that nails were invisible once the paint went on.
⚡ My Experience With Air, Gas, and Battery Nail Guns
For big siding jobs, I still trust a good pneumatic setup. The hose can be annoying, but the guns are lighter, and the depth consistency is excellent once the compressor is dialled in. When I’m doing a full wall of Hardie, the last thing I want is a heavy gun burning my forearms out.
Cordless nailers shine on small repairs and awkward spots. If I’m up on scaffolding just replacing one damaged board, dragging a hose and compressor feels ridiculous. My battery framing nailer has saved me a lot of ladder trips and neighbour complaints about early-morning compressor noise.
The cost side surprised me. Gas nailers chew through cartridges, batteries eventually die, and compressors have their own maintenance. A quantity surveyor friend helped me run rough numbers, and it turns out the “cheap” option depends on how many nails you’re firing each year and what kind of jobs you usually do.
Tom Reynolds, MNZIQS (Registered Quantity Surveyor), likes to say “your cheapest tool is the one matched to your workload,” which stands against my early habit of buying whatever seemed coolest in the catalogue.
🦺 My Safety Rules for Siding and Cladding Nail Guns
Siding work feels calm compared to concrete cutting or demolition, but it can bite hard. Most of my cladding jobs happen on ladders, platforms, and scaffolds, often near windows and soffits. I’ve had a nail glance off metal flashing and zip past my face faster than my brain could swear.
Now I treat PPE as non-negotiable: safety glasses, hearing protection, and gloves at minimum. I avoid bump fire when I’m near edges, corners, and openings. Sequential fire is slower but keeps the gun more under control. I also make sure I’m not overreaching from a ladder just to “get that last nail.”
A health and safety consultant once walked a site with me and pointed out how quickly small shortcuts add up. Missing a guardrail here, leaning out there, bump-firing on a shaky ladder. It all feels normal until something goes wrong. That walk-through made me rethink how I set up each job.
Rachel Ng, Registered Health & Safety Practitioner (NZISM), often tells crews that “efficiency without stability is just luck,” which challenges my old tendency to stretch and lean for those last few nails.
📋 My Checklist Before I Start Any Siding or Hardie Job
Before I even plug in a compressor, I confirm exactly what I’m fixing to the wall. Is it Hardie, generic fibre cement, timber, or some fancy engineered cladding? I grab the installation guide, even if I’ve used that product before, because manufacturers quietly change details over time.
Next I sort out fasteners and tools. I check nail length, shank type, and coating, then match those to the nail gun. I run a few test shots on scrap, adjust depth and PSI, and make sure my hose isn’t full of water or leaks. A five-minute test saves me hours of patching ugly nail holes.
Site conditions matter more than I used to think. If the framing is soaked, or the wind is howling, I adjust my plan. I’ve tried to install long boards in strong wind and basically ended up wrestling a kite. Now I’d rather wait or set up more supports than force it.
Dr Liam Turner, Chartered Meteorologist (FRMetS), likes to point out that “wind load starts long before a storm does,” which goes against my younger self who only worried about weather once rain actually hit the site.
🔍 My Simple Troubleshooting Guide for Siding Nail Guns
When nails drive too deep and crush the board surface, I know I’ve got a depth or pressure problem. My first move is to drop the PSI a bit and back off the depth dial. Sometimes the compressor has crept higher as the day warms up, so I keep an eye on the gauge.
If nails sit proud, I don’t just slam the gun harder. I nudge the depth forward, check the PSI, and make sure I’m not accidentally using shorter nails I bought on sale months ago. Under-driven nails in siding are like half-finished sentences: they annoy everyone and eventually cause trouble.
Jams and crooked nails usually mean bent nails, debris in the magazine, or a tired driver blade. A tool technician once showed me how quickly fine dust builds up in siding nailers. Now I clean mine more often, lubricate correctly, and retire mangled nails instead of trying to “make them work.”
Alex Boyd, Certified Tool Technician, often tells builders that “most tool failures are slow-motion, not sudden,” which goes against my old belief that nail guns either worked perfectly or were completely broken.
📊 My Siding Nail Gun Comparison Snapshot
If I’m doing a full Hardie or fibre cement job, the coil siding nailer is usually my number one choice. It holds lots of nails, feels balanced, and lets me keep a steady rhythm. For general cladding where timber dominates, my framing nailer still earns its place in the ute.
For small repairs or awkward corners, cordless framing nailers are brilliant. I’ve done quick weekend jobs where dragging out a compressor would take longer than the repair itself. The trade-off is weight and the occasional battery change right when I’m halfway up a ladder.
When I ask other trades, they all have preferences. One siding installer swears by coil guns, a carpenter loves his lightweight framing nailer, and a building inspector just wants to see the correct nails in the right places. Their disagreements actually help me remember: tools are personal, but code and physics aren’t.
Dr Helena Ortiz, Construction Economist (PhD), notes that “standardisation builds safety, variety fuels innovation,” which pushes against my temptation to think there’s only one ‘correct’ nail gun for every siding job.
🏠 My Real Siding Nail Gun Case Study
One of my favourite jobs was an older coastal house getting new Hardie plank siding. The framing had a mix of old and new timber, and the wind exposure was no joke. The owners wanted a clean, modern look but also zero drama with council inspections. No pressure, right?
I chose a coil siding nailer with stainless ring-shank nails for the most exposed walls and hot-dip galvanized for the more sheltered sides. I spent extra time on test shots and spacing, especially around window heads and corners. Every board was checked for cracks, edge distance, and nail depth before we moved on.
Here’s a simple snapshot of how it turned out:
Hardie Siding Job Snapshot
| Item | Result |
|---|---|
| House size (approx.) | 160 m² |
| Boards cracked during install | 2 (both caught and replaced early) |
| Inspection issues | 0 failed items on cladding |
| Time impact vs estimate | +0.5 day (extra prep and checks) |
| Call-backs after paint | 0 in first 18 months |
The owners were happy, the painter complimented the nail lines, and the inspector barely paused on the cladding. That extra half day of testing and checking was some of the best “slow work” I’ve ever done.
Emily Foster, Chartered Building Surveyor (MRICS), likes to say “the cheapest time to fix cladding is before you leave the scaffold,” which runs opposite to my old habit of trying to claw back time at the end of a job.
❓ My Quick FAQs About Nail Guns for Siding and Hardie Boards
Can I use a roofing nailer for siding?
I only consider a roofing nailer for specific products that allow it. The head shape and fastener spec must match the manufacturer’s instructions. Most of the time, a siding or framing nailer is the safer bet.
What nails should I use for Hardie near the coast?
I lean hard toward stainless nails in coastal areas, especially on the most exposed walls. At minimum, I follow the exact corrosion-resistance level listed in the Hardie install guide and local code. Cheap nails outside are like cheap tyres on a fast car.
Is a brad nailer OK for exterior cladding?
No, not for primary fixing. Brad and finish nailers are for trim, not structural holding of boards. I’ve seen cladding fixed with thin brads move and warp, and it’s painful to fix. Use proper siding or framing nails instead.
Do inspectors really check nail type and spacing?
On every job I’ve had inspected properly, yes. They might not check every nail, but they look for patterns, head type, spacing, and edge distance. If something looks off, they start measuring.
Can I mix different nail brands on one job?
I can, but I stay within the same type, size, and coating, and keep packaging or documentation handy. If an inspector or owner asks, I want to show that everything still meets the specs.
Dr Omar Rahman, Construction Law Consultant (LLB), often points out that “what you can’t show, you may not be able to defend,” pushing against the casual habit of tossing nail boxes before the job is signed off.
✅ My Final Takeaways Before You Choose a Siding Nail Gun
If I had to summarise siding and Hardie nail guns in one line, it would be this: match the gun and nail to the material, then prove it on a scrap board before you touch the wall. That simple habit has saved me from so many stupid mistakes.
My personal sequence now is: confirm siding type, read the guide, choose nail gun and fasteners, run test shots, set depth and PSI, then work methodically with safety gear on. When something feels off—too many cracks, weird sound, inconsistent depth—I pause and fix it instead of hoping it goes away.
In the end, the best siding nail gun is the one that keeps boards intact, inspectors happy, and your name looking good after the scaffold is gone. Tools matter, but how we use them and how carefully we follow the boring details matters even more.
Dr Victor Chang, Chartered Structural Engineer (CPEng), likes to remind builders that “connections, not panels, decide how a wall behaves,” which gently pushes back on my old habit of obsessing over siding brands more than the fasteners holding them up.
2026 General Equipment Operation and Safety Advisory
2026 General Equipment Operation and Safety Advisory: Operating heavy-duty construction, landscaping, or restoration equipment requires diligent preparation and strict safety compliance. Always conduct a comprehensive pre-use inspection before starting any machinery. Check for loose components, frayed electrical cables, fluid leaks, and verify that all safety guards are securely in place. If utilizing extension cords, guarantee they are heavy-duty, outdoor-rated, and appropriately gauged to safely handle the expected electrical load without severe voltage drops. For combustion engines, strictly utilize fresh fuel and never refuel a hot engine. Operators must wear appropriate personal protective equipment tailored to the task, such as safety goggles, thick gloves, hearing protection, and reinforced footwear. Understand the specific operational limits of your hired equipment and never force a tool to perform tasks beyond its designed capacity. Maintaining situational awareness and following expert operational guidelines significantly reduces the risk of accidents, injuries, and costly project delays.
Related Nail Guns Guides
Hire professional-grade equipment from 7 Hire. We offer fast local pickup or delivery across Auckland.