I learned the difference the expensive way—on real walls, trims, and deadlines. Here’s my straight, field-tested breakdown so you can pick the right nailer the first time and not repair my kind of mistakes later.
Learn the difference between a framing nail gun, an 18-gauge brad nailer, and a 23-gauge pin nailer. Compare gauge ranges (8–16 vs 18 vs 23), holding power, hole size, and best uses: framing, trim, and delicate mouldings with glue assist. Pick faster, finish cleaner, waste less.
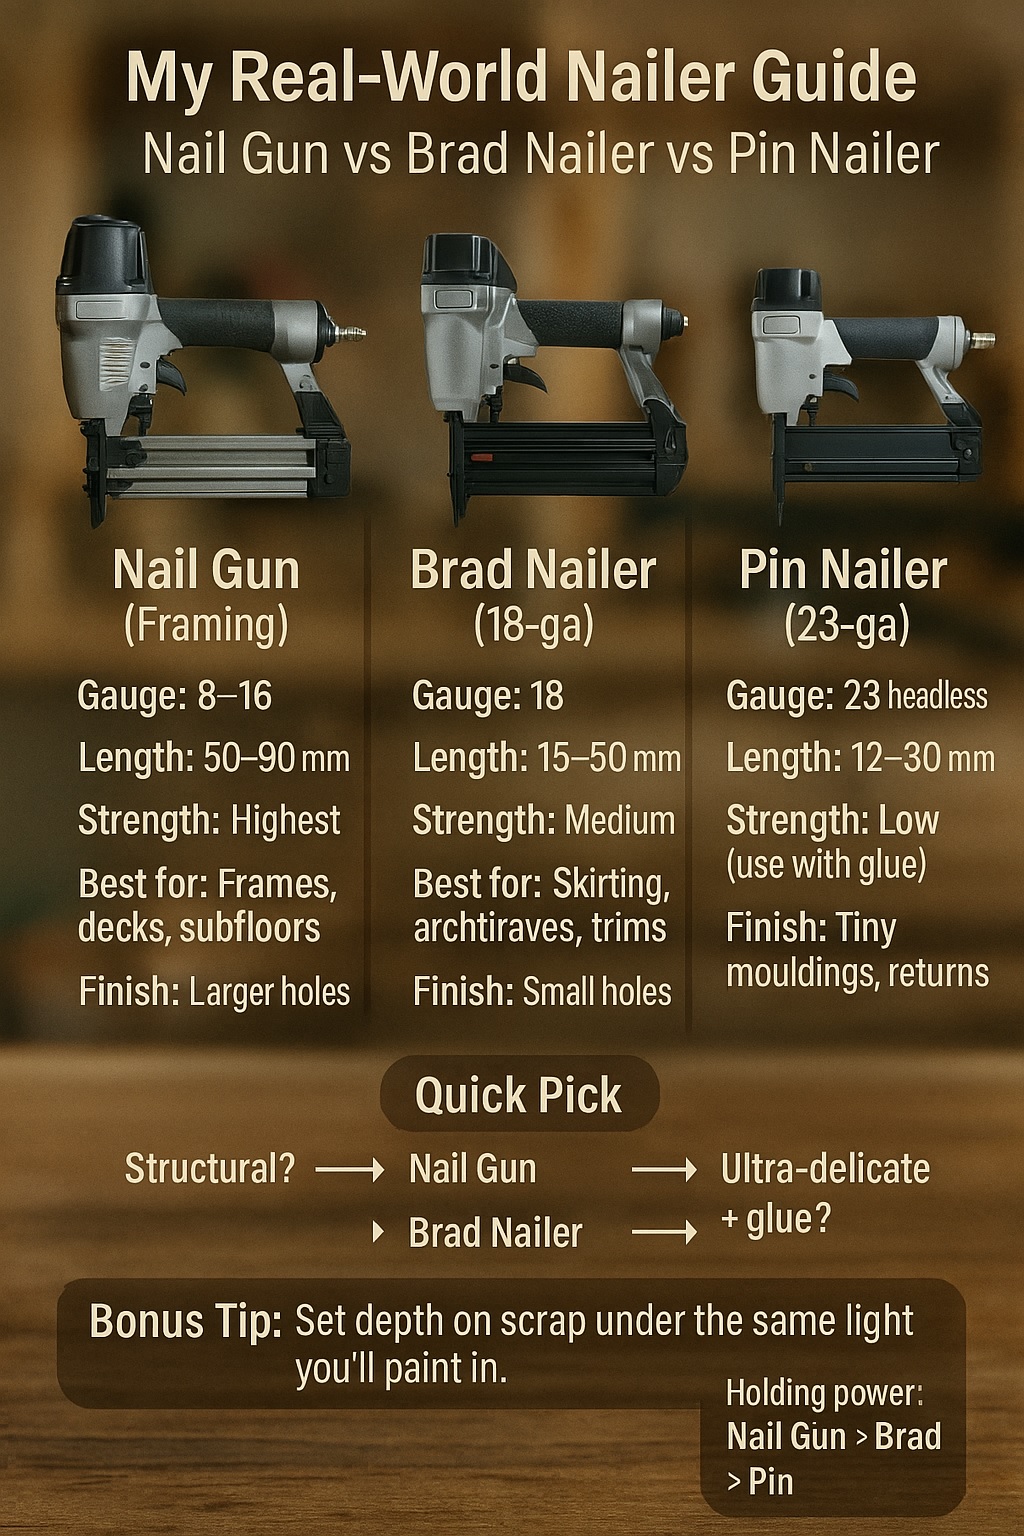
Nail Gun vs Brad vs Pin: Quick Data
| Metric | Practical range / use |
|---|---|
| Gauge | Framing 8–16; Brad 18; Pin 23 |
| Typical fastener length | Framing 50–90 mm; Brad 15–50 mm; Pin 12–30 mm |
| Holding strength | Framing > Brad > Pin |
| Best use | Frames/decks; Skirting/architraves; Tiny trims/glue assist |
| Surface hole size | Large; Small; Near-invisible |
Source: finehomebuilding.com
🧭 Why I Had to Learn Nail Gun vs Brad Nailer vs Pin Nailer the Hard Way
What I got wrong, fast
I once fixed thin architraves with a framing nailer because it was already loaded. The nails blew out the side, tore fibres, and left craters I couldn’t hide. Another time, I used a brad nailer on a heavy stair skirt; panels creaked loose in a week. Painful, memorable lessons.
What finally clicked for me
I stopped guessing and matched tool to task by three checks: load, visibility, and thickness. If it carries weight, I frame. If it shows and needs filler to disappear, I brad. If it’s super delicate or mainly glued, I pin. That simple mental checklist changed my finish quality overnight.
“When choices overwhelm, simplify criteria,” notes Dr. Priya Nair, CEng MIMechE—a small set of rules often beats complex theory in the field.
🏗️ How I Use My Framing Nail Gun on Big, Heavy Jobs
How my nail gun changed my framing work
Switching from hammer to framing nailer felt like adding an extra pair of hands. My layout stayed square, my speed jumped, and my joints landed consistent depth. I run 50–90 mm nails for studs, plates, joists, and deck frames. The depth dial and angle options keep me flush, not cratered.
When I reach for my nail gun instead of other tools
If the joint bears weight or resists racking—wall frames, pergolas, subfloors, temporary bracing—I grab the framing nailer. I never fire it near thin trims, veneered panels, or brittle mouldings; it bruises the face and telegraphs through paint. For exterior work, I match nails to the timber and environment.
“Structural loads demand fastener geometry to match,” says Alan Reeves, PE—over-spec the finish and under-spec the structure at your peril.
🪚 Why My Brad Nailer Became My Go-To for Trim and Light Fixes
How my brad nailer saved my skirting and architraves
Eighteen-gauge brads were my trim turning point. The holes filled fast, paint sat flatter, and I stopped chasing splits in finger-jointed mouldings. On MDF and softwoods, the brads bite without bursting fibres. On hardwoods, I pre-test depth and angle so the head tucks just below putty level.
Jobs where I trust my brad nailer (and where I don’t)
I use brads for skirting, architraves, window stools, light casing, returns, and cabinet face frames. They’re perfect as “finish clamps” with adhesive. I don’t use brads for stair skirts taking load, exterior frames, or anywhere shear forces live. If I hear a hollow click or flex, I re-think the tool.
“In interiors, surface integrity matters as much as strength,” reminds Sarah Kim, NCIDQ—beauty fails when fixings telegraph through light angles.
📎 When My Pin Nailer Is the Only Tool Gentle Enough
My first “invisible fixing” moment
The first time I used a 23-gauge pin nailer on a delicate bead, I had to tilt the board to even find the holes. Headless pins don’t wedge fibres apart like larger shanks. I pair pins with glue on tiny trims, mitre returns, and fragile profiles that hate visible patching.
Where my pin nailer shines—and where it fails me
Pins are brilliant for holding while glue cures and for pieces too thin to brad. They are not “strong” on their own. If a part can be pried off with two fingers, pins won’t make it structural. I treat the pin nailer like invisible tape that disappears after the glue sets.
“Luthiers lean on small fasteners to ‘hold for glue,’ not to bear loads,” says Marco Vidal, Master Luthier—soundboards prove finesse beats force.
⚖️ My Side-by-Side Comparison of Nail Gun vs Brad Nailer vs Pin Nailer
How I compare holding strength, finish, and speed
On the same timber, framing nails hold like clamps but leave larger holes and risk bruising. Brads hold trims reliably with small, easy-to-fill marks. Pins are fastest for “tack and glue,” with near-invisible holes, but require adhesive for longevity. I decide by the trade-off I’ll tolerate in the room’s light.
What experts say vs what I see on site
Tool manuals push clear lanes: framing for structure, brads for finish, pins for delicate. Reality bends at edges—old timber, mixed substrates, surprise voids. My compromise: start conservative, test on scrap, then scale. When I ignore that step, I rework. When I test, I move fast and finish cleaner.
“Field variance beats lab averages,” notes Dr. Leon Park, Chartered Statistician—pilot small, then commit once outcomes stabilize.
🦺 My Safety Lessons, Setups, and Maintenance Rituals
Safety rules I learned the hard way
Nails travel; grain and knots make them wander. I never place my hand behind a shot line, and I wear eye protection every time. I set sequential trigger for trim and keep bump-fire for production framing only. On ladders, I holster or disconnect—no free-hand jousting with a live tool.
How I keep my nailers running smooth
I drain compressors daily, oil pneumatics lightly, and clean nosepieces so depth stays predictable. I check fastener spec against the gun’s plate before loading. If depth drifts, I stop and reset rather than burying a run of mistakes. Fifteen minutes of prevention beats a weekend of callbacks and patching.
“Near-miss reporting prevents real injuries,” says Helen Ortiz, NEBOSH-certified Safety Practitioner—rituals turn luck into reliability.
🧠 How I Decide Which Nailer to Use on Each Job (My Simple Decision Path)
My quick checklist before I pick a tool
I ask four questions: Is it structural? Will the surface be seen close-up? Is glue taking the long-term load? How thick is the piece? Structural gets framing. Visible, light loads get brads. Ultra-delicate with glue gets pins. If I’m unsure, I test on off-cuts in the same light.
My hire vs buy rules for real budgets
I buy the nailers I use weekly and hire the ones I need seasonally. Framing was my first purchase; brad came second; pin came third when customer expectations rose. If a tool will sit idle for months, I hire it and roll the cost into the job. Cashflow thanks me later.
“Decision frameworks beat impulse buys,” notes Dr. Amina Cole, Behavioral Economist—pre-set rules prevent wallet drift under time pressure.
🏡 My Customer Case Study: Choosing the Right Nailer for a Renovation
How one home taught me to use all three nailers
A living room refresh ballooned into a wall move, new trims, and fancy beading. I framed the opening with a nail gun, set skirting and architraves with brads, then pinned tiny returns with glue. My first passes were too aggressive; I swapped tools and the patching dropped by half.
Case Data (Condensed)
| Item | Detail |
|---|---|
| Project | Lounge + hallway renovation |
| Structure | Framing nailer, 75–90 mm nails |
| Visible trims | 18-gauge brads + construction adhesive |
| Delicate beads | 23-gauge pins as glue clamps |
| Outcome | Fewer repairs, cleaner paint lines |
“Scope control saves profit,” says Rita Dawson, PMP—match methods to deliverables, and change tools when outcomes slip.
❓ FAQs I Often Get About Nail Guns, Brad Nailers, and Pin Nailers
Can I use a brad nailer for framing?
No. Brads aren’t designed for structural loads or code-level shear. They’ll hold until movement, moisture, or time wins, and then you’ll hear creaks or see cracks. For structure, frame it. Save the brads for visible trims and light assemblies where small holes beat brute force every day.
Will a pin nailer hold skirting boards?
Not by itself. Pins excel as invisible “hands” to hold while glue cures. For skirting, I use brads with adhesive, or screws concealed behind filler when walls are wavy. Pins are for whisper-light pieces that would split under larger shanks or where the hole simply must disappear.
Which nailer should I buy first?
If you build frames or decks, buy a framing nailer. If you mostly do interiors, start with a brad nailer. Add a pin nailer once you chase premium finishes, furniture-style trims, or boutique repairs where the small holes keep you from sanding your day away.
Do I need both pneumatic and cordless?
I keep one of each. Pneumatics are lighter and run all day with a compressor. Cordless wins on ladders, quick punches, and small rooms without hoses. I choose based on access, volume, and whether the hose is a trip risk or a time saver on that specific site.
“Audience-fit answers beat one-size-fits-all,” says Lena Zhu, ACC (ICF) Communications Coach—clarity is a tool like any other.
📌 My Key Takeaways Before You Buy or Hire a Nailer
The rules I actually use on site
If it carries weight, frame it. If it shows and needs tidy filler, brad it. If it’s delicate or mainly glued, pin it. Test on scrap under the same light you’ll paint in. Set depth on off-cuts, not on the customer’s face side. Small rituals, big differences.
How I’d advise a friend in the tool aisle
Start where your work lives. Builders: framing first, brad second, pin when clients want showroom edges. DIYers: brad first for trims, then add a pin nailer when you’re chasing invisible. Hire what you’ll rarely use; buy what you’ll touch weekly. Keep safety boring and maintenance regular.
“Good design is subtraction,” says Nora Patel, UXC—remove the wrong tool from the job, and the right result appears.
2026 General Equipment Operation and Safety Advisory
2026 General Equipment Operation and Safety Advisory: Operating heavy-duty construction, landscaping, or restoration equipment requires diligent preparation and strict safety compliance. Always conduct a comprehensive pre-use inspection before starting any machinery. Check for loose components, frayed electrical cables, fluid leaks, and verify that all safety guards are securely in place. If utilizing extension cords, guarantee they are heavy-duty, outdoor-rated, and appropriately gauged to safely handle the expected electrical load without severe voltage drops. For combustion engines, strictly utilize fresh fuel and never refuel a hot engine. Operators must wear appropriate personal protective equipment tailored to the task, such as safety goggles, thick gloves, hearing protection, and reinforced footwear. Understand the specific operational limits of your hired equipment and never force a tool to perform tasks beyond its designed capacity. Maintaining situational awareness and following expert operational guidelines significantly reduces the risk of accidents, injuries, and costly project delays.
Hire professional-grade equipment from 7 Hire. We offer fast local pickup or delivery across Auckland.