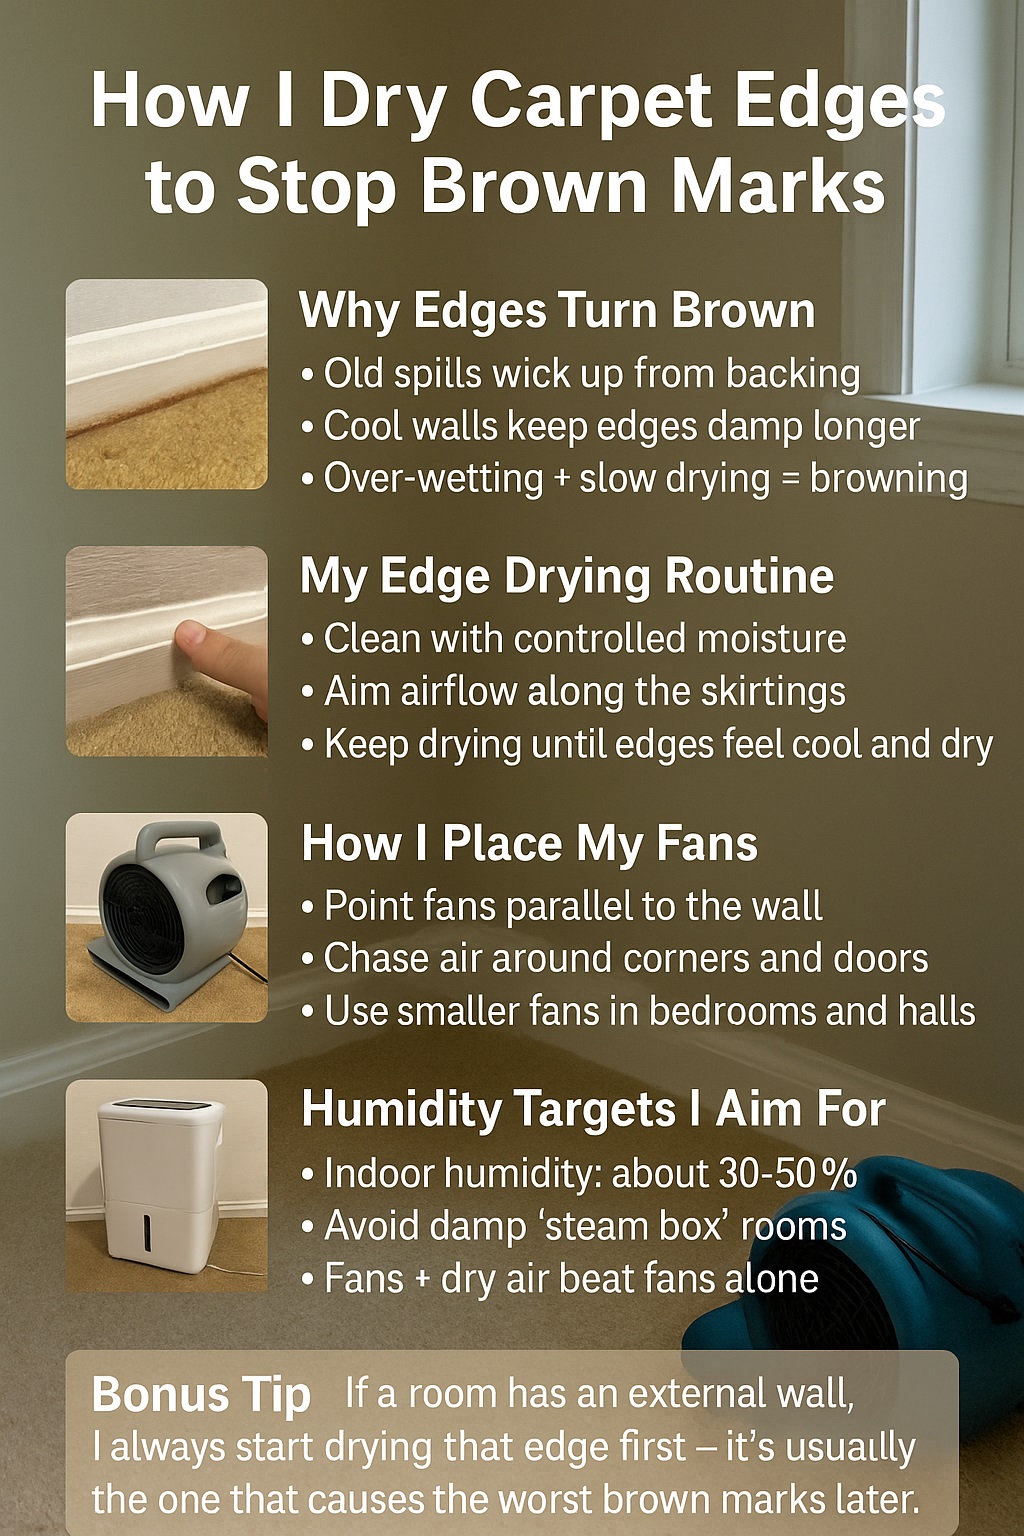
I learned the hard way that a carpet can look perfect at night and wake up with an ugly brown ring around the edges the next morning. That’s when I started taking edge drying seriously, not just blasting a fan in the middle of the room and hoping for the best.
Wet carpet edges stay damp longer than the centre, letting wicking stains and brown water marks creep up from the underlay, backing and skirting. Focused edge drying with fans keeps those perimeter strips drier, cuts the risk of browning, and helps carpets reach a safe dry time after cleaning, leaks or floods.
Key numbers I watch when I’m trying to stop brown edge marks
| Item | Typical value |
|---|---|
| Target indoor humidity during drying | 30–50% relative humidity |
| Maximum indoor humidity before mould risk rises | Around 60% relative humidity |
| Typical surface carpet drying time after clean | 6–12 hours |
| Maximum time carpet should stay damp | Under 24–48 hours |
| Best practice for edge drying | Strong airflow along skirtings and edges |
Source: epa.gov
💧 My Simple Breakdown of Brown Water Marks at Carpet Edges
The first time I saw brown edges after a clean, I honestly thought I’d ruined the carpet. It looked like someone had traced a dirty line along every skirting board. Later I learned it was wicking: old residues and tannins being pulled up as the carpet dried from the bottom.
On many jobs, the middle of the room dries first because it gets more airflow and warmth. The edges sit over cooler walls, thicker underlay joins and tack strips. If I over-wet or use strong alkaline products there, the moisture sits longer and carries colour, rust and soil up into the visible fibres.
I now treat edges as their own little danger zone. I look for water stains on skirtings, metal strips, old spills near walls and any signs of previous leaks. If I see those, I already know I’ll need extra care with moisture, chemistry and fan placement to avoid browning.
Dr Lisa Ng, Chartered Materials Scientist (CSc), often reminds her students that “capillary action doesn’t care about your schedule, it just follows the easiest path”, which is exactly what I see happening at carpet edges.
💨 How I Use Fans to Stop Edge Browning Before It Starts
When I first started, I’d clean a room, park one fan in the middle, and feel proud of myself. Then I’d come back the next day and see brown edges waving at me like a bad joke. That’s when I realised I wasn’t drying the problem area — the perimeter.
Now I use fans to create a tunnel of air along the skirtings. Instead of aiming straight across the room, I angle the airflow so it runs parallel to the wall, skimming that 30–40 cm strip of carpet where most wicking happens. The middle still dries fine, but the edges finally get first-class treatment.
Fans on their own are good, but fans plus dry air are much better. If the room feels humid or I’m dealing with a big spill, I bring in a dehumidifier. The fans push damp air off the carpet edges, and the dehumidifier pulls that moisture out of the air so it doesn’t just settle back into the fibres.
According to building physicist Prof Mark Jensen (CIBSE Member), “Air movement without moisture control is like drying clothes in a steam room”, which perfectly explains why I stopped relying on fans alone in tight, humid spaces.
📐 How I Set Up My Fans Around My Rooms
How I Lay Out My Fans in Lounges
In a normal lounge, I walk in and imagine a racetrack for air around the walls. I start with the worst edge – usually an external wall or where a leak ran – and aim my first fan along that skirting. Then I add more fans to chase the air around corners and behind big furniture.
I often lift the edge of couches or pull them slightly away from walls, so air can sneak behind and dry those hidden strips. If there’s a sliding door, I’m extra careful, because those areas often have gaps where outside moisture or cold air affects drying. My goal is a continuous airflow path around the room.
How I Dry Bedroom Edges Without Annoying Everyone
Bedrooms are different because someone usually wants to sleep in there soon. I still treat the edges as priority, but I’ll choose quieter fan settings or smaller low-profile units. Sometimes I run them hard during the day, then step them down at night once the edges feel cool and dry to the touch.
Wardrobes are funny: tiny spaces but big trouble if they stay damp. I aim a fan at the wardrobe entrance and keep doors open so air can sweep over the carpet inside. If there’s a built-in unit with a long wall of clothes, I pay extra attention to the strip near that wall, because it almost never gets natural airflow.
How I Handle Hallways, Corners and Tight Spots
Hallways can look harmless, but they trap moisture along both sides. I like putting a fan at one end, angled so the airflow runs along one skirting, then bounces off a door or wall and returns down the opposite side. It’s like running a tiny wind circuit through a narrow tunnel.
For tight areas or sharp corners, I love low-profile and snail-style fans. They tuck into corners and blast air along the edges without blocking walkways. I still do a “hand test” afterwards, sliding my fingers along the skirting line; if it feels cool and dry, I know the edge has had enough airflow.
How I Deal with Stairs and Landings
Stairs and landings are where gravity, spills and muddy shoes all team up. I angle fans so they blow slightly up the stairs, drying the front edges of treads and the side strips near the balustrade. I’m careful not to turn it into a wind tunnel that blows papers and pet fluff everywhere.
On landings, I often aim a fan diagonally across the corner where two stair edges meet. Those areas are famous for dark lines and shadow marks that people blame on dirt, when they’re often from moisture and wicking. A few extra hours of focused airflow there saves me from awkward call-backs later.
Ergonomics consultant James O’Reilly (NZIEB Member) likes to say “airflow should follow how people move through a space, not fight it”, which is exactly how I think about fans in lounges, bedrooms and hallways.
🔍 What My Real Jobs Taught Me About Edge Drying
One of my early nightmare jobs was a beautiful lounge with cream wool carpet. I cleaned it, set a fan in the middle, and left feeling proud. The next day, the client sent me photos of brown edges all around the room. I wanted to crawl under my own carpet.
When I went back, I noticed old water stains on the skirting and a slightly musty smell near one external wall. The underlay had probably been wet before, maybe from a past leak. My cleaning had re-wet that area, and the slow-drying edges had dragged all the old colour right up into the fibres.
After that, I changed my checklist. I now walk rooms slowly, inspecting skirtings, under windows, doorways and external walls for past damage. If I see anything suspicious, I use less moisture, rinse more thoroughly and put fans straight onto those edges. My call-backs for browning dropped sharply after I made that change.
Risk engineer Dr Priya Shah (FEngNZ) often says “most failures are just old problems meeting new conditions”, which is exactly how I see edge browning after I’ve re-wet a carpet that already had hidden water damage.
🤝 How I Bring In Other Carpet and Building Experts
Over time, I stopped guessing and started paying attention to what restoration trainers and carpet manufacturers were saying. In water-damage courses, they hammer home how quickly damp carpet can turn into mould, odour and damage if it isn’t dried properly, especially in cool corners and along external walls.
I also read care guides from carpet makers. A lot of them quietly warn against over-wetting and strong alkaline products, especially on natural fibres. That pushed me to use rinses more carefully at the edges, where backing, jute and underlay joins are more exposed and slower to dry. Less chemical, more control.
On bigger jobs, I’ve chatted with builders and property managers about things like ventilation, insulation and cold bridging. When I know a wall is poorly insulated or prone to condensation, I treat that edge like a high-risk zone. Good cleaning is important, but drying and building conditions often make or break the final result.
Building surveyor Helen Morris (MRICS) likes to point out that “finishes only behave as well as the structure beneath them”, which matches what I see when carpet edges sit over cold, damp or badly detailed walls.
🏠 My Edge Drying Case Study with a Real Customer
One memorable job was a family lounge with a long external wall that had taken on water from wind-driven rain. By the time I arrived, the carpet edges along that wall were damp and slightly discoloured, and the homeowners were worried they’d end up with permanent brown marks.
I checked the fibre type, underlay and wall. It was a wool blend with older underlay and a chilly external wall. Red flags everywhere. I cleaned lightly, extracted carefully, then lined three low-profile fans along that wall, all angled to run airflow tight along the skirting, plus a dehumidifier ticking away in the corner.
Here’s how I noted it in my job log:
| Case detail | Example value |
|---|---|
| Room type | Family lounge, external wall |
| Length of wet edge along skirting | 7 m |
| Number of edge-focused fans used | 3 low-profile air movers |
| Edge drying time to “cool and dry” | ~18 hours |
| Brown marks / wicking after 48 hrs | None visible along carpet edges |
When I checked back two days later, the edges were still the same colour as the rest of the carpet. No brown halo, no “mystery” stains. The customer thought I’d used some magic product; in reality, it was just focused edge drying and patience.
Project manager Daniel Cruz (PMP) would say “what gets measured gets managed”, and logging edge length, fan count and dry times has quietly improved how I handle every similar job since.
❓ My Short FAQs About Edge Drying and Brown Water Marks
Why do brown marks show up a day after cleaning, not straight away?
Because the carpet usually dries from the top down. As moisture moves up, it carries old spills, tannins and residues with it. When the water reaches the surface, it evaporates and leaves colour behind, especially along slow-drying edges near walls.
Can I fix existing brown edge marks myself?
Sometimes. Light browning from minor spills can improve with professional spot treatments and careful drying. But deep, repeated browning often needs a pro clean with controlled moisture, rinsing and proper edge drying. If the underlay or backing is badly damaged, sometimes replacement is the only long-term fix.
How many fans do I really need in one room?
For a standard lounge, I like at least two-to-three fans if the edges are very wet, especially along external walls. For smaller bedrooms, one well-placed fan aimed along the worst edge can be enough, as long as the air has a clear path and the humidity isn’t too high.
Do I always need a dehumidifier as well?
Not always. On a dry day with good airflow, fans alone can work fine. But if it’s humid, cold or there’s been a serious leak, a dehumidifier helps prevent that “wet box” effect where you’re just moving damp air around instead of actually drying the carpet edges.
Is edge drying different for wool, nylon and solution-dyed carpets?
Yes. Wool and natural blends are more prone to browning if over-wet, especially at the edges. Synthetic carpets handle moisture better but can still wick soil lines. Either way, controlling moisture and drying the perimeter properly is the safest move.
Health psychologist Dr Aaron Blake (PhD) jokes that “people only notice air when it smells bad or feels wrong”, which is why I try to make airflow visible in my head whenever I’m planning fan and dehumidifier setups.
✅ My Quick Takeaways So You Don’t Get Brown Edges Again
If there’s one thing I’ve learned, it’s that edge drying isn’t optional. It’s the difference between a clean that looks great for one evening and a clean that still looks great a week later. Brown water marks are just moisture and residues taking advantage of slow-drying carpet edges.
My basic checklist is simple: check the edges first, clean with controlled moisture, aim fans along the skirtings, control humidity, and only pack up once those perimeter strips feel cool and dry. When in doubt – especially after leaks, heavy spills or older water damage – I treat the edges like the VIPs of the room.
As productivity coach Maria Lee (ICF Member) says, “small habits protect big results”, and for me, edge drying with simple fans is the small habit that protects every carpet clean I do from surprise brown borders the next morning.
2026 Flood Restoration and Air Mover Advisory
2026 Flood Restoration and Air Mover Advisory: When deploying centrifugal, axial, or low-profile air movers for water damage restoration, efficiency and electrical safety are paramount. Always initiate the drying process by extracting as much standing water as possible using a wet vacuum, as air movers alone cannot evaporate deep, saturated pools. Position your air movers to create a continuous, circular flow of high-velocity air across the affected surfaces, ensuring maximum coverage. Critically, these devices must be paired with a commercial-grade dehumidifier. Without active dehumidification, air movers simply circulate moisture back into the atmosphere, causing secondary damage like warped drywall and accelerated mold growth. Ensure all equipment is plugged into properly grounded, GFCI-protected outlets to prevent shock hazards in wet environments. Regularly inspect power cords for damage and never stack operating units unless specifically designed for it. Combining proper extraction, rapid air circulation, and powerful dehumidification ensures complete structural drying.
Hire professional-grade equipment from 7 Hire. We offer fast local pickup or delivery across Auckland.