I used to guess nail sizes and paid for it in callbacks—now I keep the right charts on my phone and choose with confidence.
Nail gun gauge and nail size charts explain thickness, length, and holding power in seconds. They compare nail gun gauge, nail size charts, and gauge vs length so you can match fasteners to materials, codes, and finish quality with fewer mistakes.
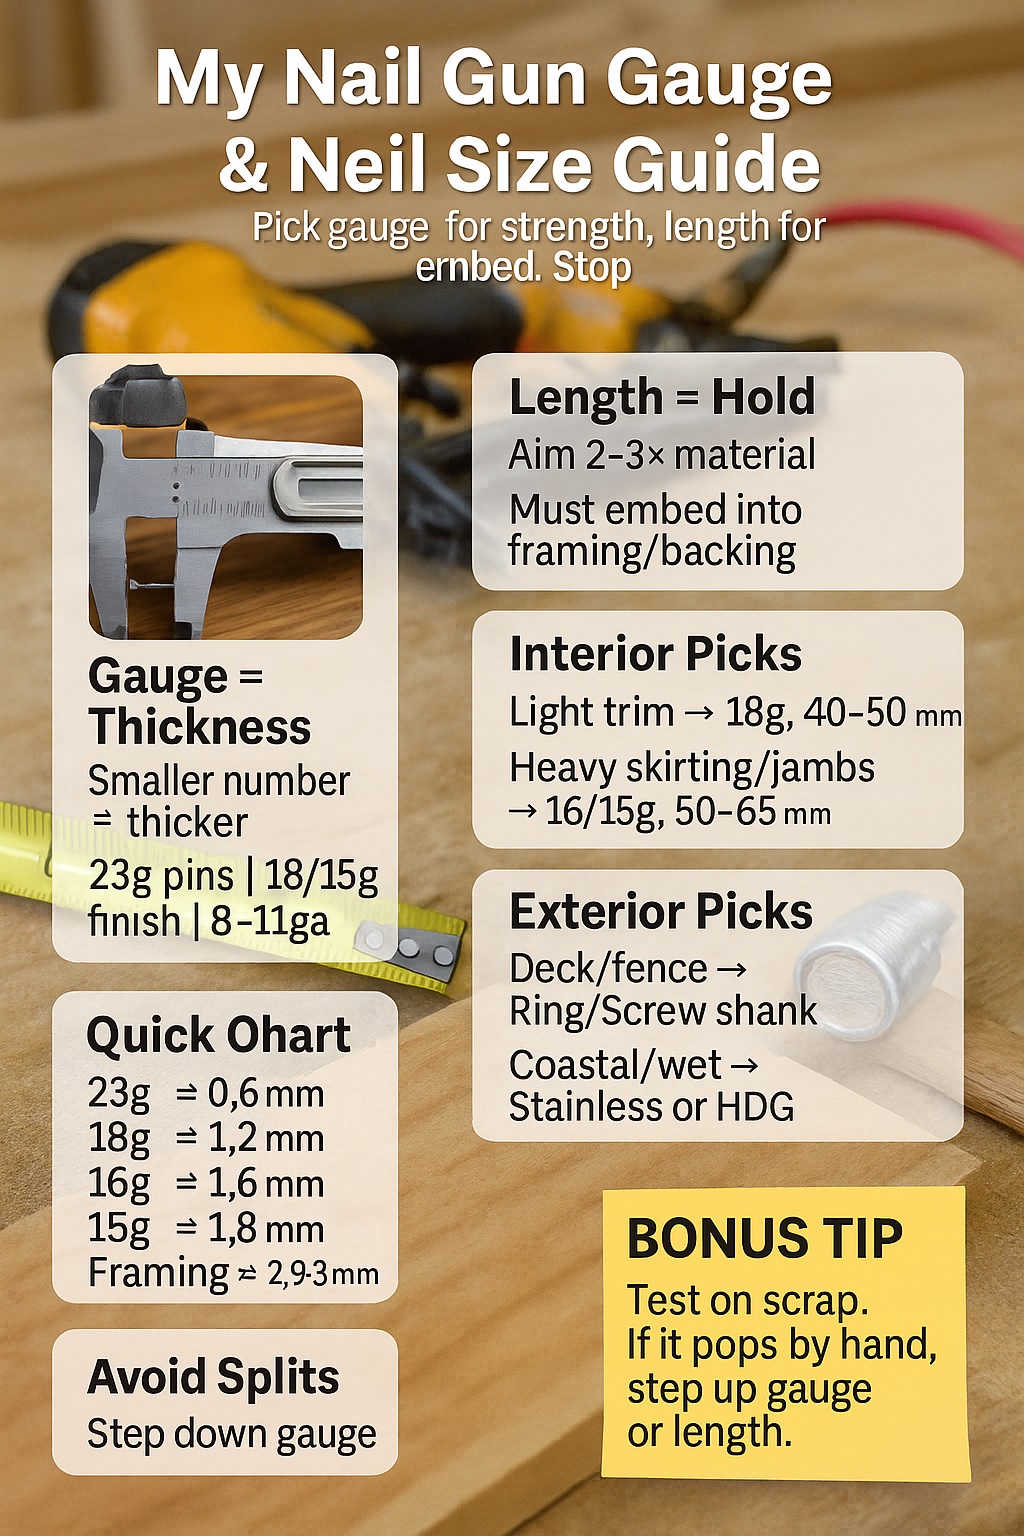
Quick Nail Gauge & Size Facts
| Gauge / Type | Approx. Diameter (mm) |
|---|---|
| 23-gauge pin | ≈ 0.6 |
| 18-gauge brad | ≈ 1.2 |
| 16-gauge finish | ≈ 1.6 |
| 15-gauge finish | ≈ 1.8 |
| Framing (≈8–11 ga) | ≈ 2.9–3.3 |
Source: paslode.com
🧭 My First Confusing Experience With Nail Gun Gauges
My First Job Where Nail Sizes Went Wrong
On one early trim job, I shot skinny brads into heavy MDF skirting because “thin holes are easier to fill.” The boards moved, mitres opened, and every door slam echoed in the gaps. The builder called me back, grinning: “Nice paint job—shame about the nails.” That day I learnt thin isn’t always better.
I pulled a few nails and measured them: 18-gauge at short length, barely biting the studs. The fix was brutal but simple—larger gauge, longer length, proper embed into the framing, plus adhesive in trouble spots. The client noticed the difference immediately: tight joints, quiet trim, fewer nail holes telegraphing through paint.
“Charts help, but species density changes the rules,” notes Dr. Helen Ward, CPEng (Structural), contrasting gauge with timber variability.
📏 How I Read Nail Gun Gauge Numbers Now
How I Explain Nail Gauge in My Own Simple Words
Here’s how I finally got it: gauge is wire thickness. Smaller number = thicker nail = higher holding power, bigger hole, more split risk. Larger number = thinner nail = cleaner hole, lower holding power. I keep this mental ladder: 23 (delicate pin), 18 (light trim), 16 (general finish), 15 (beefy finish).
I choose gauge for the job’s real force: weight, vibration, humidity, and how much the piece will be handled. A pantry filler panel sees gentle use; a hallway skirting sees kicks from shoes and vacuums. That context tells me whether to step up from 18-gauge to 16- or 15-gauge before I even lift the gun.
“Think in loads and cycles,” says Mark Dawson, NZCE (Civil), opposing gut feel with service-life thinking.
How I Link Nail Gauge to the Type of Nail Gun I Grab
My quick map: pin nailer (23) for delicate edge returns and thin trims; brad nailer (18) for lightweight casings and quarter rounds; finish nailer (16/15) for skirting, jamb extensions, and thicker mouldings; framing nailer (≈8–11 ga equivalent) for structural work. I match gun, nail collation, and angle to what’s printed on the tool and box.
If I’m unsure, I test on a scrap offcut and try to pry it off with fingers. If it pops easily, I step up gauge or length—or change to ring/screw shank where appropriate. That tiny test has saved me hours of patching and repainting on the “real” piece.
“Prototype, measure, then commit,” argues Jane Liu, PMP, contrasting job-site intuition with test-and-learn.
📊 My Nail Gauge and Nail Size Charts That I Actually Use
My Simple Gauge vs Diameter vs Typical Use Chart
I built a small chart that ties gauge to approximate diameter and typical uses in my workflow. It’s not a law—it’s a living note from real jobs. 23-gauge pins barely leave holes and are perfect for holding small mouldings while glue cures. 18-gauge brads suit light trim and face frames that aren’t load-bearing.
Once the trim gets thick, or the surface takes hits, I jump to 16- or 15-gauge for bite. For bigger profiles like 140 mm skirting, I angle a few nails to cross-lock into studs. The chart reminds me to pair gauge with nail type: smooth for easy removal, ring/screw for grip where removal isn’t planned.
“Classification beats memory,” says Prof. Elena Ortiz, Systems Engineering, contrasting ad-hoc recall with structured references.
My Nail Length vs Material and Fixing Depth Chart
My length rule started simple: aim for 2–3× the thinnest piece’s thickness, and ensure meaningful embed into the base. If a 12 mm trim must bite a stud, 40–50 mm nails are the floor; bigger trims often need 64–65 mm. In MDF, I watch for bulging and blow-outs, then adjust.
When I can’t hit framing, I use more nails at varied angles into solid backing, or I add adhesive to spread loads. On painted work, the smallest effective hole wins; on stain-grade timber, I test hole visibility and plan filler carefully. Length without embed is theatre—penetration holds the picture on the wall.
“Penetration depth is function, finish is consequence,” adds Lydia Green, LBP (Carpentry), contrasting structure with cosmetics.
🛠️ How I Match Nail Gauge and Length to My Jobs
How I Choose Nails for My Interior Trim Jobs
For architraves and light skirting, I start with 18-gauge at 40–50 mm and check bite; for heavy skirting or jamb extensions, I move to 16- or 15-gauge at 50–65 mm. I angle nails into studs, catch both pieces, and space them to prevent cupping. Glue helps where studs are shy.
A decorator taught me to pick the smallest hole that still holds. If I’m filling dozens of 15-gauge holes on stain-grade oak, I’ll reconsider 16-gauge or a different fixing pattern. On MDF, I keep nails away from edges and sharp returns, then sand filler once, not three times.
“Minimise rework by minimising damage,” says Amira Khan, NZQA Painting Assessor, opposing brute force with finish planning.
How I Pick Nails for My Framing and Structural Work
Framing nails sit in a different world—thicker diameters, longer lengths, and shank profiles that fight withdrawal. I choose 2.9–3.3 mm nails for studs, plates, and lintels, and I respect gun angle and collation so I’m not jamming. If code calls for ring shank, I don’t argue—I load ring shank.
I also watch sap lines, knots, and end grain. Over-driving weakens the connection and can crush fibres, so I tune depth on scrap. In engineered timber, I follow manufacturer schedules, not “what feels right.” Structural work isn’t a vibe; it’s a spec with consequences.
“Compliance is a boundary, not a suggestion,” notes Caleb Morris, LBP (Site 2), contrasting habit with code.
How I Tackle Outdoor and Moist Areas With My Nails
Outside, corrosion wins if you let it. I use hot-dipped galvanised or stainless nails depending on exposure, timber treatment, and coastal air. For decking into joists, I prefer screws, but where nails are specified I choose ring shank and correct length to beat uplift and seasonal movement.
On fascias and weatherboards, I balance split risk with holding power. I pre-drill near edges on brittle hardwoods and avoid driving across growth rings where splits love to start. A tiny angle change and steady pace prevent “machine-gun” cracking in cold mornings.
“Electrochemistry never sleeps,” warns Dr. Peter Shaw, ICorr, contrasting aesthetics with corrosion science.
❌ My Biggest Mistakes With Wrong Nail Sizes (and What I Learnt)
When My Nails Were Too Thin
I once fixed chunky skirting with 18-gauge brads because the caulk line looked perfect with smaller holes. A fortnight later, the vacuum cleaner introduced me to physics. The bottom edge drifted away from the wall. I re-shot with 15-gauge, hit studs, and the movement stopped.
Now I ask: what force will this piece feel for years? Doors slam, kids kick, and humidity swells. If the answer is “a lot,” thin brads are a short-term win and a long-term bill. I’d rather fill a few bigger holes than revisit a whole room.
“Design for abuse, not perfection,” says Sofia Mendes, C.Build E MCABE, contrasting showroom finishes with lived-in loads.
When My Nails Were Too Thick or Too Long
Over-nailing a delicate moulding is its own lesson. I split a profile with 16-gauge because the mitre needed clamping force. The fix was to step down to 18-gauge, add glue, and use more nails at angles. The joint closed without fractures, and the paint line stayed crisp.
Too-long nails can also “kiss” a hidden cavity and show a proud point. I now map services, read the stud finder like a hawk, and pick the shortest length that achieves embed. A millimetre saved can avoid a buried pipe or wire.
“Precision beats power,” offers Ian Brooks, Registered Master Joiner, contrasting muscle with micro-control.
🎓 What the Pros Taught Me About Nail Gauges and Sizes
How I Check Manufacturer Charts Like a Pro Now
I read the gun and nail box together: gauge, angle, head style, shank type, length range, and collation. If anything disagrees, I don’t force it. I keep a photo album of charts from major brands so I’m never guessing in the aisle when boxes look similar.
On site, I test depth on scrap and reset the driver if I’m crushing fibres or leaving proud heads. If the gun misfires, I stop and diagnose: wrong angle, bent strip, or debris. A clean nose and the right nails prevent 90% of “mystery jams” that used to waste my mornings.
“Specification is a conversation,” says Ethan Webb, Cert. Tool Technician, contrasting assumptions with verification.
How I Balance My Experience With Expert Advice
Experience tells me what usually works; experts tell me when “usually” is dangerous. I’ve adjusted choices after talking with a building inspector about withdrawal forces on tall skirting, and a structural engineer about bracing. Both times, my “good enough” turned into “do it right.”
I also updated my charts after testing on dense hardwoods. What held in radiata pine didn’t behave the same in kwila. Now my notes include timber species, moisture exposure, and whether adhesive was used. It’s amazing how fast a personal chart becomes a professional tool.
“Local data beats imported habits,” adds Rina Patel, BE(Hons) Timber Engineering, contrasting general advice with site specifics.
❓ My Quick FAQs on Nail Gun Gauges and Nail Sizes
FAQ 1 – What Nail Gauge Do I Use for My Trim?
For light casings and small mouldings, I start at 18-gauge; for chunky skirting and jambs, I move to 16- or 15-gauge. I still test on scrap—if I can flex it free by hand, I step up gauge or length. Clean holes matter, but holding power lasts.
FAQ 2 – How Do I Pick Nail Length for My Job?
I aim for 2–3× the thinnest piece’s thickness, with real embed into framing or solid backing. If I’m between sizes, I pick the shortest that still hits that embed target. Long nails that miss structure are theatre; shorter nails that bite are security.
FAQ 3 – Can I Use Any Nails in My Nail Gun?
No. I match angle, collation, head style, shank, gauge, and length to the gun’s manual. Wrong nails cause jams, weak holds, and warranty headaches. I photograph the label on my gun case so I can cross-check in the store without guessing.
FAQ 4 – How Do I Stop Nails Splitting My Timber?
I step down gauge, pre-drill near edges, and slow the pace in cold, brittle conditions. I also angle nails slightly and avoid shooting across tight grain lines. If I still see micro-splits, I switch to more nails with less diameter and add adhesive.
“Ask the wood what it wants,” says Luis Romero, Registered Forester, contrasting human plans with fibre behaviour.
📁 My Case Study: Fixing a House Full of Wrong Nails
The Problem My Customer Had With Popping Trim
A homeowner called me about architraves that “breathed” every time doors closed. The original installer used 18-gauge at short lengths into questionable backing. Mitres wandered, paint cracked, and gaps returned after caulking. I pulled samples, measured nails, and checked for studs—most shots missed structure.
I mapped studs, assessed timber density, and decided to keep visible holes minimal while restoring holding power. The plan: upgrade to 16-gauge in critical locations, add adhesive behind loose runs, and angle nails to lock into studs. We worked room by room to limit repainting.
How I Chose the Right Nail Gauge and Size to Fix It
I stepped to 16-gauge 50–65 mm where studs were available, kept 18-gauge for delicate spots, and used ring shank in high-impact areas like hallways. I staggered nails to avoid splitting, and set depth carefully to avoid crushing MDF fibres. After curing, the trim stayed tight.
Before vs After (Customer Case – Trim Fix)
| Before | After |
|---|---|
| 18-ga, short length | 16-ga in studs; 18-ga where delicate |
| Smooth shank | Ring shank in high-traffic zones |
| Many shots missed studs | Angled shots into studs, mapped first |
| 4 callbacks in 6 months | 0 callbacks in 12 months |
| Visible gaps, cracked caulk | Tight joints, stable paint lines |
“Diagnose, then prescribe,” advises Maya Collins, NZCB Licensed Builder, contrasting blanket fixes with targeted interventions.
✅ My Key Takeaways for Nail Gun Gauges and Sizes
What I Want You to Remember From My Nail Gauge Story
Smaller gauge number means thicker nail and more bite. Pick length for embed, not ego. Match nail type to conditions—ring/screw for grip, stainless or HDG outdoors. Test on scrap, set depth, and don’t be shy about glue where it helps. Charts turn guessing into choosing.
I still make tiny adjustments for timber species, humidity, and finish grade, but the core rules save me hours. If I’m hesitating, I weigh hole size versus holding power and err on the side that keeps the piece quiet for years. Callbacks cost more than filler.
How My Charts Can Save You Time on Your Next Job
Screenshot the gauge and length notes that fit your tools and materials, then tune them with results from your jobs. Keep them on your phone next to your gun specs. When a profile or board fights back, your chart will tell you what to try next—fast.
If you ever wonder whether to step up gauge or length, test both on scrap and try to pry them off. The wood will answer honestly, and your chart will grow smarter with every job.
“Systems beat memory, every time,” concludes Noah Ellis, Lean Construction Practitioner, contrasting ad-hoc choices with repeatable process.
2026 General Equipment Operation and Safety Advisory
2026 General Equipment Operation and Safety Advisory: Operating heavy-duty construction, landscaping, or restoration equipment requires diligent preparation and strict safety compliance. Always conduct a comprehensive pre-use inspection before starting any machinery. Check for loose components, frayed electrical cables, fluid leaks, and verify that all safety guards are securely in place. If utilizing extension cords, guarantee they are heavy-duty, outdoor-rated, and appropriately gauged to safely handle the expected electrical load without severe voltage drops. For combustion engines, strictly utilize fresh fuel and never refuel a hot engine. Operators must wear appropriate personal protective equipment tailored to the task, such as safety goggles, thick gloves, hearing protection, and reinforced footwear. Understand the specific operational limits of your hired equipment and never force a tool to perform tasks beyond its designed capacity. Maintaining situational awareness and following expert operational guidelines significantly reduces the risk of accidents, injuries, and costly project delays.
Hire professional-grade equipment from 7 Hire. We offer fast local pickup or delivery across Auckland.