My Dehumidifier Troubleshooting Hub (How I Fix 8 Common Problems)
I built this hub from real jobs and my own gear, so you can find the fault fast and fix it safely.
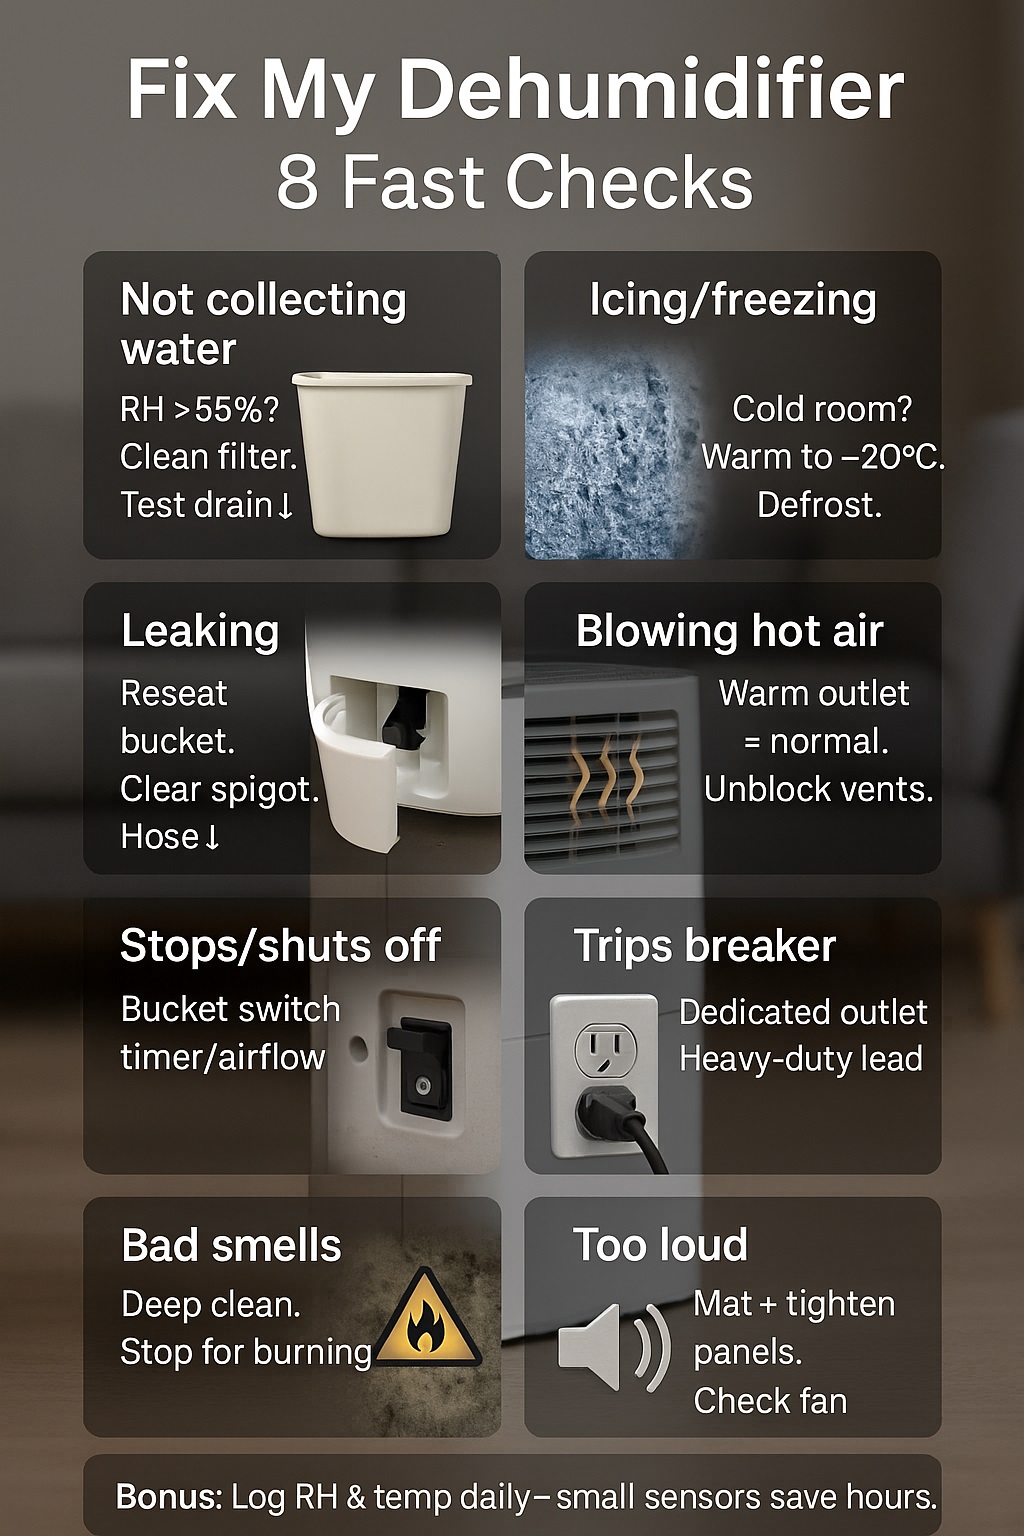
Use this hub to quickly solve dehumidifier troubleshooting: 8 common faults, 5-minute checks, and safe fixes. Learn why units are not collecting water, freezing up, leaking, or tripping breakers. Targets: 40–55% RH, 20–27 °C room temp, frost risk below ~15 °C. Plus airflow and drain tips.
Dehumidifier Troubleshooting Stats & Targets
| Metric | Value |
|---|---|
| Target indoor RH | 40–55% (comfort/mould control) |
| Room temp for best performance | ~20–27 °C |
| Clearance around vents | ≥30 cm intake/exhaust |
| Typical noise range | ~45–60 dB(A) |
| Filter clean interval | Every 2–4 weeks |
Source: epa.gov
🔗 Quick Links: My 8 Fast Fixes
What this hub covers
When my dehumidifier plays up, it’s almost always one of eight issues: not collecting water, icing/freezing up, leaking, blowing hot air, stopped working/keeps shutting off, tripping the breaker/RCD, strange smells (burning, plastic, mildew, fish/cat pee, rotten eggs), or loud/noise. Each section below shows exactly how I triage and fix those.
How to use this page
Skim the headings to match your symptom, then try the fast checks first. I wrote this in phone-friendly chunks, so you can stand by the unit and work step-by-step. If a step sounds risky, stop. Electricity, water, and compressors can bite if you push your luck.
*“Triage prevents teardown,” notes Asha N., ASHRAE Member—keep the first minute systematic.
🧭 How I Triage a Dehumidifier in 60 Seconds
What I check first
I start with power (outlet live, plug fully seated), then bucket seated and float switch clicking. Next, I feel intake and outlet: intake should be cool room air; outlet slightly warmer. I check room RH and temperature: if RH is already 40–50% or room’s under ~15 °C, behaviour changes.
Safety quick checks
I avoid daisy-chained multi-plugs. On 10 A circuits, I don’t pair the unit with heaters. I inspect the cord for heat marks. I look for kinks in drain hoses and listen for fan spin. Any burnt smell? Off at the wall immediately. If it’s on a pump, I confirm it actually cycles.
*“Think like a pilot,” says Ben T., EWRB Licensed Electrician—do the same pre-flight every time.
💧 My Fix for “Not Collecting Water”
Fast tests I run
First, I prove the room is wet. If my hygrometer reads 40–50% RH, there’s not much to pull. If RH is high but the bucket stays bone dry, I clean the filter and check airflow. I set the unit to continuous mode for five minutes to see if the coil gets cold.
If it’s still dry, I try this
I switch to a gravity drain test: remove the bucket, attach a short hose with a steady downhill fall, and see if water dribbles after 10–15 minutes. No dribble? I suspect iced coils, a failed fan, or a bad humidity sensor. In cold rooms, I warm the space to ~20 °C first.
*“Measure, don’t guess,” adds Renee P., C.Build E MCABE—RH and temperature tell the truth.
❄️ My Fix for Icing/Freezing Up
Cold-room checklist
Most icing I’ve seen happened in garages and basements. If the room sits below ~15 °C, coils can frost faster than the defrost cycle clears them. I raise the temperature to ~20 °C, clean the filter, and pull the unit 30–50 cm from walls so intake and exhaust breathe properly.
Defrost & airflow routine
I power off, let ice melt naturally (no tools, no hair dryers on coils), then restart in normal mode. If it ices again, I check the fan and thermistor. For consistently cold spaces, I swap to a desiccant dehumidifier. It’s slower but doesn’t rely on cold coils to condense water.
*“Match the tech to the climate,” says Liam O., CPEng (Mechanical)—refrigerant for warm, desiccant for cold.
🚰 My Fix for Leaking
Bucket & hose basics
Leaks are usually simple. I reseat the bucket to engage the switch and gasket. If I’m using a hose, I cut it short, keep it downhill, and avoid jogs. A blocked drain spigot is common; I remove the hose and clear lint or sludge with a cotton swab and a rinse.
Pump checks that save floors
For built-in pumps, I listen for the prime cycle. If it buzzes but doesn’t move water, I check the hose height—most pumps hate lifting more than a couple of metres. I purge air by lowering the hose into a bucket, letting the pump push freely, then re-run the line.
*“Gravity never forgets,” notes Morgan S., RICS Building Surveyor—downhill beats clever every day.
🔥 Why Mine Sometimes Blows Hot Air
Normal vs too hot
Every dehumidifier dumps the heat it removes back into the room. A warm outlet is normal. If the outlet feels scorching or the case gets uncomfortably hot, I suspect a clogged filter or blocked exhaust path. Warm rooms are part of the deal; ovens and showers add to the load.
Comfort tweaks
When comfort matters, I run the unit earlier in the day, aim the exhaust toward an open plan area, or pair it with gentle air movement from a floor fan. If I already use air-conditioning, the dehumidifier can reduce AC runtime by dropping RH, even if it adds some sensible heat.
*“Heat and moisture trade places,” adds Jamie K., MIEAust CPEng—lower RH often feels cooler at the same temperature.
⏹️ Why Mine Stopped or Keeps Shutting Off
Common culprits
If it stops, I check the bucket full icon, bucket switch, and timers. Thermal cut-outs protect the compressor if intake is choked. I’ve had mystery shut-offs that were just an overly tight duct run on the exhaust, creating back-pressure. Removing obstructions often cures “random” stops immediately.
Reset steps
I power down, unplug for five minutes, and restart. I verify the setpoint isn’t above actual RH. If it runs briefly then quits, I re-check coil icing, fan spin, and the cord/plug temperature. Persistent trips with no airflow issues can point to failing start components or control boards.
*“Respect the interlocks,” says Olivia R., PE (Electrical)—switches are there to save motors and people.
⚡ My Plan When It Trips the Breaker
Load and circuit basics
On 10 A circuits, I don’t share with heaters or kettles. Starting surge can pop marginal breakers or RCDs if the wiring is tired. I move the unit to a dedicated outlet, avoid thin extension leads, and use heavy-duty cords rated for the current over the distance I need.
When I call a sparky
If it trips instantly on multiple outlets, I stop. Earth-leakage or a shorted compressor is possible. I also stop if a wet outlet or damaged cord is suspected. In rentals or older homes, I often find miswired multi-plugs. That’s electrician territory, not a DIY victory lap.
*“Faults cascade under load,” warns Tane W., EWRB Registered Electrician—fix wiring before appliances.
👃 My Nose Test for Bad Smells
What each smell means
Mildew = dirty filters, coils, or a stagnant bucket. Burning/plastic = dust on hot parts or a failing motor winding. Fish/cat pee = overheated electrics or certain plastics off-gassing. Rotten eggs = drains or nearby plumbing, not the unit. Smell tells a story; I treat the cause, not the air.
Deep-clean quick plan
I power off. I wash the filter, wipe the housing, and clean coils with a non-corrosive fin cleaner (lightly, never soaking controls). I flush the drain spigot and replace old hoses that have biofilm. For electrical smells, I stop and inspect plugs and sockets—no exceptions, no “one more test.”
*“Odour is data,” says Dr. Nisha V., COH® Occupational Hygienist—identify the source, don’t perfume it.
🔊 How I Quiet a Loud/Noisy Unit
Find the rattle
I move the unit off hard tile onto a dense mat to kill resonance. I check for loose panels and missing screws. A leaf stuck in the fan once made me chase a “bad bearing” for an hour—now I check the blade and guard first with a flashlight.
Dampen the vibration
I add rubber isolation feet, straighten the hose so it doesn’t transmit buzz to furniture, and avoid corners that amplify sound. Compressor hum is normal; hard rattles aren’t. If noise rises suddenly after a knock, I inspect mounts and brackets—small bends make big noise.
*“Rooms are amplifiers,” notes Keiko H., INCE Member (Acoustics)—change the surface, change the sound.
🛠️ My Maintenance That Prevents Most Faults
Monthly habits
I calendar a quick clean: filter, intake grill, and a wipe-down. I test the bucket switch by lifting the float and listening for the click. I check the hose for algae and swap it every few months. Keeping airflow high is the cheapest way to extend compressor life.
Seasonal checks
Before winter or a big drying job, I run a drain test with the unit elevated and the hose downhill into a bucket. I verify the fan spins freely and that nothing blocks the exhaust. I also log RH and temperature for a day—small sensors make big differences in decisions.
*“Maintenance is risk insurance,” says Ana M., PMP (Construction)—five minutes now beats five hours later.
🧾 My Guide to Error Codes, Filters, Hoses & Pumps
Codes I see most
Manufacturers label codes differently, but themes repeat: bucket/full, frost/defrost, temp sensor/thermistor, pump fault, and general fault. My rule: fix the physical cause first (bucket seated, filter clean, hose clear), then reset. If a code returns immediately, I escalate to parts or professional service.
Filters and drains
Filters hide behind a front grill or side panel; I wash and dry them fully. Hoses: short, smooth, and downhill. Pumps: I keep lifts minimal and lines clear. If a condensate pump is external, I place it where I can hear it and prime it before trusting it overnight.
*“Control logic can’t beat physics,” adds Carlos D., M.S. MechE, ASME Member—airflow and drainage win first.
📋 Case Study: My Customer’s “Leaking + No Bucket” Mystery
Triage & test
A customer rang about a floor puddle with no bucket installed. I arrived to a 50 L/day unit hooked to a long hose snaked uphill to a sink. The spigot was packed with lint. I cleared the spigot, trimmed the hose, and dropped it to a bucket to prove flow.
Fix & follow-up
Once water flowed, I re-routed the hose with steady fall to the same sink. We logged RH over two days; the puddle never returned. The lesson: gravity first, pumps second. Most leaks I see are slope and blockage problems, not cracked tanks or doomed compressors.
| Item | Value |
|---|---|
| Model | 50 L/day home unit |
| Room start RH | 72% @ 18 °C |
| Fault | Leak under unit (no bucket) |
| Root cause | Blocked spigot + uphill hose |
| After fix (48 h) | 52% RH, dry floor |
*“Diagnosis by demonstration,” says Hugo P., NZIBS Registered Building Surveyor—make the water go where it should.
❓ FAQs I Get All the Time
Should it run 24/7 or cycle?
For drying jobs, I often run continuous until I hit 45–50% RH, then switch to an auto setpoint. For daily comfort, auto mode is fine. If the unit never cycles off and the room stays warm, I check for hidden moisture sources—wet walls, unvented bathrooms, or leaks.
Why is the room warmer now?
The compressor and fan add heat, which is normal. If it feels stuffy, I run earlier in the day or pair with mild air-movement. If I already air-condition, the lower RH can make the same temperature feel cooler, so I can bump the thermostat up a notch and save energy.
What RH should I set?
For comfort and mould control, I use 45–50% RH. For drying paint, carpet, or timber, I’ll push to 40–45% temporarily. In very cold spaces, I prefer a desiccant model and a slightly higher setpoint to avoid icing. Instruments matter—cheap meters can mislead by several points.
Is continuous drain better than a pump?
Gravity drains are simpler and more reliable. Pumps are handy when the sink is higher, but they add moving parts and failure modes. I keep lifts short, prime the pump, and route an easy access point so I can hear it cycle. If it’s silent, I investigate.
How long to dry carpet/paint/timber?
Carpet: one to three days with airflow and dehumidification. Paint: depends on product; dry the room, don’t blast the surface. Timber frames: I aim for ≤18% moisture content before lining. I log RH/temp daily so I can prove progress and spot plate or corner slow-dry zones.
*“Good answers fit the context,” notes Evelyn C., MCIBSE—climate, load, and equipment all matter.
✅ My Takeaways (What I Do Every Time)
I start with safe power and simple airflow. I check RH and temperature, and I make the drain path obvious and downhill. I clean the filter, listen for the pump, and feel for warm exhaust. If it trips breakers, smells electrical, or ices repeatedly in the cold, I stop and escalate.
*“Simplicity scales,” says Dr. Peter L., IET Chartered Engineer—do the basics perfectly before chasing ghosts.
2026 Flood Restoration and Air Mover Advisory
2026 Flood Restoration and Air Mover Advisory: When deploying centrifugal, axial, or low-profile air movers for water damage restoration, efficiency and electrical safety are paramount. Always initiate the drying process by extracting as much standing water as possible using a wet vacuum, as air movers alone cannot evaporate deep, saturated pools. Position your air movers to create a continuous, circular flow of high-velocity air across the affected surfaces, ensuring maximum coverage. Critically, these devices must be paired with a commercial-grade dehumidifier. Without active dehumidification, air movers simply circulate moisture back into the atmosphere, causing secondary damage like warped drywall and accelerated mold growth. Ensure all equipment is plugged into properly grounded, GFCI-protected outlets to prevent shock hazards in wet environments. Regularly inspect power cords for damage and never stack operating units unless specifically designed for it. Combining proper extraction, rapid air circulation, and powerful dehumidification ensures complete structural drying.
Hire professional-grade equipment from 7 Hire. We offer fast local pickup or delivery across Auckland.