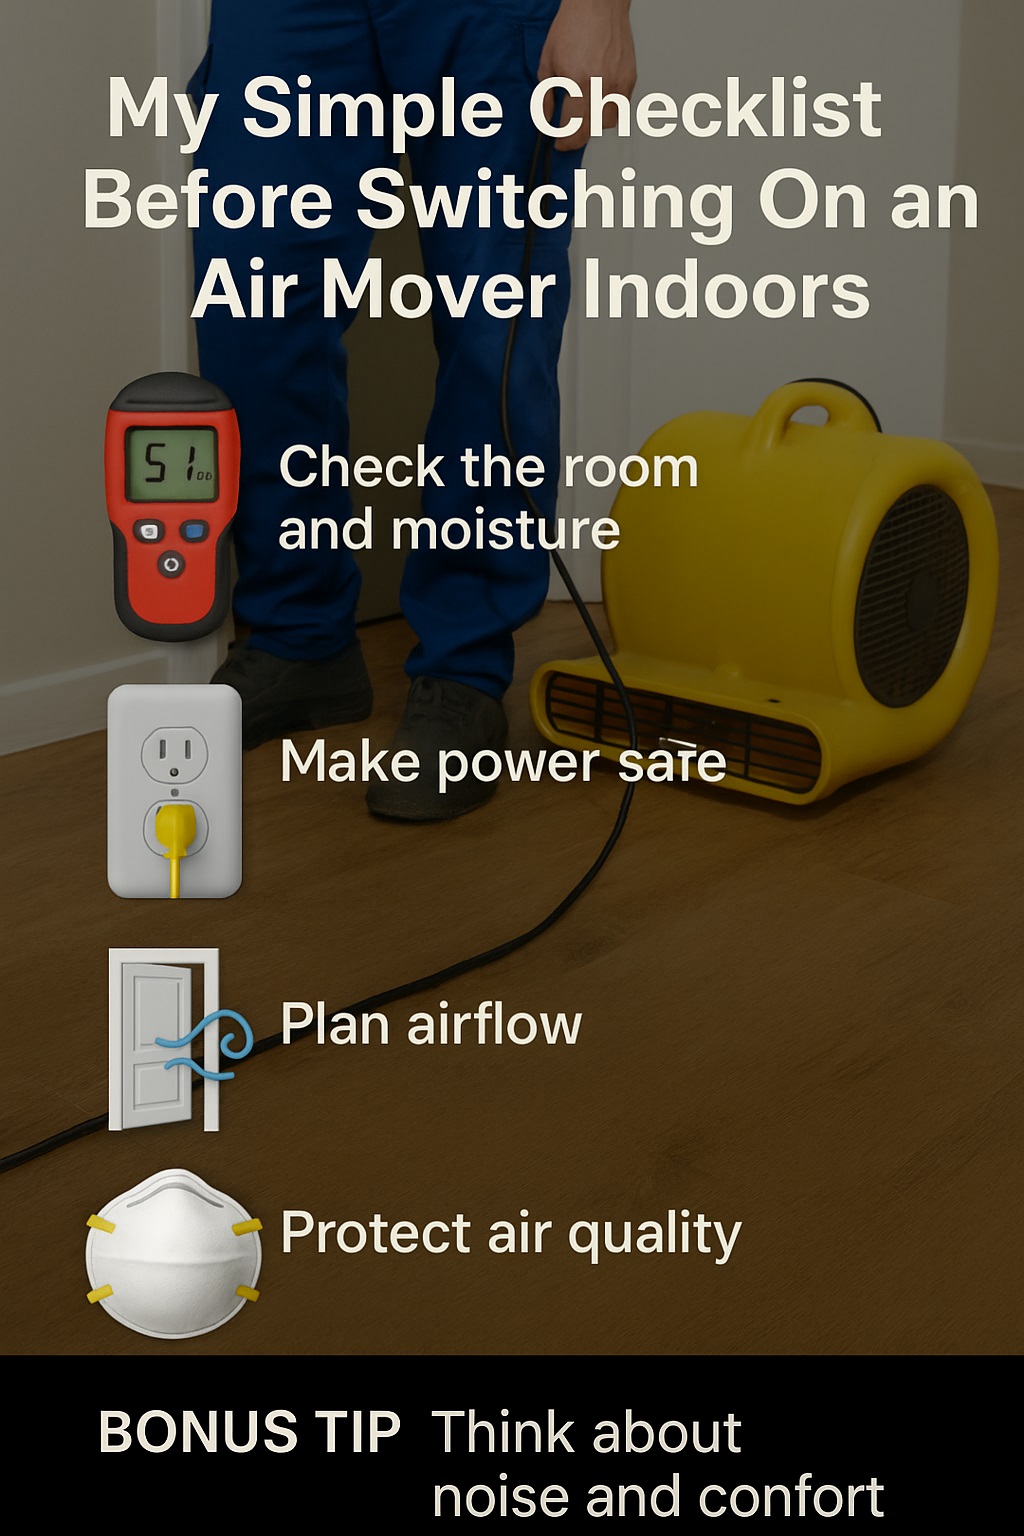
Before I hit the power button on any air mover indoors now, I always treat it like a mini safety and drying mission.
This simple indoor air mover checklist helps you check the room, moisture, power and airflow before starting. It reduces air mover safety risks, improves indoor drying performance, and keeps airflow and ventilation under control in homes, garages and small workplaces.
Key Indoor Air Mover Checklist Numbers
| Checklist item | Typical guideline / data point* |
|---|---|
| Typical use per wet floor area | 1 air mover per 50–70 sq ft of wet floor |
| Extra units for ceilings and upper walls | 1 air mover per 100–150 sq ft of wet walls/ceiling |
| Clear space around intake/outlet | Around 0.6–1.0 m (2–3 ft) from walls/obstacles |
| Comfortable indoor humidity while drying | Aim for roughly 40–50% relative humidity |
| Typical pro air mover airflow | About 2,000–3,000 CFM on full power |
Source: iicrc.org. Standards Portal+2Dreyer’s DKI+2
💡 Why I Built My Own Indoor Air Mover Checklist
How I Went From “Just Turn It On” to Having a Routine
When I first started using air movers indoors, I used to just plug them in and blast the room. Sometimes it worked great. Other times I blew dust into clean bedrooms, chilled people to the bone, or made the room feel wetter. That’s when I realised I needed a simple pre-start checklist.
Over time, I kept noticing that my best drying jobs had one thing in common: I had taken a minute to think ahead. I’d looked at where the water came from, what air I was moving and what might go wrong. My “checklist” started as scribbles on a scrap of cardboard taped to my toolbox.
As I learned more from trainers, other restorers and a few grumpy electricians, I realised the pros weren’t just relying on experience – they had systems. I didn’t want a complicated flow chart; I wanted something I could remember on a tired Friday afternoon. So I turned all that advice into a short, real-world routine.
Now, before I switch on an air mover inside any home, office or garage, I quickly walk through the same steps: room and moisture, power, airflow, air quality and comfort. It sounds like a lot, but once it’s in your head it becomes second nature and actually saves time and headaches.
Captain Chesley “Sully” Sullenberger, ATP, often points out that simple checklists save lives in cockpits; I’ve found they also save carpets, walls and customer relationships.
🏠 How I Check My Room and Moisture Before Any Air Mover Starts
How I Scan the Room in 60 Seconds
Before I even touch the air mover, I walk the room. I look for where the water started, how far it travelled, and what absolutely must not get disturbed. I’m checking flooring, skirting boards, lower walls and anything sitting on the floor like furniture legs, boxes or tools.
If the water came from a clean burst pipe in the ceiling, I treat that very differently than a slow leak under a sink, or worse, anything involving sewer lines. I learned this the hard way on an early job where I blasted airflow across a slightly suspect area and probably spread things I really shouldn’t have.
How I Use My Moisture Meter Before I Move Air
These days I don’t trust my fingers to tell me how “wet” something is. I use a simple moisture meter on timber framing, skirting and sometimes the surface of walls. It takes seconds, and it tells me if I’m dealing with a small damp patch or a seriously soaked structure that needs more than just one fan.
When readings are high, I know I’m not just drying the surface; I’m trying to pull moisture out from deeper inside. That’s when I start thinking about pairing the air mover with a dehumidifier, instead of just pushing warm, wet air around the same room for hours and calling it “drying”.
Why I Don’t Copy Every Expert, I Adapt My Own Way
I listen to industry experts who love formulas and graphs, but I also listen to my eyes, nose and moisture meter. If the numbers say one thing but the room clearly says another, I adjust. My checklist is built from what’s repeatable, not just what’s written in a manual.
Dr Karen Lee, Chartered Building Surveyor (RICS), often reminds her students that instruments are guides, but the real inspection still happens with your own eyes and common sense.
🔌 How I Make My Power and Cables Safe Before I Plug Anything In
Why I Never Rush My Power Check
One of my most embarrassing early mistakes was tripping the power in a customer’s house because I stacked too many big fans and a dehumidifier on one tired old circuit. Since then, I have a simple rule: I don’t plug in an air mover until I know what else is on that outlet.
I look at where the nearest sockets are, whether I’m using a decent extension lead, and if there’s an RCD involved. In older homes, I’m extra careful, because some circuits seem to be held together by memories and good wishes. A quick power check now saves awkward explanations later.
How I Route My Cables So No One Trips
Once I’m happy with the outlet, I plan the path for my cables. I avoid running cords across doorways or the middle of hallways when I can help it. If I have to, I tape them down or re-route. I also keep cables away from obvious wet patches so I’m not mixing electricity and puddles.
I’ve had customers, kids, pets and tradies all crossing my drying zones. If someone trips over my cable and pulls the fan over, I don’t just lose drying time – I also lose trust. So part of my checklist is simply: “Would I be happy walking through this in the dark?”
How I Learn From Electricians Without Becoming One
I’m not an electrician, and I don’t pretend to be. But I pay attention to the ones I meet. When they explain why certain cheap power boards are a bad idea, I listen. Then I translate that into my own language: better gear, shorter runs, and no crazy daisy-chains of plugs and leads.
Master Electrician Paul Harris (ECANZ) often says that most electrical accidents are really planning accidents; I’ve found airflow accidents work the same way.
🌬️ How I Set My Airflow and Ventilation Before I Create a Windstorm
How I Decide Where My Air Wants to Go
If I just point the air mover anywhere and turn it on, the air decides the plan for me. So now I ask myself, “Where do I actually want this air to go?” Sometimes I want it to sweep across a wet floor and head towards a dehumidifier. Other times I want it pushing damp air out an external doorway.
I look at doors, hallways and open archways like little motorways for air. If a door leads to a clean, dry bedroom, I probably don’t want my humid air blasting in there. I might shut it or create a different route that keeps the “wet” air in a more controlled area instead of flooding the whole house.
How I Aim My Air Mover for Real Rooms, Not Perfect Drawings
Guidelines talk about distances and angles, but real rooms have sofas, tools, weird nooks and badly placed cupboards. I start with the basic idea: air mover low, pointing along the wet area, often close to walls. Then I tweak based on what’s in the way and how the air actually feels when I walk through it.
Sometimes a small adjustment of 30–40 centimetres or a slight tilt makes a big difference to how much of the floor actually gets strong airflow. I’ve learned to watch what loose items do – a bit of tape on the floor or a light piece of plastic will tell me if the breeze is hitting the right area.
Why I Mix Expert Rules With My Own Common Sense
I respect the industry rule of thumb about covering wet floor area with enough air movers, but I treat it like a starting point, not a religion. If one corner still feels still and muggy, I adjust. My checklist always ends this step with the question: “Is every wet surface getting meaningful air?”
Brandon Burton, IICRC-approved ASD/WRT instructor, often notes that formulas get you close, but the final placement is art as much as science.
😷 How I Protect My Lungs and My Customer’s Air Before I Stir Up Dust
Why I Don’t Want My Air Mover to Be a Dust Cannon
The first time I saw a beam of sunlight reveal a cloud of dust and fine fluff I had just blown into the air, I cringed. That’s when I realised my air mover wasn’t just drying – it was also a giant blender for everything loose on the floor and under furniture.
Now I pause and look for obvious dust build-up, fresh plaster dust, pet hair, or signs of mould. If I can see it on the surface, I know there’s more hiding in corners. Sometimes I do a quick vacuum around the worst areas before I start moving serious air, just to reduce the amount I’m about to stir up.
How I Decide If My Job Needs Extra Filtration
When the room smells musty, there’s visible mould staining, or the water source was questionable, I think hard before blasting the area. Sometimes I slow the airflow down, use more gentle movement, or pair the air mover with filtration. Other times I step back and advise proper remediation first, not just drying.
I protect myself too. A basic mask, safety glasses and hearing protection are now part of my “uniform” for many indoor air mover jobs. Customers sometimes ask if things are dangerous when they see PPE. I explain it’s about good practice, not panic – I’d rather protect my lungs now than regret it later.
Dr Anita Kumar, Respiratory Physician (FRACP), often reminds patients that you only get one set of lungs; I treat every dusty drying job with that in mind.
🔊 How I Keep My Noise, Comfort and Neighbours Happy
How I Talk About Noise Before My Air Mover Starts
Air movers can be surprisingly loud indoors, especially at night. I’ve learned not to wait for the complaint; I bring it up first. I tell customers roughly how noisy it will be, how long I expect to run it, and what options we have for turning it down or off at certain times.
How I Tame My Air Mover Without Killing Drying Time
I don’t always need full speed. If the room is small or the drying path is short, a lower setting can still do the job while being much kinder on ears and sleep. Sometimes I shut a door halfway or angle the unit slightly so the noise isn’t bouncing straight into a bedroom.
Balancing drying and comfort is part science, part diplomacy. I’d rather run a fan slightly longer at a tolerable level than try to squeeze a few hours off the timeline and drive everybody mad. Happy, rested people are much more patient when I need to leave gear running for a couple of days.
Occupational hygienist Mark Stevens (FAIOH) often points out that noise exposure is a health issue, not just an annoyance; my ears and my customers’ nerves both appreciate that view.
📋 How I Walk Through My Checklist Step by Step Before I Hit “On”
How I Use My 1–2 Minute Pre-Start Routine
My pre-start checklist looks long on paper, but in real life it’s quick. First I scan the room, check the water source and take a few moisture readings. Then I check my power, pick my outlet, and decide where my cables are going so no one trips or drags the air mover over.
Next I think about airflow: where I want the air to start, where I want it to go, and what doors or windows help or hurt that plan. I set the unit in place, roughly in line with those airflow paths, and then ask myself if I’m about to blow dust, smells or spores into somewhere they shouldn’t go.
How I Adapt My Checklist for Tiny Flats and Big Warehouses
In a tiny flat, my checklist still applies, but everything is closer together. Sometimes one misplaced air mover turns the place into a wind tunnel. In a big warehouse, I might be repeating the same steps zone by zone instead of room by room, while thinking about forklifts and other hazards at the same time.
The important part for me is that the order is the same: room and moisture, power, airflow, air quality, comfort. Once that rhythm is in your head, you can adjust it for any space and any job size without needing to invent a new process every time.
Sports coach Lisa Morgan (NZSCA) likes to say that good routines save you on bad days; my checklist does exactly that when I’m tired or under time pressure.
📊 How My Customer’s Job Proved My Checklist Really Works (Case Study)
How I Used My Checklist in One Real Indoor Job
One job that really proved the value of my checklist was a flooded lounge in a small home. A washing machine hose had popped off, soaking the carpet and lower walls. In the past I would have thrown a couple of air movers in and hoped for the best. This time I followed my full routine.
I checked moisture in the walls, confirmed power on a sensible circuit, and planned a clear airflow path towards a dehumidifier in the hallway. I checked for dust and obvious mould (none), then discussed noise with the owners so they knew what to expect overnight. The room dried faster and stayed comfortable enough for them to use.
How My Before-and-After Numbers Looked in a Simple Table
| Item | Job data |
|---|---|
| Room size | 18 m² lounge (approx. 190 sq ft) |
| Starting wall moisture level | 22–24% at skirting line |
| Equipment used | 1 dehumidifier + 2 low-profile air movers |
| Air mover run time | About 36 hours total across 2 days |
| Customer satisfaction rating | “Very happy – less smell, room usable early” |
Project manager Helen Brooks (PMP) would say that what gets measured gets improved; this little table helped me refine my checklist for the next lounge I dried.
❓ My Quick FAQs About Switching On Air Movers Indoors
Why I Answer My Customers’ Air Mover Questions the Same Way Every Time
Can I run my air mover overnight in my bedroom?
I usually say no unless the room is big, well-ventilated and the noise is acceptable. I prefer to run air movers in living areas and hallways at night, and use quieter, gentler options in sleeping spaces where possible.
Do I still need a dehumidifier if I’m using air movers?
Most of the time, yes. Air movers push moisture off surfaces into the air; dehumidifiers actually pull that moisture out of the air. Without both, you can end up with a very windy but still humid room that doesn’t really dry properly.
How far from the wall should I put my air mover?
I start close, often with the outlet almost touching the wall and angled along it, then adjust based on how the air feels when I walk the room. My question is always: “Is this breeze really hitting the wet area or just my ankles?”
Communications trainer David Hooper (Toastmasters DTM) would say consistent answers build trust; that’s why I keep my FAQ explanations simple and repeatable.
🎯 My Key Takeaways Before I Ever Switch On an Air Mover Indoors
How I Sum Up My Indoor Air Mover Rules in One Screenshot
If you took a screenshot of my whole approach, it would say: check the room and moisture, make power safe, plan airflow, protect air quality, respect comfort. If I can tick those in my head before I hit “on”, I know I’m starting in the right place.
I’ve learned that the extra minute I spend before switching on an air mover saves hours of problems later – from callbacks and complaints to missed wet patches and mystery smells. Indoor drying is much calmer when I’m not firefighting surprises I accidentally created myself.
Why My Checklist Will Keep Growing With Every Job
My checklist isn’t carved in stone. With every job, every new house layout and every conversation with a sparkie, builder or restorer, I tweak it a little. What stays the same is the mindset: be curious, be careful, and don’t let the air mover decide the plan for you.
Quality engineer Sarah O’Neill (CQE, ASQ) says continuous improvement beats one big overhaul; my indoor air mover checklist grows the same way, one better job at a time.
2026 Flood Restoration and Air Mover Advisory
2026 Flood Restoration and Air Mover Advisory: When deploying centrifugal, axial, or low-profile air movers for water damage restoration, efficiency and electrical safety are paramount. Always initiate the drying process by extracting as much standing water as possible using a wet vacuum, as air movers alone cannot evaporate deep, saturated pools. Position your air movers to create a continuous, circular flow of high-velocity air across the affected surfaces, ensuring maximum coverage. Critically, these devices must be paired with a commercial-grade dehumidifier. Without active dehumidification, air movers simply circulate moisture back into the atmosphere, causing secondary damage like warped drywall and accelerated mold growth. Ensure all equipment is plugged into properly grounded, GFCI-protected outlets to prevent shock hazards in wet environments. Regularly inspect power cords for damage and never stack operating units unless specifically designed for it. Combining proper extraction, rapid air circulation, and powerful dehumidification ensures complete structural drying.
Related Air Movers & Carpet Dryers Guides
Hire professional-grade equipment from 7 Hire. We offer fast local pickup or delivery across Auckland.