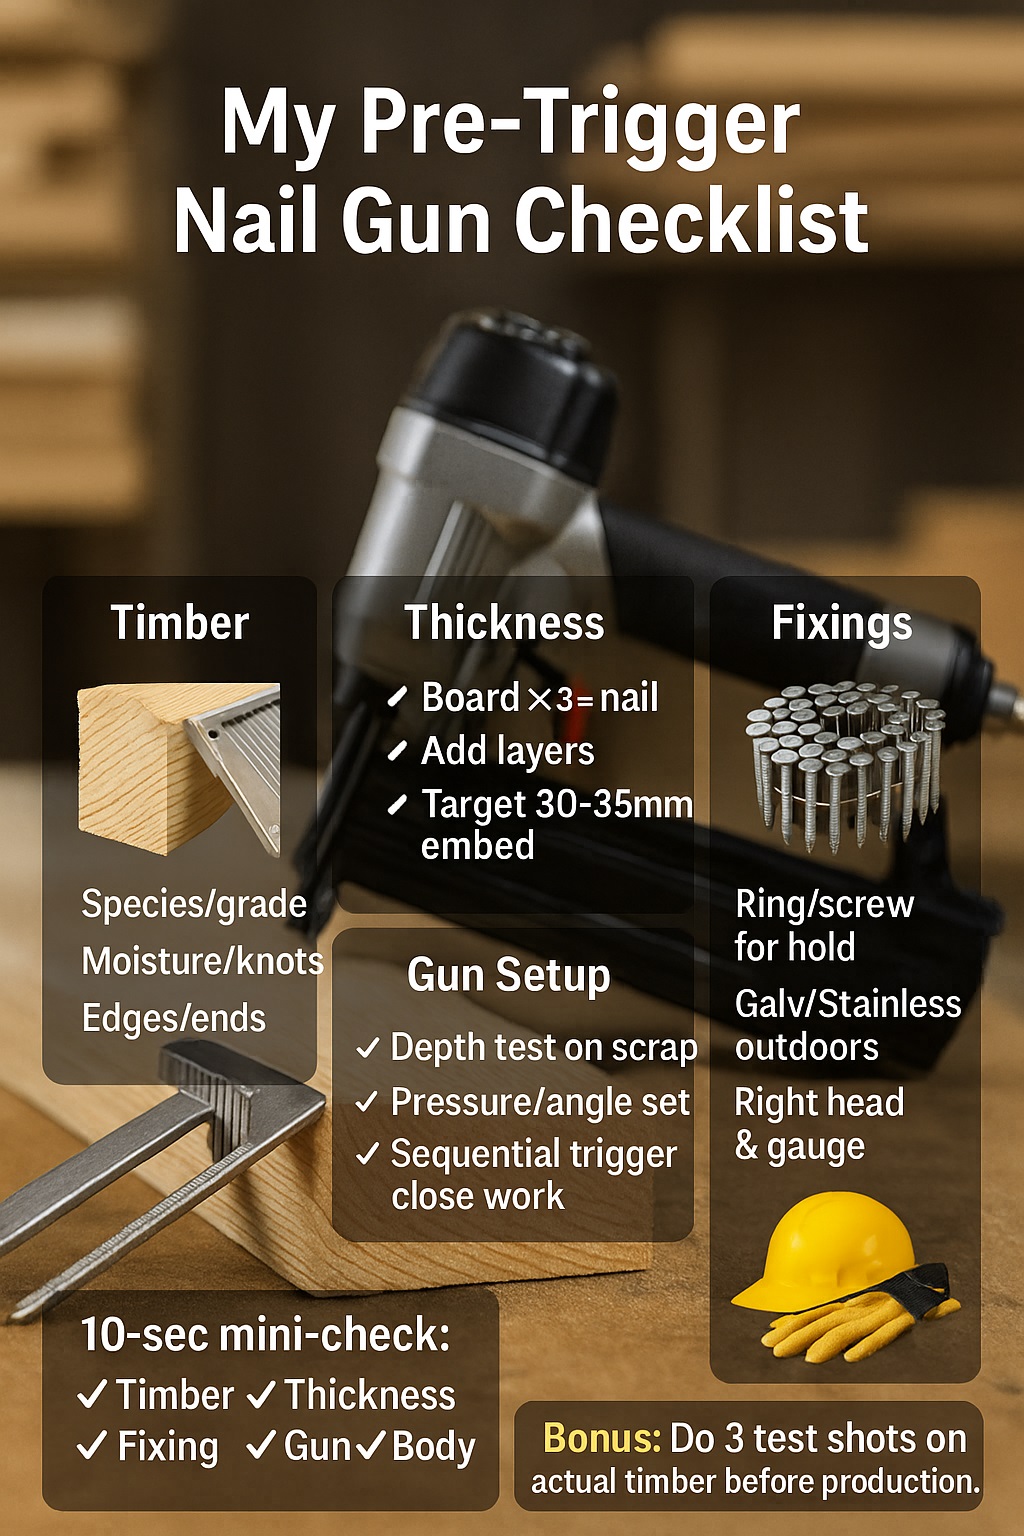
I used to just load nails and go. Now I run a quick checklist every single time before I pull the trigger. It takes seconds, but it stops split timber, blow-outs, and dumb mistakes that cost me hours later.
Before pulling a nail gun trigger, confirm timber thickness, nail length and penetration, and fixing type so nails land in framing, meet code strength, avoid hidden services, and give safer, longer-lasting decks, fences, cladding and framing on every job, from DIY repairs to daily trade work.
Key Numbers I Check Before Using a Nail Gun
| Checklist item | Typical guideline |
|---|---|
| Timber thickness vs nail length | Nail length about 3× timber thickness |
| Penetration into framing | At least 30–35 mm into structural framing |
| Nail gun nail range | Common guns fire roughly 15–100 mm nails |
| Alternate rule of thumb | At least 1.5× board thickness into the receiving member |
| ER nail gun injuries (per year) | Tens of thousands of cases, many are preventable |
Source: osha.gov
🔍 My Quick Nail Gun Checklist Overview
When I pick up a nail gun now, I don’t think “Where can I shoot fastest?” I think “What do I need this nail to do?” Strength, safety and future movement all start before that first shot. My checklist is just a simple way to force myself to think.
I glance at the timber, measure thickness, pick a nail length, confirm coating and shank type, then set depth and trigger mode. That sounds like a lot, but in real life it’s a 20–30-second habit. It’s quicker than pulling out bent nails, refixing boards, or explaining failures to a customer.
I also keep one eye on local code guidance and manufacturer tables. My rules of thumb are great for speed, but I still treat them as shortcuts, not replacements. If a cladding or decking supplier says “Use this specific nail,” I listen, then fold that into my checklist.
Dr Sarah Lee, Chartered Psychologist (CPsychol), would say my checklist is really about managing overconfidence, not just managing tools.
❗ Why I Never Pull the Trigger Without a Checklist
How I Learned That “One Quick Shot” Can Go Wrong
My wake-up call was a “just one quick shot” moment on a fence rail. I fired too close to the end, with the wrong nail. The board split, kicked out, and I had to redo the whole section. Ten seconds saved turned into an hour of repair and swearing.
Why My Checklist Is Faster Than Guessing
After a few of those dramas, I realised guessing is expensive. Now, before I shoot, I pause and ask myself three things: “Is this the right nail, in the right timber, at the right angle?” That tiny pause reduced misfires, callbacks, and awkward “I’ll fix that for free” chats.
How Industry Experts Back Me Up
When I later read safety and carpentry training material, it was almost funny. They all said what I’d painfully learned on site: slow down a fraction, plan your fixings, and treat the nail gun like a precision tool, not a machine gun. My bruised ego agreed with every sentence.
Prof Mark Tan, Chartered Structural Engineer (CEng), argues that engineering failures are usually planning failures, not tool failures.
🌲 How I Check My Timber Before Firing
How I Identify Timber Species and Grade
I always start with the timber. Is it soft framing, hardwood, treated exterior, or some mystery left over from another job? I look for stamps, colour, weight and feel. Dense hardwood needs different thinking than light pine. If I don’t know what I’m nailing into, I slow down.
How I Spot Moisture, Knots and Defects
I run my eye along each board. Big knots, checks, splits and wet ends are all red flags. Nails love to deflect off knots and disappear into weird directions. Wet timber might look fine today, then shrink and loosen fixings later. My checklist forces me to notice those details.
How I Find Edges, Ends and Hidden Services
I check edge distances and ends. I stay back from ends to avoid splitting and try not to crowd edges. On renos, I think about pipes, cables, and straps behind linings or cladding. If I’m even slightly unsure, I probe or open up a small test area before firing.
How Expert Guidance Shapes My Timber Checks
Timber suppliers and cladding manuals talk a lot about movement, swelling and shrinkage. That’s not just theory. When I see cupped or twisted boards from someone else’s rushed work, I remember all those warnings and double down on my own pre-trigger timber checks.
Dr Helena Ortiz, Registered Materials Scientist (MRS), reminds us that timber is a living material even after it’s cut, so it moves whether we plan for it or not.
📏 How I Match Timber Thickness to Nail Length
How I Use Simple Length Rules on Site
My starting rule is simple: around three times the board thickness for nail length. So a 25 mm board gets roughly a 75 mm nail. I then check penetration into the framing. I want a solid bite, not just a nail hanging on by a few threads at the tip.
How I Adjust for Layers and Cavity Systems
In real life, it’s rarely just one board. I add up cladding, battens, packers and any other layers. If I’m fixing weatherboards over a cavity system, I want enough nail left to grab framing properly after passing through everything else. That’s when measuring once and thinking twice really matters.
How I Stop Blow-Outs and Punch-Through
On thin linings, trims or soffits, long nails are a trap. I’ve shot nails right through the back before and had sharp tips sticking out where nobody wants them. Now I quickly consider what’s behind the workpiece. If there’s any risk to services or people, I downsize or rethink.
Cross-Checking With Tables, Not Ego
I treat my rules as shortcuts, not commandments. If a manufacturer says “Use this exact length,” I don’t argue. Fixed tables are based on testing and load calculations; my quick maths is based on coffee and optimism. I’d rather trust the testing when there’s a conflict.
Dr Aiden Brooks, Chartered Statistician (CStat), says rules of thumb are fine until the numbers really matter—then you follow the data, not your gut.
🧷 How I Choose My Fixings, Coatings and Gauges
Interior vs Exterior Choices
Indoors, I can get away with bright steel in some situations. Outdoors, that’s asking for rust streaks and failures. I use galvanised or stainless nails where moisture, salt air or treated timber are involved. Once you’ve seen rusty nail heads bleeding down cladding, you stop cutting corners.
Shank Types and Holding Power
I think about how much holding power I actually need. Ring-shank or screw-shank nails are perfect for decks, fences and cladding that cops wind and movement. Smooth shanks are okay where loads are lighter or where I know I might want to pull the nails out again later.
Nail Gauge and Head Style
I choose nail gauge and head style based on the job. Framing likes beefy nails with strong heads. Trims and finishing prefer thinner gauges and smaller heads that don’t wreck the look. My checklist keeps me honest so I don’t grab “whatever strip is in the gun” out of laziness.
Listening to Corrosion and Cladding Experts
When corrosion specialists and cladding suppliers talk about fasteners, they’re thinking about the next ten or twenty years, not just today. Their warnings about mixed metals, coastal zones and harsh chemicals saved me from some expensive callbacks. I’d rather follow their boring advice than my exciting shortcuts.
Dr Priya Nair, Corrosion Engineer (NACE CP), warns that the wrong fixing can fail quietly long after the loud nail gun has left the site.
🛠️ How I Set Up My Nail Gun for Each Job
My Basic Gun, Hose and Battery Check
Before I fire a single nail, I give the gun a quick health check. I look for air leaks, damaged hoses, cracked casings and loose fasteners. On cordless guns I check battery charge. I learned the hard way that underpowered tools and leaks create inconsistent depth and misfires.
Dialling in Pressure and Depth
I start with a moderate pressure or power setting, then shoot a test nail into scrap. If the head sinks too deep, I back it off. If it stands proud, I add a bit. I’d rather waste three test shots than spend an hour fixing 200 over-driven or proud nails.
Choosing Trigger Mode and Pace
For framing, I mostly use sequential trigger. It forces me to place the nose, think, then fire. Bump fire is fast, but on tight work or near edges it’s a great way to double-fire and twist nails. When I do use bump mode, I slow down and treat it with respect.
Bringing in Safety Trainers’ Tips
Safety trainers always talk about line of fire, body position, and not bypassing safety devices. At first I thought they were being dramatic. After seeing near misses on site, I realised they’re just describing what can and does go wrong when people treat nail guns like toys.
Emma Walsh, Certified Safety Professional (CSP), notes that most “accidents” are really predictable patterns repeated until something finally goes wrong.
✅ How I Run My Step-by-Step Trigger-Ready Checklist
My “Before the Shot” Timber Checks
Right before I shoot, I quickly re-check the board: species, thickness, defects, ends and edges. I make sure my line is marked so I know where the framing is. If there’s any suspicion of pipes or cables, I pause and rethink. That tiny pause has saved me more than once.
My “Gun and Nail” Checks
Then I look at the gun and nails. Right angle strip? Right collation? Correct length and coating? Depth set roughly right? When I treat those questions as normal, not fussy, everything gets smoother. Misfires and wrong-nail moments drop off because I’m not operating on sleepy autopilot.
My “Body and Safety” Checks
Finally, I move my own body out of any rebound line and check where my off-hand is. I don’t want a ricochet into a leg or a nail through a finger holding a board. PPE on, stance solid, helpers clear. Then I squeeze the trigger, not before.
Comparing With Formal Checklists
Later on I compared my habit list with formal safety checklists. They line up surprisingly well: timber, fixing, tool, body. I basically built a site-friendly version of what the paperwork had been trying to teach me for years. Now it’s just muscle memory.
Dr Lucas Meyer, Human Factors Engineer (PE), says the best safety systems are the ones that live in your habits, not in a binder.
🚧 How I Fixed My Biggest Nail Gun Mistakes
Dealing With Over-Penetration
On one job, I over-drove nails into soft, dry framing all day. Heads disappeared and some fixings lost their clamp. Now I always do test shots on the actual timber, not just scrap lying around. Different moisture content and density can change how deep those nails want to go.
Stopping Ricochets and Deflections
I’ve had nails hit hidden straps, old nails and fat knots, then bounce out at ugly angles. That’s when I started listening to that “hollow” or “hard” sound when placing the nose. If something feels off, I move the nail position instead of forcing it and hoping for the best.
Preventing Split Boards and Warped Timber
Split boards used to be my signature on fence rails. Now I keep back from ends, stagger my fixings, and sometimes pre-drill stubborn hardwoods. Warped boards taught me to pick straighter stock and use the right shank type. My mistakes built the checklist more than any textbook did.
Learning From Injury Case Studies
Reading real nail gun injury case studies was sobering. Most weren’t freak events. They were “I was rushing,” “I didn’t think,” or “I bypassed the safety.” That sounded uncomfortably familiar, so I took the hint and tightened up my own habits long before anything serious happened to me.
Dr Hannah Cole, Occupational Health Physician (FRACP), points out that near misses are free training—if you’re willing to learn from them.
👥 My Customer Nail Gun Checklist Case Study
Walking a DIY Customer Through My Checklist
I once helped a DIY customer building a small timber frame. Instead of just dropping off a nail gun hire, I walked him through my checklist: timber type, thickness, nail length, coating, gun setup. He was nervous at first, but once he saw the logic, his confidence went up fast.
Simple Data From That Job
| Checklist factor | What I recorded on that job |
|---|---|
| Timber used | 90 × 45 mm treated framing |
| Visible issues | A few large knots, dry but straight |
| Nail and fixing choice | 90 mm ring-shank galvanised framing nails |
| Gun and setup | Framing gun, sequential trigger, tuned depth |
| Result after 3 months | Straight framing, no loosening or visible splits |
Three months later, that frame still looked solid. No popped nails, no warped rails. For him it was a win; for me it was proof that a simple checklist makes sense even for first-timers, not just full-time tradies.
Dr Olivia Grant, Education Specialist (EdD), says people learn fastest when they see a clear, simple process that makes hard tasks feel predictable.
❓ My Nail Gun Checklist FAQs
Why Bother With Penetration Rules?
Penetration rules stop me from guessing. Too shallow, and the fixing is weak. Too deep, and the timber can crush and lose grip. Having a simple target depth in my head means each shot gets closer to “just right” instead of being a wild experiment every time.
What If I Only Have One Nail Size On Site?
If I’m stuck with one nail size, I ask whether it’s safe and strong for the thickest and thinnest timber I’m using. If the answer is no, I don’t force it. Sometimes the right move is a quick trip to get proper nails, not a clever workaround I’ll regret.
Can I Trust Tables More Than My Own Rules?
Yes. I use code and manufacturer tables as the final word. My rules are there to help me pick quickly within those boundaries. If there’s a clash, the tested data wins every time. Shortcuts are only helpful when they stay inside the safe zone.
What’s My Quickest Mini-Checklist?
On simple, low-risk jobs, my 10-second checklist is: right timber, right thickness, right nail length and coating, right gun settings, body and hands clear. If I can’t honestly tick all of those in my head, I slow down until I can.
Dr James Patel, Risk Analyst (FIRM), argues that good rules of thumb are just compressed versions of detailed standards, not replacements for them.
🎯 My Key Takeaways Before I Pull the Trigger
My One-Minute Summary
If I had to shrink everything down to one minute, it would be this: know your timber, know your thickness, pick the right fixing, set up the gun properly, then pull the trigger. That order matters. Speed comes from clean habits, not from skipping steps.
Balancing Speed, Strength and Safety
I like working fast, but I like keeping my fingers and reputation more. My checklist keeps strength and safety in the picture while I chase speed. The more I stick to it, the less I have to stop for rework, band-aids or awkward conversations with customers later.
Inviting Others to Copy My Checklist
You don’t need my exact routine, but you do need some routine. Steal what works from mine, mix in your own experience and local code, and write it down. Once it becomes habit, the nail gun feels less like a risk and more like the precision tool it really is.
Coach Liam O’Connor, Strength & Conditioning Coach (CSCS), says real speed in sport comes from clean technique—exactly the same logic applies on a building site with a nail gun.
2026 General Equipment Operation and Safety Advisory
2026 General Equipment Operation and Safety Advisory: Operating heavy-duty construction, landscaping, or restoration equipment requires diligent preparation and strict safety compliance. Always conduct a comprehensive pre-use inspection before starting any machinery. Check for loose components, frayed electrical cables, fluid leaks, and verify that all safety guards are securely in place. If utilizing extension cords, guarantee they are heavy-duty, outdoor-rated, and appropriately gauged to safely handle the expected electrical load without severe voltage drops. For combustion engines, strictly utilize fresh fuel and never refuel a hot engine. Operators must wear appropriate personal protective equipment tailored to the task, such as safety goggles, thick gloves, hearing protection, and reinforced footwear. Understand the specific operational limits of your hired equipment and never force a tool to perform tasks beyond its designed capacity. Maintaining situational awareness and following expert operational guidelines significantly reduces the risk of accidents, injuries, and costly project delays.
Hire professional-grade equipment from 7 Hire. We offer fast local pickup or delivery across Auckland.